Quick Install - Linux

GT400 Installation
Quickly get started with the GT400 REDCAP 5G Dongle (module:
MT5710-CN) on Linux
Prerequisites
- A Linux device (demonstrated here with ImmortalWrt / OpenWrt; the sample is a Cudy router whose package manager is
apk) - Dongle GT400 and a Type-C data cable
- A Nano-SIM card with Internet service
- One Ethernet cable with Internet access and one LAN Ethernet cable (during the first driver installation, WAN Internet access is recommended)
Installing the Nano-SIM Card
The nano-SIM card is shown for demonstration only and is not included with this product.
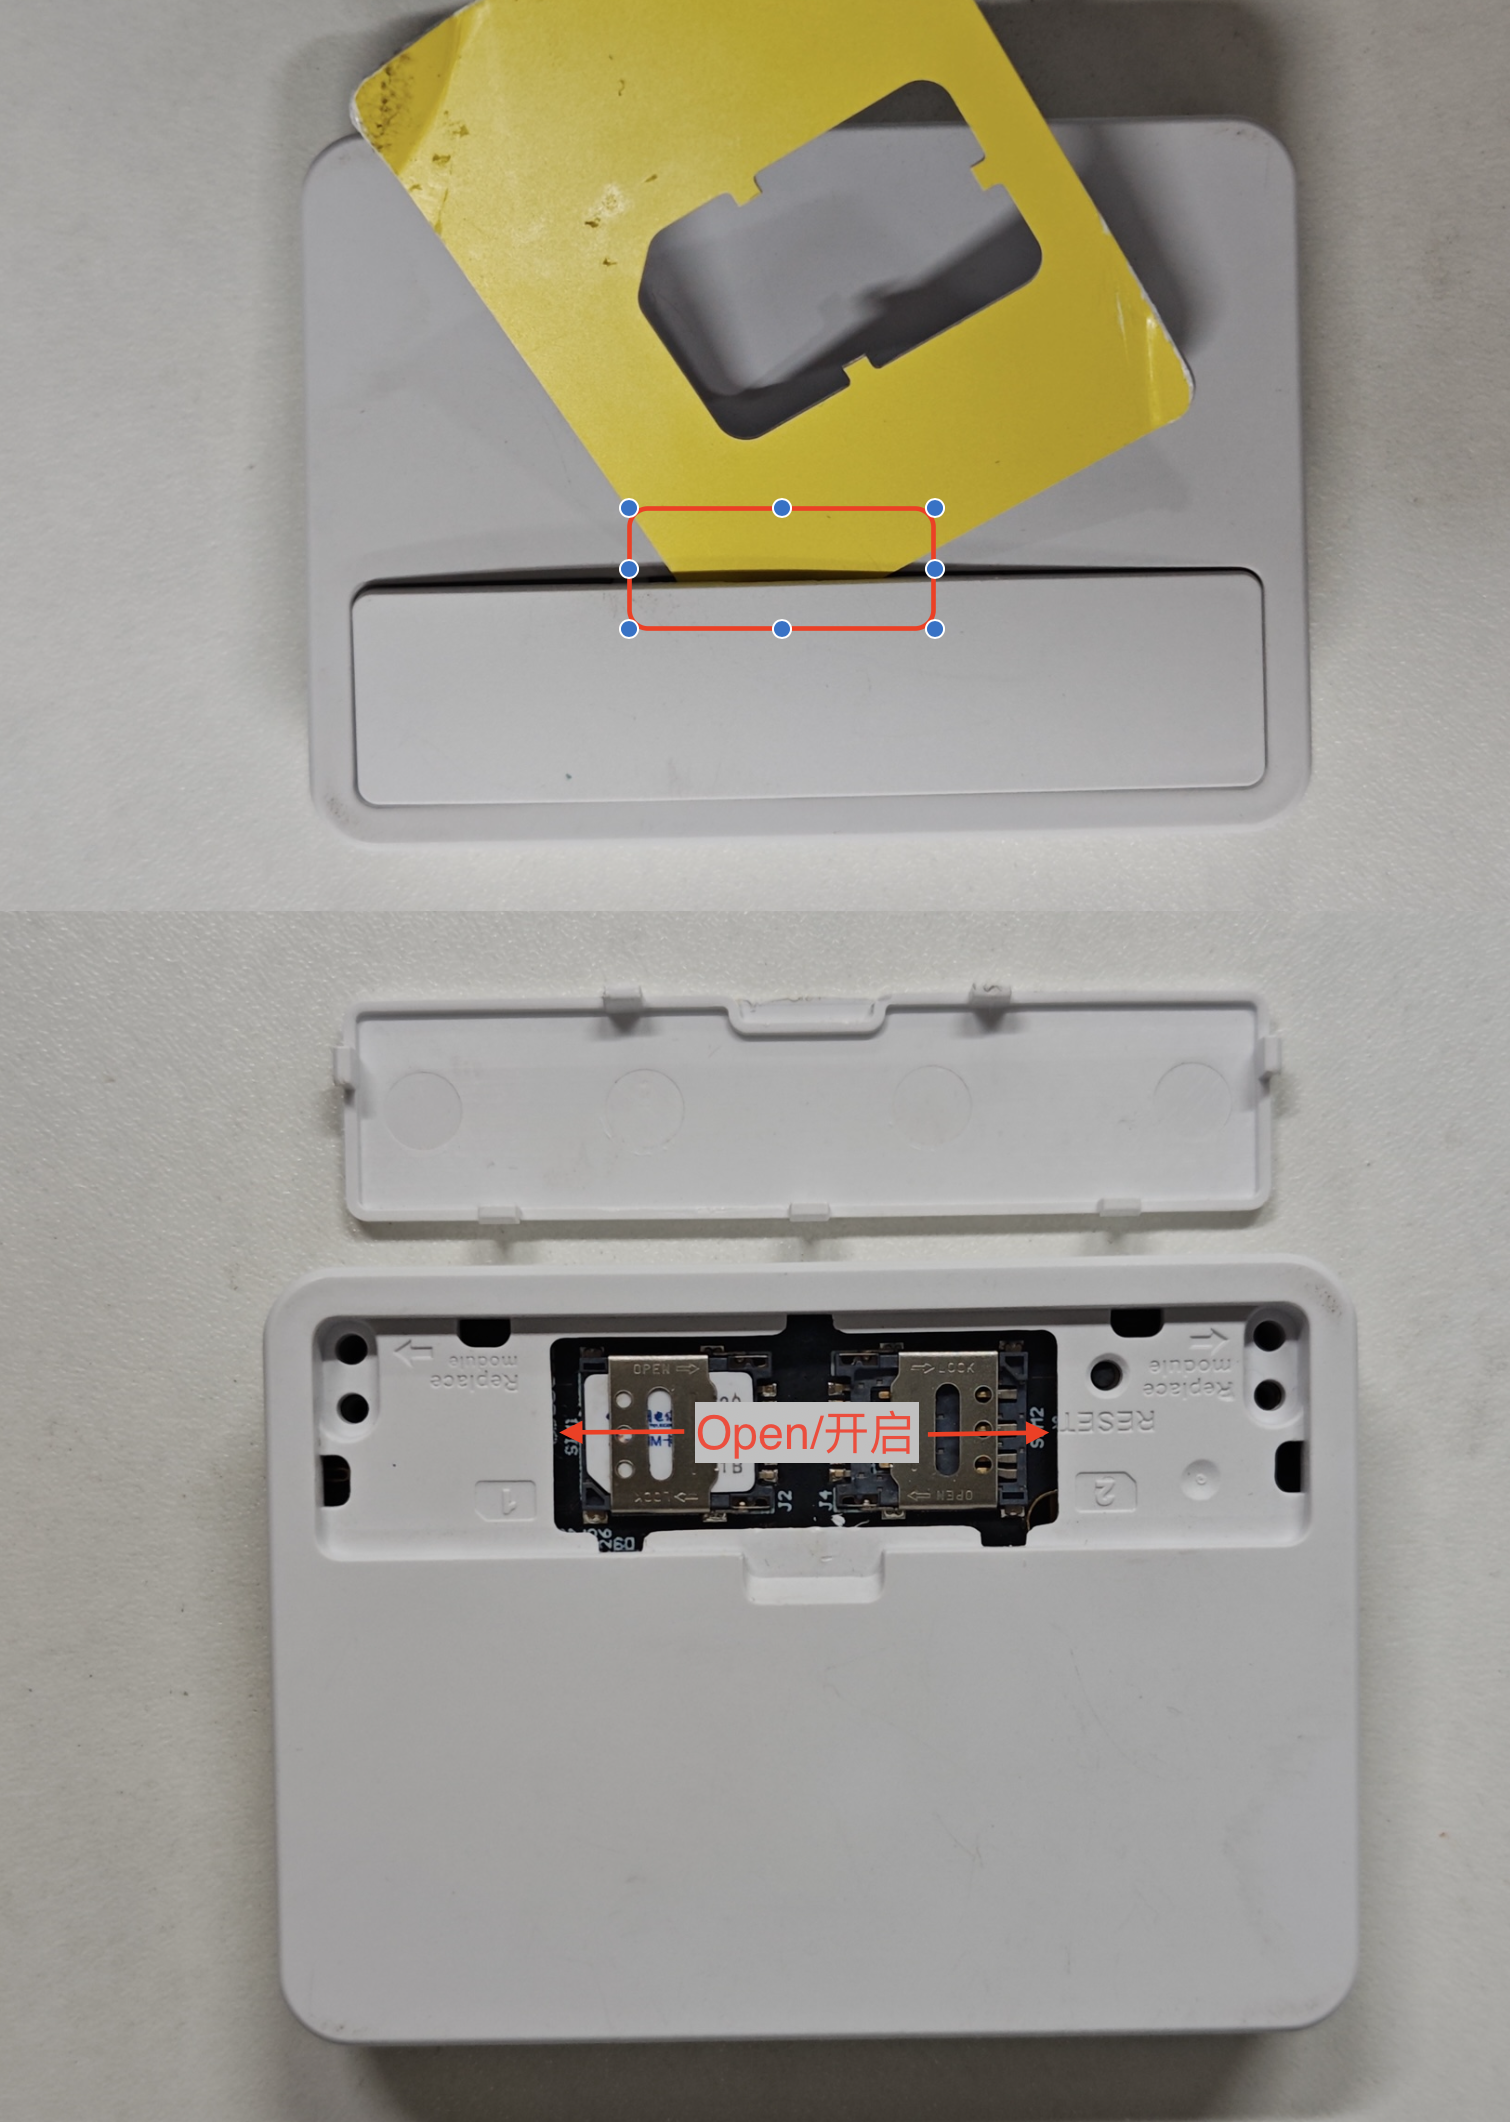
- Find a plastic card and pry the cover open
- Gently pull out the SIM1 card holder, insert the Nano-SIM card, and push it back in place
Connecting to the Router USB Port
The Cudy router is used for connection illustration only.
It is not included with this product.
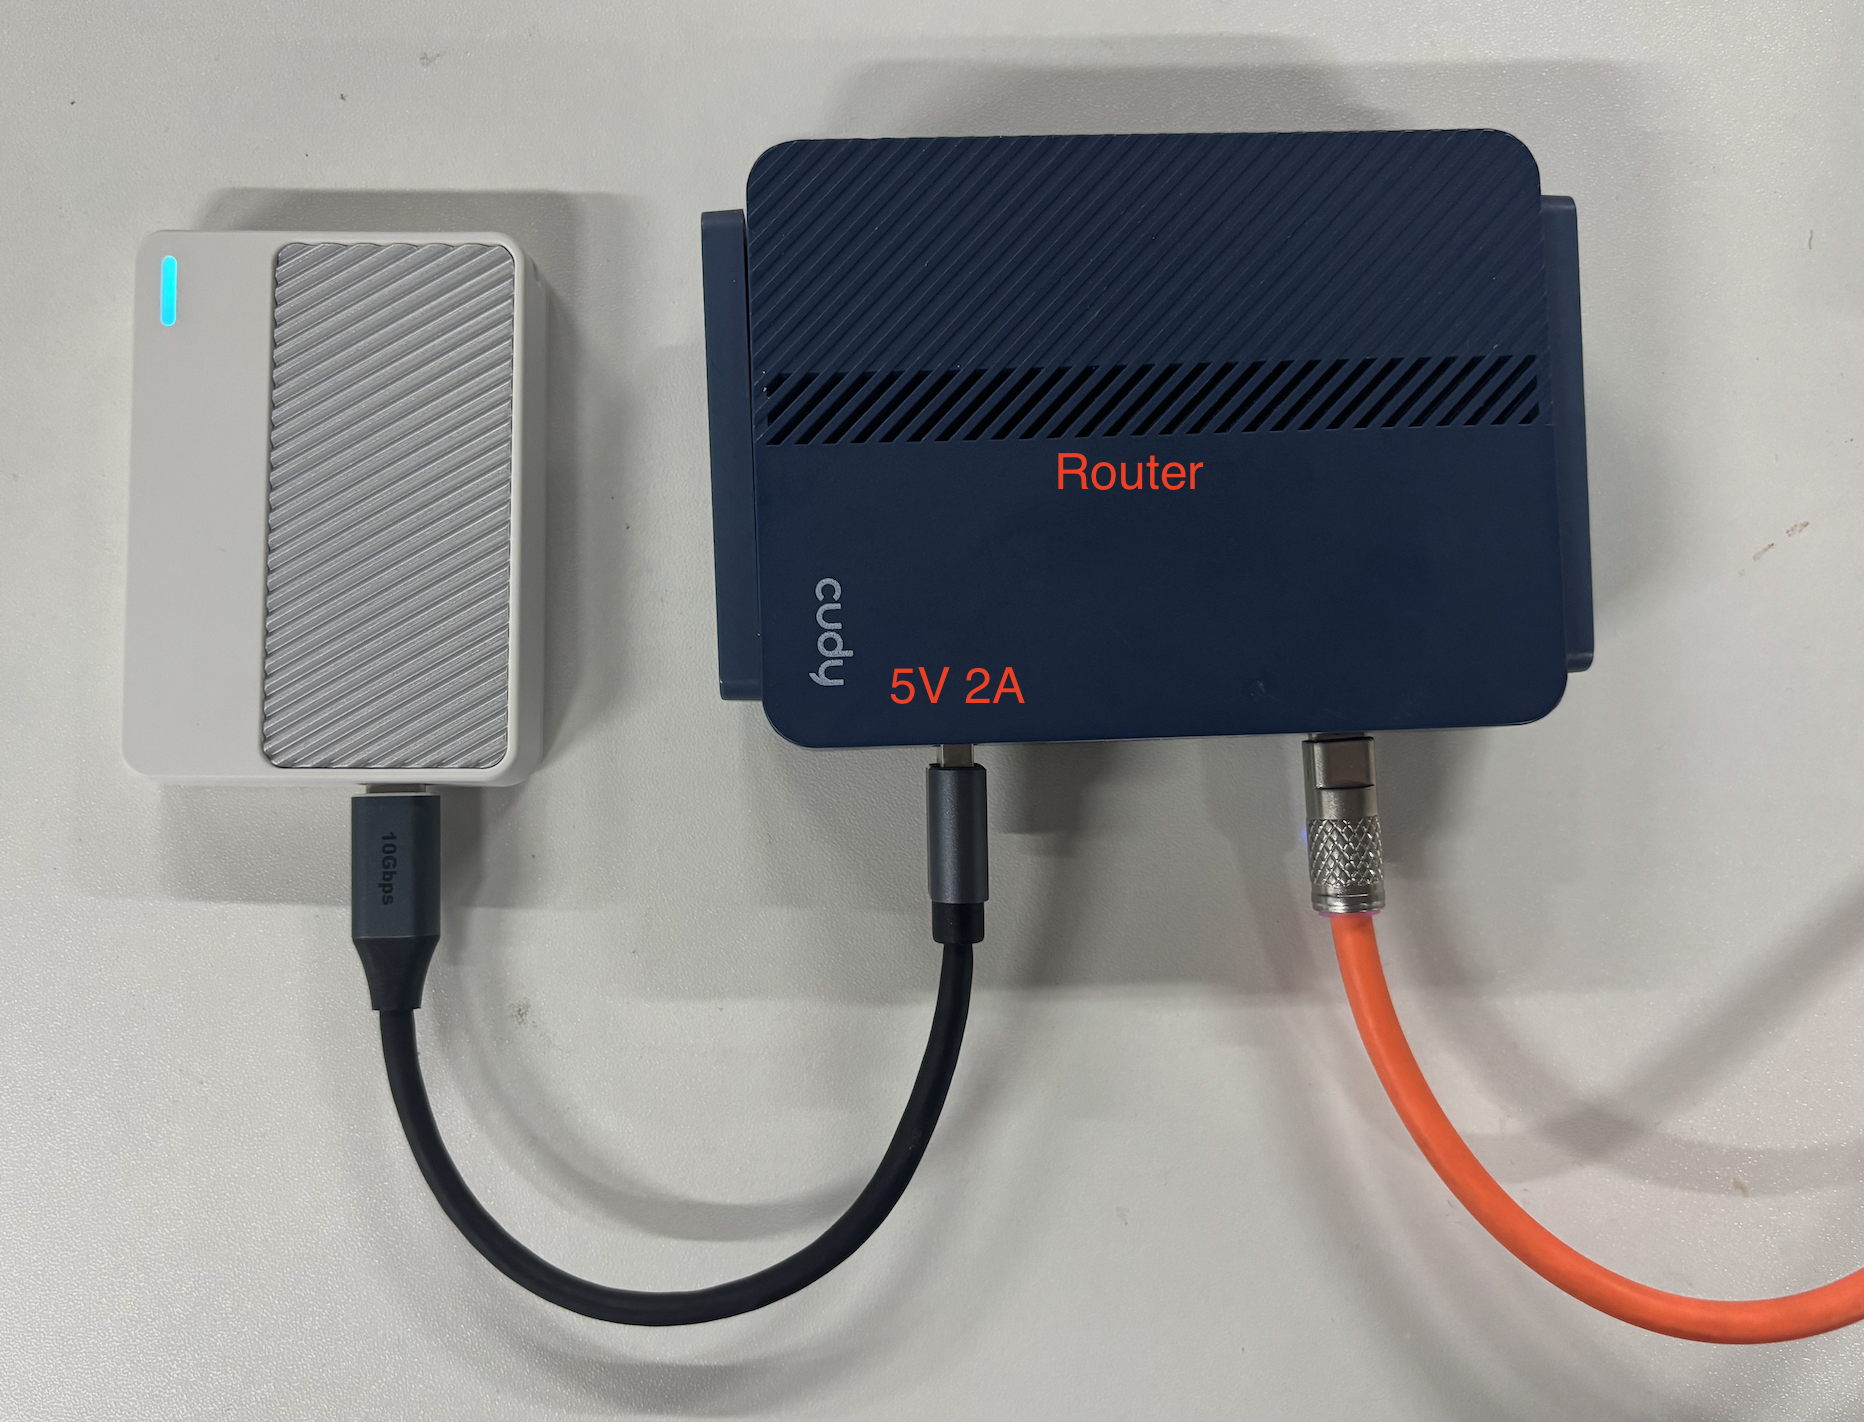
The blue indicator LED means the network registration succeeded
Wiring instructions:
- Router-Power: router power supply
- USB-Dongle: connects the Dongle
- WAN: used to give the router Internet access for downloading driver software
- LAN: the official OpenWRT / ImmortalWrt firmware may have Wi-Fi disabled by default, so a computer must be connected to LAN for management (once Wi-Fi is enabled manually, the LAN cable is no longer needed)
Choose one USB network adapter mode per platform; after changing SETMODE, always run AT^RESET or AT+CFUN=0/1, and do not mix multiple procedures.
AT^SETMODE | Mode | Kernel driver (OpenWrt) | Recommendation for Linux |
|---|---|---|---|
4 | Linux NCM | kmod-usb-net-cdc-ncm → usb0 (cdc_ncm) | First choice (daily use on OpenWrt / ImmortalWrt) |
0 | ECM | kmod-usb-net-cdc-ether → usb0 (cdc_ether) | Alternative; can also be combined with USB E5 to preconfigure a Mac |
6 | RNDIS | Requires RNDIS-related drivers | Not recommended; Windows-oriented, poor Linux compatibility |
1 | Win10 NCM | — | Not recommended for Linux; for Windows see the installation document |
Others: 2 = ECM Debug; 3 = NCM Debug; 7 = MBIM (not supported yet); 8 = Modem/PPP (generally not recommended).
Configuring the Dongle - Router Side
The following demonstrates Linux NCM (
AT^SETMODE=4) by default, the recommended mode for OpenWrt.
Connecting to the Linux Router
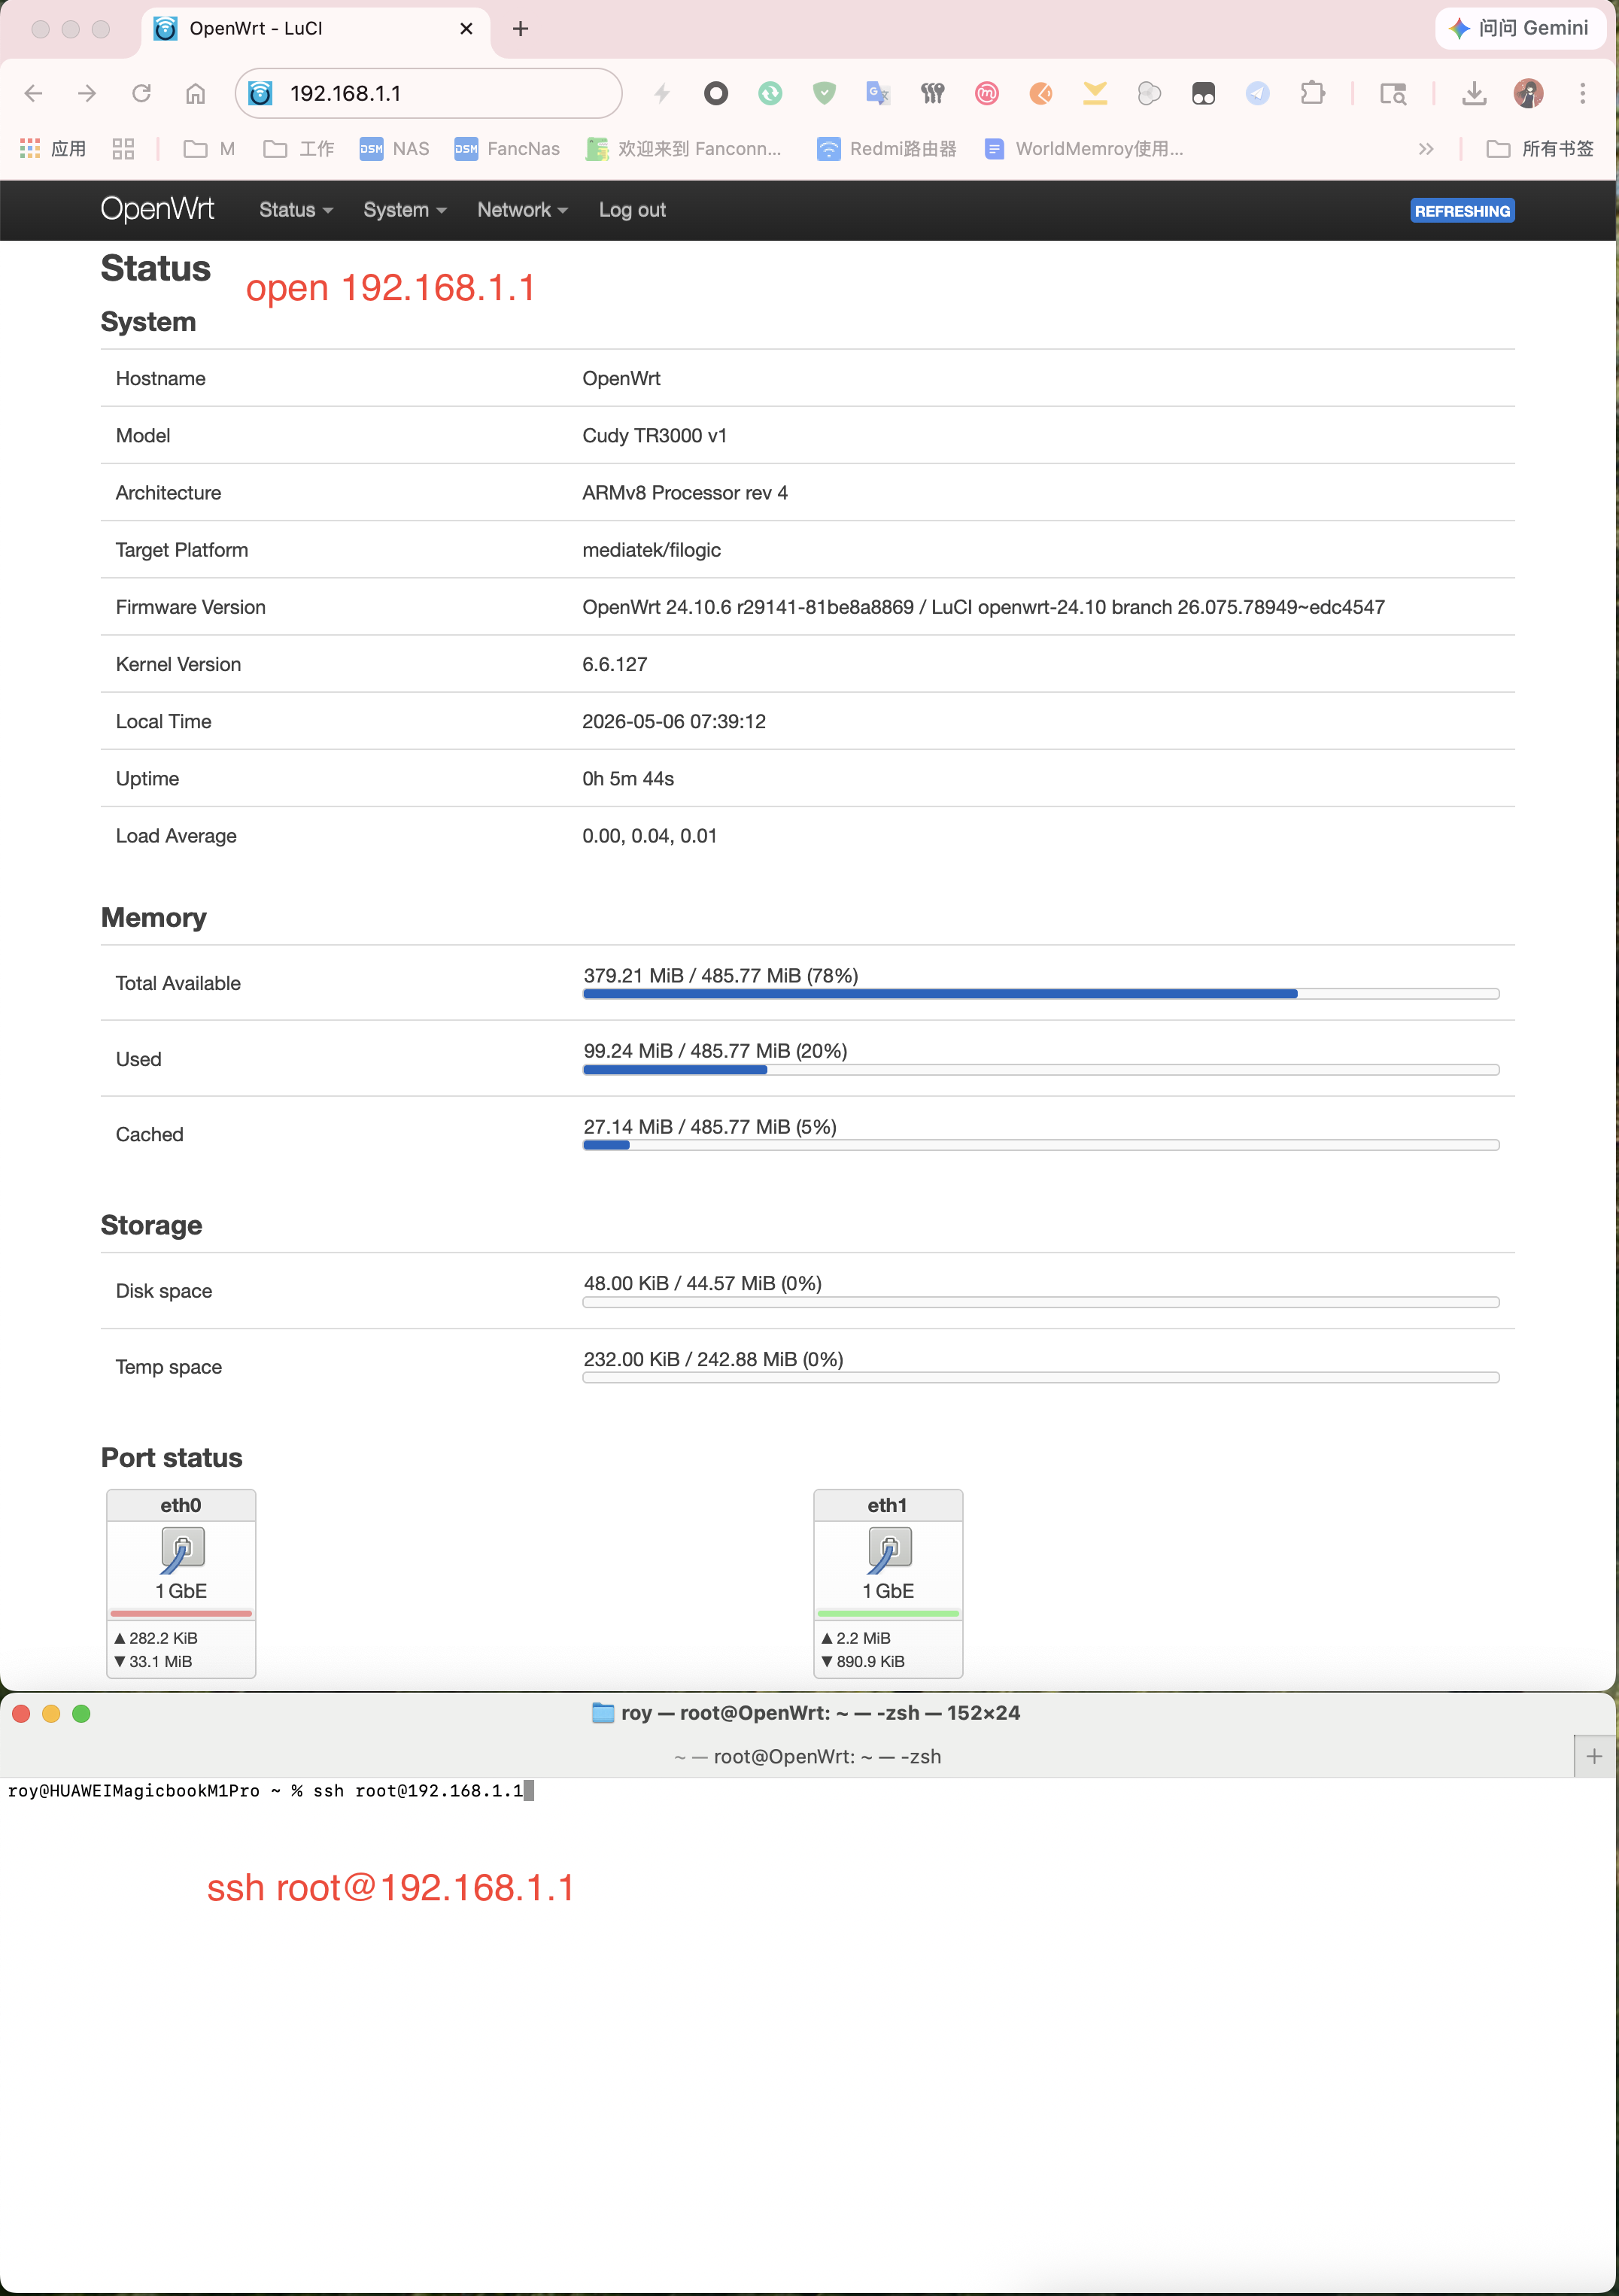
- Open the router management address in a browser (example:
192.168.1.1) to view the basic router information - Connect to the router over SSH:
ssh root@192.168.1.1(in the demo environment it can also bessh root@10.0.0.43)
roy@HUAWEIMagicbookM1Pro ~ % ssh root@10.0.0.43
The authenticity of host '10.0.0.43 (10.0.0.43)' can't be established.
ED25519 key fingerprint is: SHA256:xxxxxxxxxxxxxxxxxxxxxxxxxxxxxxxxxxxxxxxxxxx
This key is not known by any other names.
Are you sure you want to continue connecting (yes/no/[fingerprint])? yes
Warning: Permanently added '10.0.0.43' (ED25519) to the list of known hosts.

BusyBox v1.37.0 (2026-07-02 01:40:04 UTC) built-in shell (ash)

 -----------------------------------------------------
 ImmortalWrt 25.12.1, r37978-cd0a06bfd3fd
 -----------------------------------------------------
root@Cudy-WRT:~#
Installing Drivers and Tools on the Router
Note : the WAN port must have Internet access in order to download the drivers.
Note : the example system usesapk(ImmortalWrt 25.x). For a classic OpenWrtopkgsystem, replace theapkcommands below with the correspondingopkginstallation method.
Update the package lists
root@Cudy-WRT:~# apk update
Install the USB inspection tool
root@Cudy-WRT:~# apk add usbutils
Install the option serial driver
root@Cudy-WRT:~# apk add kmod-usb-serial-option
Install the NCM network adapter driver (essential; corresponds to SETMODE=4)
root@Cudy-WRT:~# apk add kmod-usb-net-cdc-ncm
If you switch to ECM (
SETMODE=0), additionally install:apk add kmod-usb-net-cdc-ether
Install the minicom terminal tool
root@Cudy-WRT:~# apk add minicom
Confirming the USB Device Is Recognized
root@Cudy-WRT:~# lsusb
Expected output (the key line):
Bus 001 Device 002: ID 3466:3301 TD Tech Ltd. TDTECH MT571X
Forcibly Binding the AT Serial Port
Note :3466:3301is usually not in the kernel's default whitelist, so the option driver must be bound manually; otherwise no/dev/ttyUSB*appears.
# Add 3466 3301 to the option whitelist to create /dev/ttyUSB0~3
echo 3466 3301 > /sys/bus/usb-serial/drivers/option1/new_id
Check the serial ports
root@Cudy-WRT:~# ls /dev/ttyUSB*
Expected output:
/dev/ttyUSB0 /dev/ttyUSB1 /dev/ttyUSB2 /dev/ttyUSB3
| Port | Common purpose (for reference) |
|---|---|
/dev/ttyUSB0 | Application Interface |
/dev/ttyUSB1 | PC UI / AT command port (recommended) |
/dev/ttyUSB2 | SerialC |
/dev/ttyUSB3 | GPS |
Persistence tip:
echo 3466 3301 > .../new_idis lost after a reboot. To bind automatically at boot, add the command to/etc/rc.localbeforeexit 0.
Configuring the MT5710-CN Operating Mode (NCM + Dial-Up)
Start minicom
root@Cudy-WRT:~# minicom -D /dev/ttyUSB1 -b 115200
Tips after entering Minicom:
- Type an AT command and press Enter to send it (try
Ctrl + Mif there is no response) - Exit Minicom: press
Ctrl + A, thenQ(orX), and selectYes
Send an AT command; a reply of OK means success
AT
OK
Disable echo (optional)
ATE0
OK
Query / set the data mode to Linux NCM (recommended)
AT^SETMODE?
^SETMODE:4
OK

AT^SETMODE=4
OK
A reply of
4means Linux NCM. If it is not4, after setting it to4it is recommended to runAT^RESETorAT+CFUN=0→AT+CFUN=1.
Set USB Stick mode
AT^SETE5STICK=0
OK
Set the subnet mask mode to /32 (to avoid advertising too large a subnet that overrides LAN routes)
AT^CFGMASKMODE=2
OK
Toggle the RF to apply the parameters
AT+CFUN=0
OK
AT+CFUN=1
OK
Configure the APN (example: China Telecom public ctnet)
AT+CGDCONT=1,"IPV4V6","ctnet"
OK
For China Mobile / China Unicom, change the second and third parameters according to the carrier's APN.
Query the dial-up status and dial
AT^NDISSTATQRY?
OK

AT^NDISDUP=1,1,"ctnet"
OK
View the module-side DHCP / IP
AT^DHCP?
OK
Write auto-dial settings (recommended)
AT^SETAUTODIAL=1,1,"IPV4V6","ctnet","","",0
OK

AT^SETAUTODIAL?
^SETAUTODIAL:1,1,"IPV4V6","ctnet","","",0
OK
Note: the stability of auto-dial may still be affected by the firmware / carrier; verify it in practice.
Exit the minicom terminal:
Press Ctrl + A, then Q (or X), and select Yes
Alternative: ECM (SETMODE=0)
Usable on Linux, but NCM is still recommended for daily OpenWrt use. To preconfigure a Mac, use the ECM + USB E5 procedure in Quick Install - Mac instead.
AT^SETMODE=0
AT^SETE5STICK=0
AT^TDCFG="infcfg","mode",1
AT^RESET
On the OpenWrt side, kmod-usb-net-cdc-ether must be installed; the interface is usually usb0 (cdc_ether).
Not Recommended: RNDIS (SETMODE=6)
RNDIS targets Windows. It is not recommended on Linux / OpenWrt: driver support is weak and the debugging cost is high. If you switch to
6by mistake, change it back to4:
AT^SETMODE=4
AT^RESET
Appendix
OpenWRT / ImmortalWrt: Configuring Internet Access from the Command Line
Check whether the network adapter is detected (usually usb0; the NCM driver is cdc_ncm)
root@Cudy-WRT:~# ip addr
Example output:
4: usb0: <BROADCAST,MULTICAST,UP,LOWER_UP> mtu 1500 qdisc fq_codel state UP qlen 1000
    link/ether c2:e1:76:28:cb:8c brd ff:ff:ff:ff:ff:ff
    inet 10.5.185.57/32 brd 255.255.255.255 scope global usb0
       valid_lft forever preferred_lft forever
    inet6 240e:xxxx:xxxx:xxxx:xxxx:xxxx:xxxx:xxxx/64 scope global noprefixroute
       valid_lft forever preferred_lft forever
Set the WAN / WAN6 (or an independent wan3) device to usb0
# Option A: point the default wan interface to usb0
uci set network.wan.device='usb0'
uci set network.wan6.device='usb0'
uci commit
service network restart

# Option B: if you created a separate wan3 (usb0), bring it up manually
# ifup wan3
Verify connectivity
ping -I usb0 -c 4 223.5.5.5
Configuring Internet Access in the Web UI
In the web interface:
- Click Interfaces → wan → edit → select
usb0for Device → Save → Save & Apply - For IPv6: click Interfaces → wan6 → edit → select
usb0for Device → Save → Save & Apply
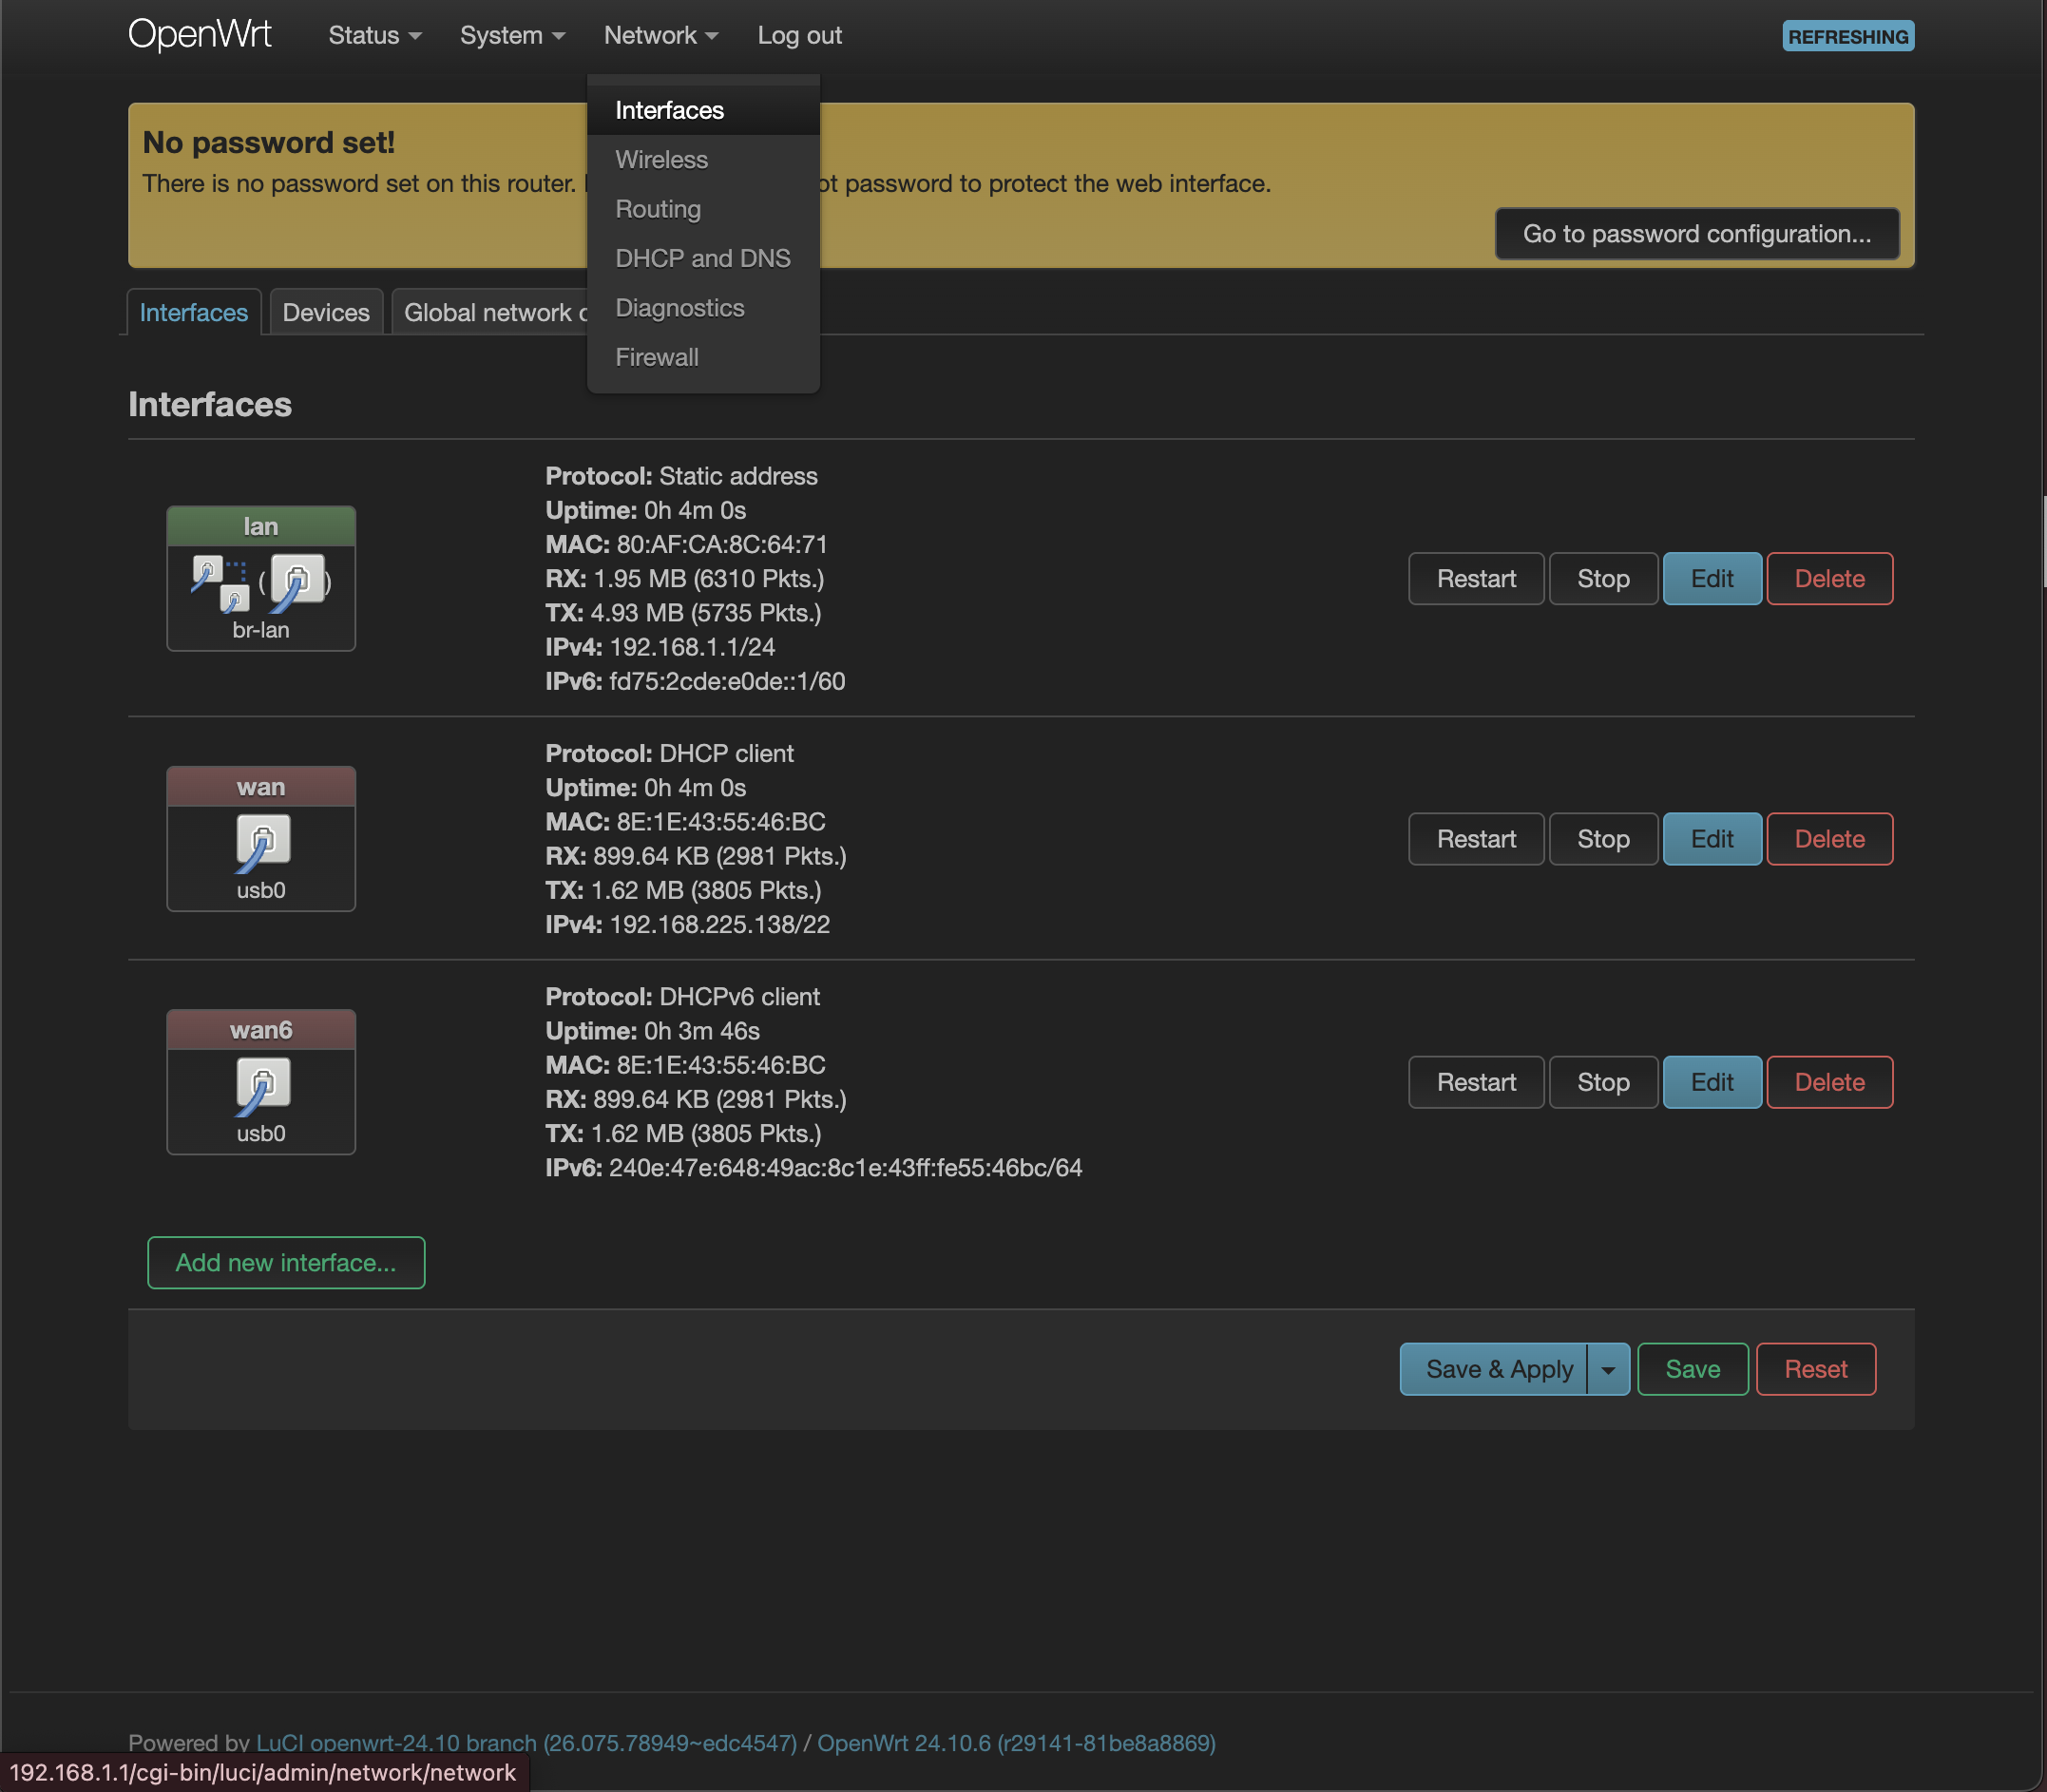
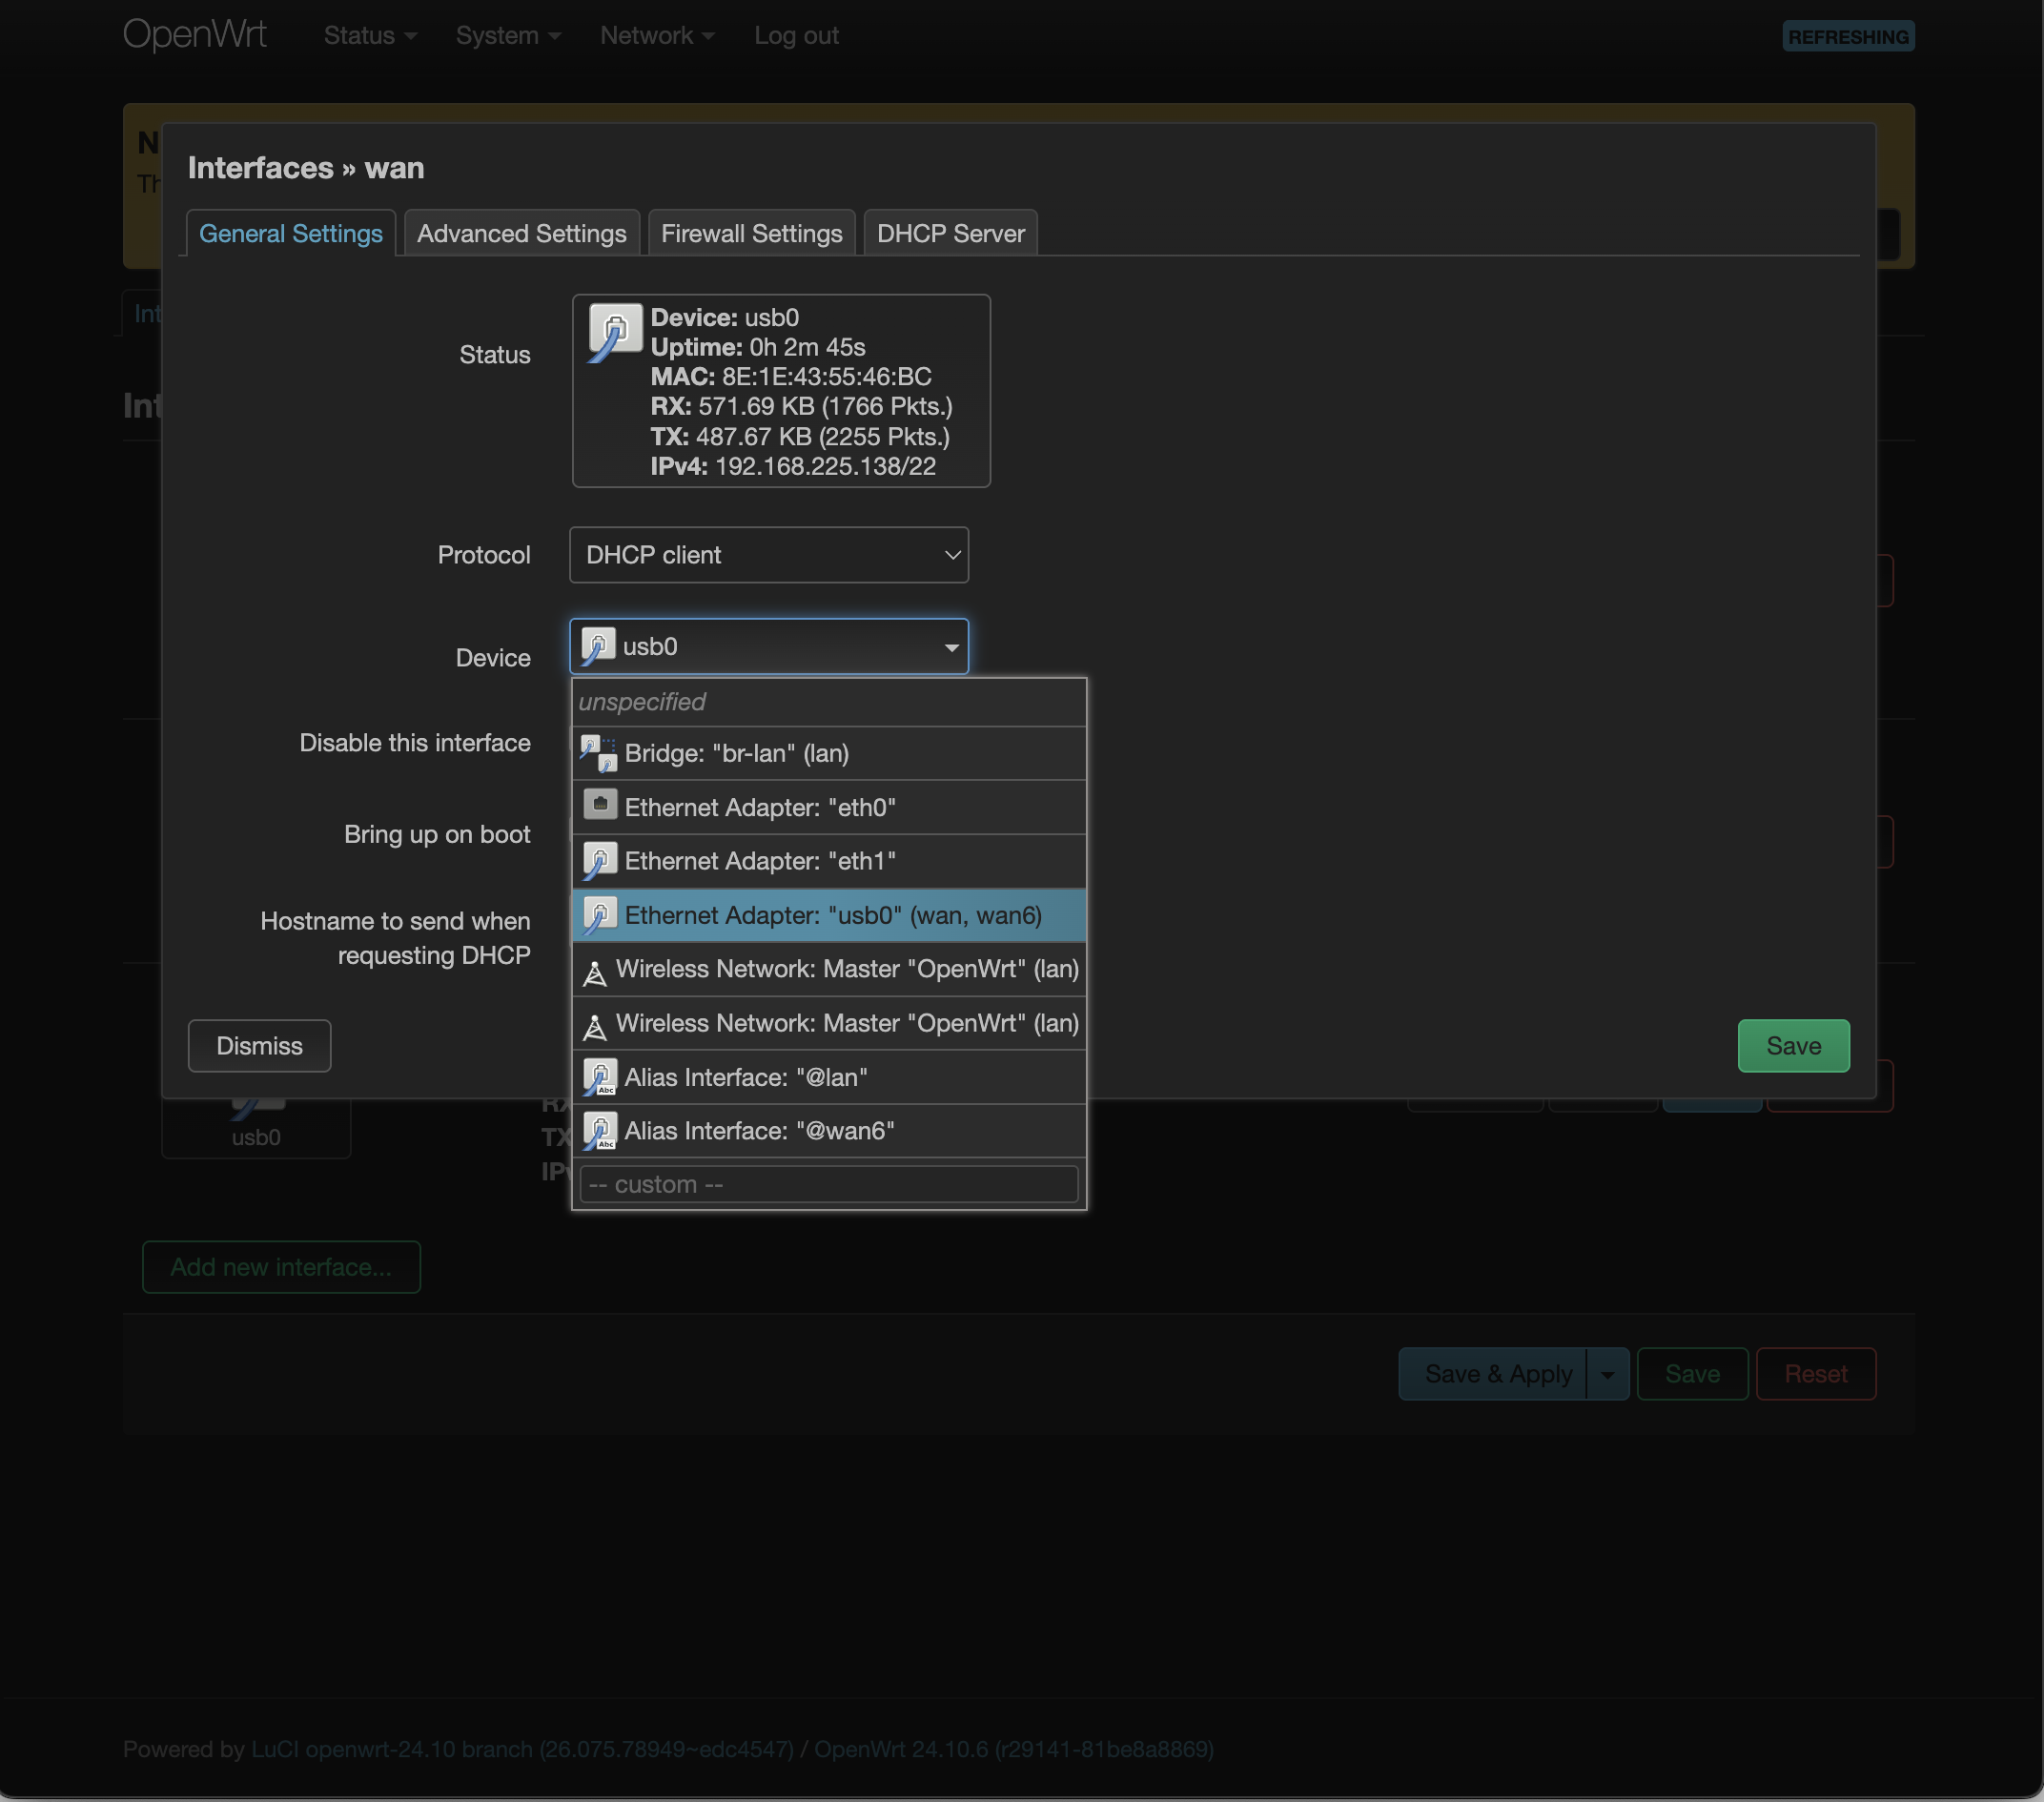
Once the configuration above is complete, you can disconnect the WAN port and use the Dongle for Internet access.
Wi-Fi Configuration
Note: the official firmware may have no Wi-Fi password by default, and the SSID is
OpenWrt/ImmortalWrt.
# Remove the disabled flag
uci del wireless.radio0.disabled
uci del wireless.radio1.disabled
uci set wireless.radio0.channel='auto'
uci set wireless.radio1.channel='auto'

# Enable the default Wi-Fi
uci del wireless.default_radio0.disabled
uci del wireless.default_radio1.disabled
uci commit
wifi reload
Wi-Fi Password Configuration
Custom Wi-Fi settings:
- 2.4 GHz SSID:
ORBI60_2g - 5 GHz SSID:
ORBI60 - Password for both:
fanconn123 - Available encryption methods:
sae,psk2,sae-mixed,psk-mixed(psk2is used in the example)
# Remove the disabled flag
uci del wireless.radio0.disabled
uci del wireless.radio1.disabled
uci set wireless.radio0.channel='auto'
uci set wireless.radio1.channel='auto'

# Delete the default Wi-Fi configuration
uci del wireless.default_radio0
uci del wireless.default_radio1

# 2.4 GHz AP
uci set wireless.wifinet0=wifi-iface
uci set wireless.wifinet0.device='radio0'
uci set wireless.wifinet0.network='lan'
uci set wireless.wifinet0.mode='ap'
uci set wireless.wifinet0.ssid='ORBI60_2g'
uci set wireless.wifinet0.encryption='psk2'
uci set wireless.wifinet0.key='fanconn123'

# 5 GHz AP
uci set wireless.wifinet1=wifi-iface
uci set wireless.wifinet1.device='radio1'
uci set wireless.wifinet1.network='lan'
uci set wireless.wifinet1.mode='ap'
uci set wireless.wifinet1.ssid='ORBI60'
uci set wireless.wifinet1.encryption='psk2'
uci set wireless.wifinet1.ocv='0'
uci set wireless.wifinet1.key='fanconn123'

uci commit
wifi reload
Troubleshooting
Reset the module configuration
If dialing fails, try:
AT^RESET
or:
AT+CFUN=0
AT^SETMODE=4
AT+CFUN=1
Summary Checklist
- ✅
lsusbshows3466:3301 - ✅
/dev/ttyUSB1exists - ✅
AT^SETMODE?returns4(Linux NCM, recommended);6RNDIS is not recommended for daily use - ✅
AT^SETAUTODIAL?returns the auto-dial configuration - ✅
usb0has obtained an IP andping -I usb0 223.5.5.5succeeds
Once all the configuration above is complete, the router accesses the Internet through the GT400 Dongle and Wi-Fi can be used as needed.
Relationship with Other Documents
| Document | Scenario |
|---|---|
| This document | Linux / OpenWrt: NCM first choice, ECM alternative, RNDIS not recommended |
| Quick Install - Windows | Windows: RNDIS / NCM |
| Quick Install - Mac | Mac: ECM + USB E5 (must be configured on Linux first) |