Quick Install - Linux

GT500 Installation
Quickly get started with the GT500 5G Dongle on Linux
Prerequisites
- A Linux device (OpenWRT; a CUDY TR30000 is used for demonstration here, pre-flashed with the official firmware)
- Dongle GT500 and a Type-C data cable
- A Nano-SIM card with Internet service
- One Ethernet cable with Internet access, and one LAN Ethernet cable
Installing the Nano-SIM Card
The nano-SIM card is shown for demonstration only and is not included with this product.
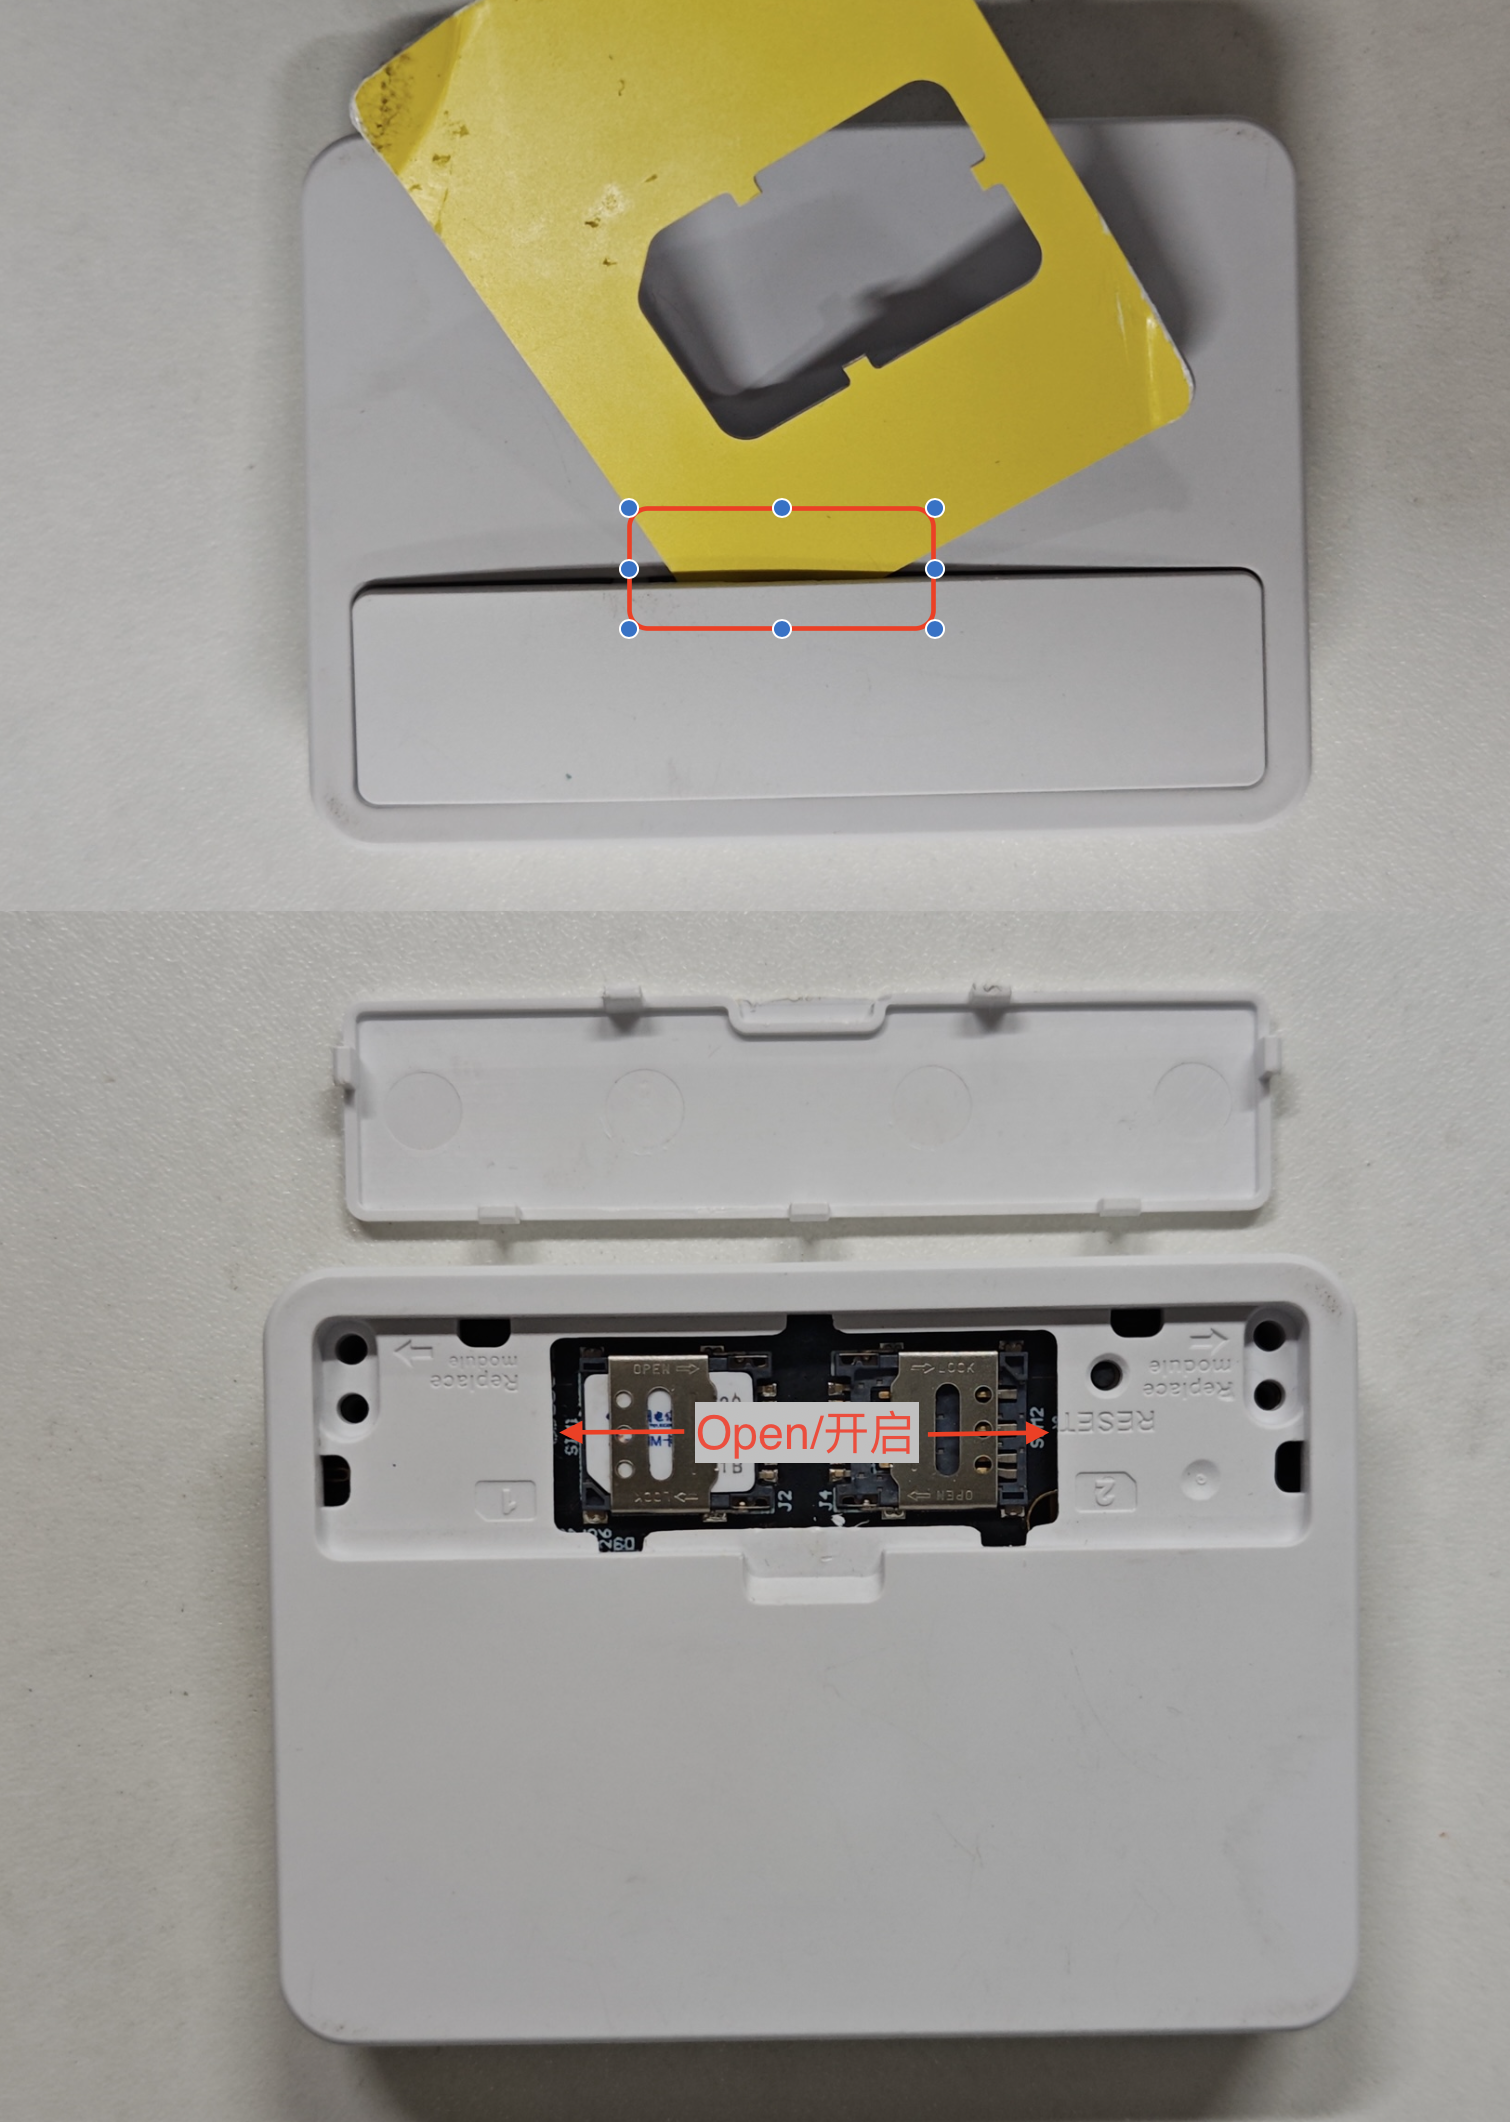
- Find a plastic card and pry the cover open
- Gently pull out the SIM1 card holder, insert the Nano-SIM card, and push it back in place
Connecting to the Router USB Port
The Cudy router is used for connection illustration only.
It is not included with this product.
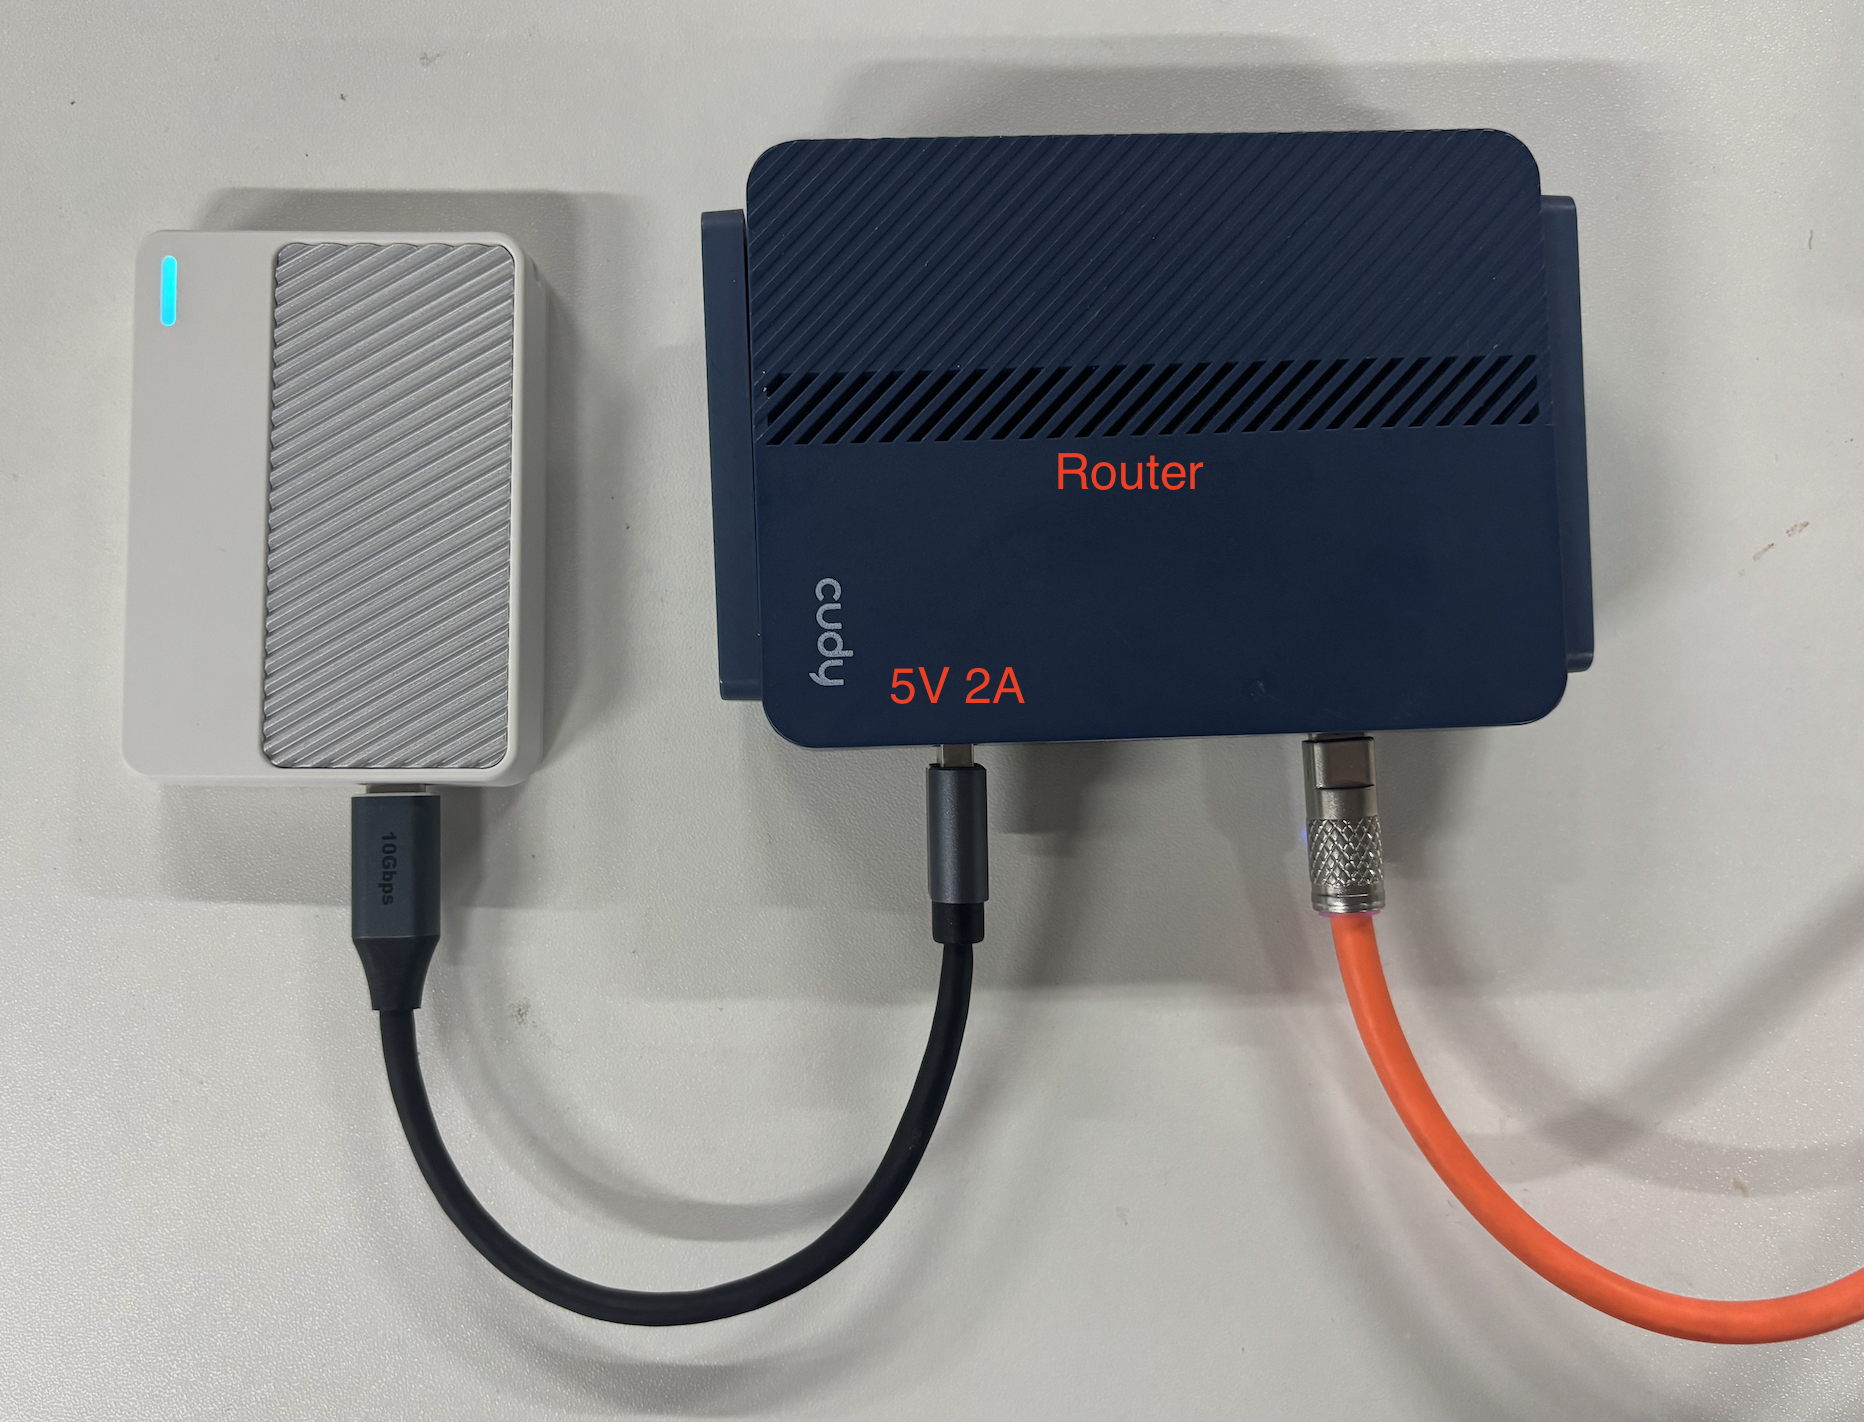
The blue indicator LED means the network registration succeeded
Wiring instructions:
- Router-Power: router power supply
- USB-Dongle: connects the Dongle
- WAN: used to give the router Internet access for downloading driver software
- LAN: the official OpenWRT firmware has Wi-Fi disabled by default, so a computer must be connected to LAN for management (once Wi-Fi is enabled manually, the LAN cable is no longer needed)
Quick Configuration
The first three things to do after plugging in the Dongle: disable SIM hot-swap → check the USB mode → switch to ECM.
Recommended order
| Platform | Commands to run |
|---|---|
| Linux (including OpenWrt / Android) | 1 → 2 → 4 (disable hot-swap → check mode → switch to ECM) |
| Windows | 1 → 2 → 3 (disable hot-swap → check mode → switch to RNDIS) |
| Dual-SIM models | Use 6 (SIM1) or 7 (SIM2), then confirm +CPIN: READY |
| Changes not taking effect | Run 8 AT+CFUN=1,1 to reboot the module |
Every command below was tested on a RM520N-GL (firmware
RM520NGLAAR03A04M4G, China Telecom 5G). Serial parameters115200 8N1, no flow control.
Open the AT port (install minicom first, see "Installing drivers and tools on the router" below):
stty -F /dev/ttyUSB2 115200 raw -echo
minicom -D /dev/ttyUSB2 -b 115200
| No. | Command | Notes | Measured response |
|---|---|---|---|
| 1 | AT+QSIMDET=0,0 | Disable SIM hot-swap detection; the first parameter 0 means off | OK, reads back +QSIMDET: 0,0 |
| 2 | AT+QCFG="usbnet" | Query the current USB mode (1=ECM, 0=RNDIS) | +QCFG: "usbnet",1 |
| 3 | AT+QCFG="usbnet",0 | Switch to Windows mode (RNDIS); takes effect after AT+CFUN=1,1 | OK, reads back +QCFG: "usbnet",0 |
| 4 | AT+QCFG="usbnet",1 | Switch to Linux mode (ECM), usb0 appears on the router | OK, reads back +QCFG: "usbnet",1 |
| 5 | AT+CPIN? | Check the SIM; +CME ERROR: 10 = no card, SIM PIN = PIN locked | +CPIN: READY |
| 6 | AT+QUIMSLOT=1 | Switch to SIM1; re-reads the card in about 3~5 s | OK, then +CPIN: READY |
| 7 | AT+QUIMSLOT=2 | Switch to SIM2; CPIN: NOT READY when that slot is empty | OK, reads back +QUIMSLOT: 2 |
| 8 | AT+CFUN=1,1 | Reboot the module; USB re-enumerates after ~40 s | OK, then /dev/ttyUSB* disappears and returns; no data in between |
| 9 | AT&F | Factory reset (AT command defaults only, NV settings untouched) | OK; usbnet stays 1, QUIMSLOT stays 1, CGDCONT is not cleared; a few seconds of garbage / ERROR echoes afterwards |
| 10 | ATI | Model and firmware revision | Quectel / RM520N-GL / Revision: RM520NGLAAR03A04M4G |
| 11 | AT+GMR | Firmware revision | RM520NGLAAR03A04M4G |
| 12 | AT+CGSN | IMEI (15 digits on the real unit; middle 4 masked) | 86854906****457 |
| 13 | AT+QUIMSLOT? | Current SIM slot | +QUIMSLOT: 1 |
| 14 | AT+QSIMDET? | Hot-swap detection switch | +QSIMDET: 0,0 |
| 15 | AT+CSQ | Meaningless on 5G; use AT+QCSQ instead | +CSQ: 99,99 |
| 16 | AT+QCSQ | 5G returns RSRP / RSRQ / SINR | +QCSQ: "NR5G",-81,32,-10 (floats between -80 and -81 dBm) |
| 17 | AT+CEREG? | Registration status; 5G SA may return 0,0 while fully online | +CEREG: 0,0 (still able to access the Internet) |
| 18 | AT+COPS? | Current operator | +COPS: 0,0,"CHN-CT",11 |
| 19 | AT+QNWINFO | RAT / band / EARFCN | +QNWINFO: "TDD NR5G","46011","NR5G BAND 78",620640 |
| 20 | AT+QENG="servingcell" | Serving cell; cellID / TAC tail masked | +QENG: "servingcell","NOCONN","NR5G-SA","TDD",460,11,75A0CB***,390,752A**,620640,78,12,-81,-10,32,1,- |
| 21 | AT+CGDCONT? | Current APN profiles | 4 lines: ctnet(1) / IMS(2) / ctwap(3) / sos(4), all IPV4V6 |
| 22 | AT+IPR? | AT port baud rate | +IPR: 115200 |
| 23 | AT+CFUN=0 / AT+CFUN=1 | RF off / on; quick way to reload configuration | OK (no extra output) |
IMEI, cellID and TAC are values from the real unit with sensitive digits masked; signal figures vary with location and weather.
AT&F does not reset usbnet / QUIMSLOT / APN on this firmware (it only restores AT command defaults), and the module keeps working afterwards. Other firmware versions may behave differently, so re-check AT+QCFG="usbnet" and AT+QUIMSLOT? after a factory reset.
/dev/ttyUSB* only appears after kmod-usb-serial-option is installed. On a fresh system, follow "Installing drivers and tools on the router" below, then come back to the table above.
Configuring the Dongle - Router Side
Install and configure the Dongle for Internet access
Connecting to the Linux Router
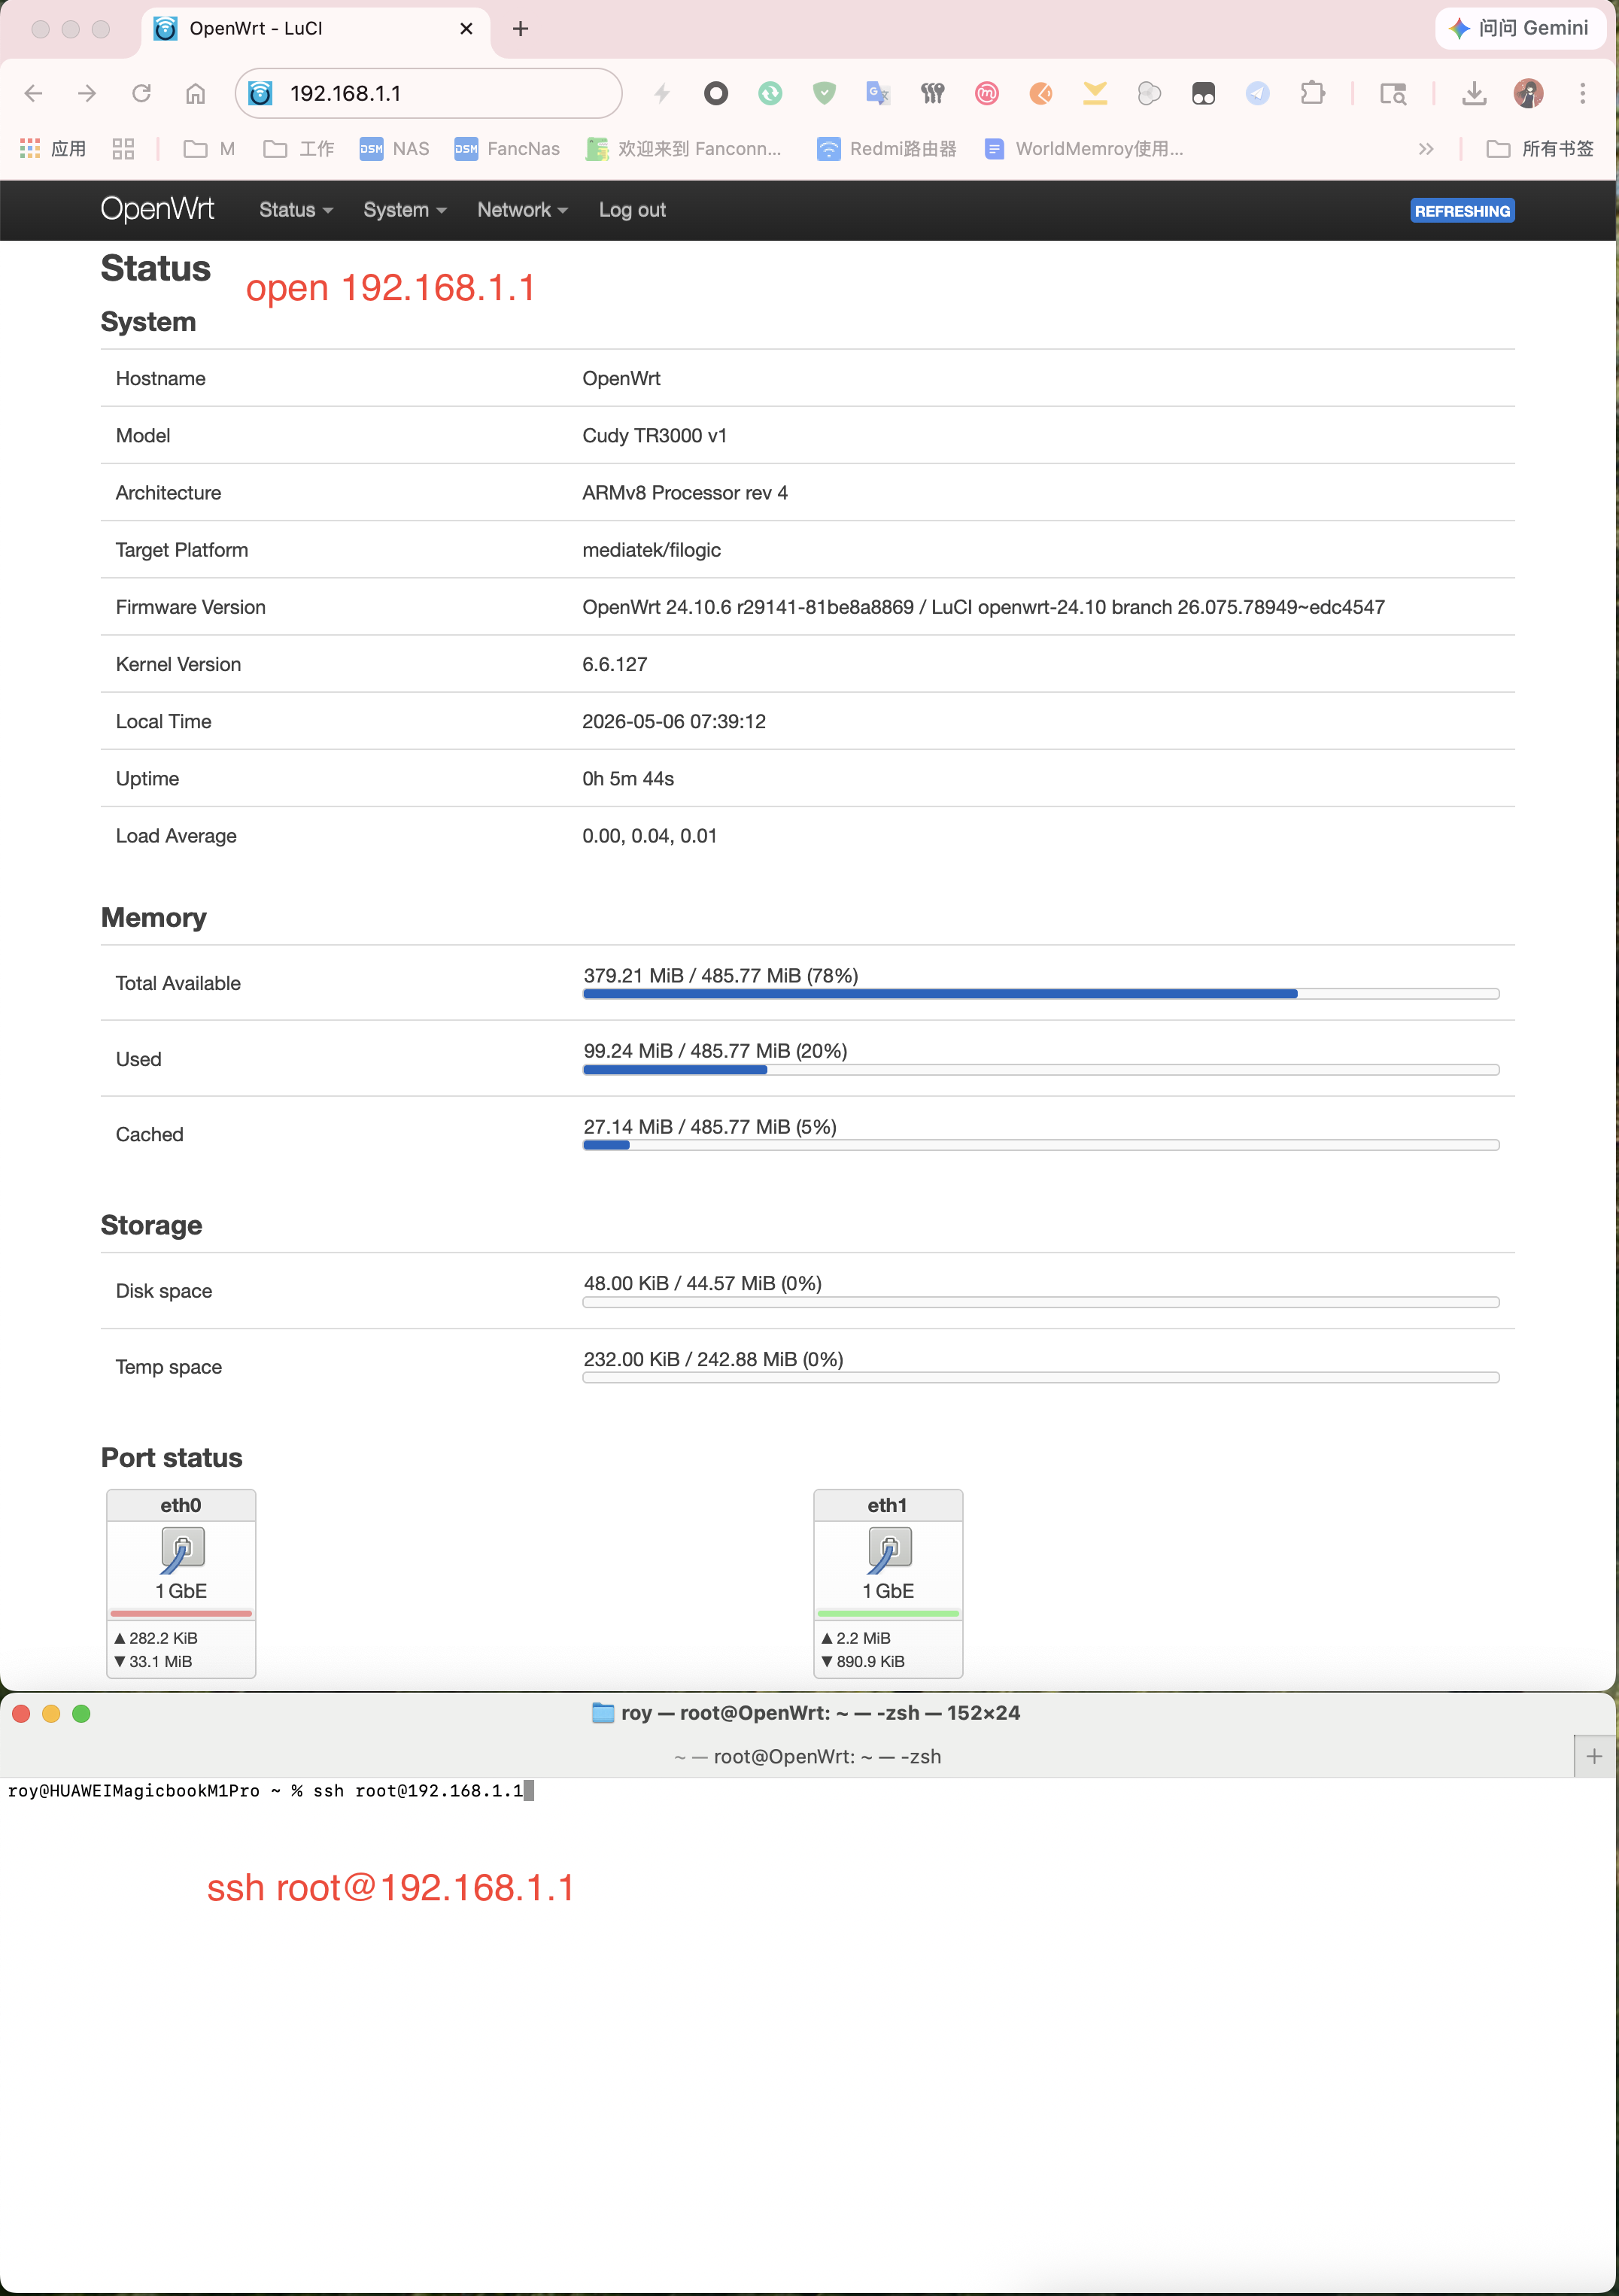
- Open the router management address
192.168.1.1in a browser to view the basic router information - Connect to the router over SSH:
ssh root@192.168.1.1
roy@HUAWEIMagicbookM1Pro ~ % ssh root@192.168.1.1
The authenticity of host '192.168.1.1 (192.168.1.1)' can't be established.
ED25519 key fingerprint is: SHA256:W+oPSxJkukBdzWxgtKRutIGYc5KGRfUrzS7aV9RZOek
This key is not known by any other names.
Are you sure you want to continue connecting (yes/no/[fingerprint])? yes
Warning: Permanently added '192.168.1.1' (ED25519) to the list of known hosts.
*WARNING: connection is not using a post-quantum key exchange algorithm.
*This session may be vulnerable to "store now, decrypt later" attacks.
*The server may need to be upgraded. See https://openssh.com/pq.html

BusyBox v1.36.1 (2026-03-17 00:58:59 UTC) built-in shell (ash)

  _______                     ________        __
 |       |.-----.-----.-----.|  |  |  |.----.|  |_
 |   -   ||  _  |  -__|     ||  |  |  ||   _||   _|
 |_______||   __|_____|__|__||________||__|  |____|
          |__| W I R E L E S S   F R E E D O M
 -----------------------------------------------------
 OpenWrt 24.10.6, r29141-81be8a8869
 -----------------------------------------------------
=== WARNING! =====================================
There is no root password defined on this device!
Use the "passwd" command to set up a new password
in order to prevent unauthorized SSH logins.
--------------------------------------------------
root@OpenWrt:~#
Installing Drivers and Tools on the Router
Note : the WAN port must have Internet access in order to download the drivers.
Note : if there is no network, you can download the corresponding IPK packages and install them from a USB flash drive. The IPK download URLs appear asDownloading ...in the corresponding installation log; router architectures differ between versions, so find the matching driver yourself at https://downloads.openwrt.org/releases/24.10.6
Update the OPKG package lists
root@OpenWrt:~# opkg update
Install the serial driver
root@OpenWrt:~# opkg install kmod-usb-serial-option
Example installation output:
Installing kmod-usb-serial-option (6.6.127-r1) to root...
Downloading https://downloads.openwrt.org/releases/24.10.6/targets/mediatek/filogic/kmods/6.6.127-1-43cbcde0affaaf16309bb4ab09799e9a/kmod-usb-serial-option_6.6.127-r1_aarch64_cortex-a53.ipk
Installing kmod-usb-serial (6.6.127-r1) to root...
Downloading https://downloads.openwrt.org/releases/24.10.6/targets/mediatek/filogic/kmods/6.6.127-1-43cbcde0affaaf16309bb4ab09799e9a/kmod-usb-serial_6.6.127-r1_aarch64_cortex-a53.ipk
Installing kmod-usb-serial-wwan (6.6.127-r1) to root...
Downloading https://downloads.openwrt.org/releases/24.10.6/targets/mediatek/filogic/kmods/6.6.127-1-43cbcde0affaaf16309bb4ab09799e9a/kmod-usb-serial-wwan_6.6.127-r1_aarch64_cortex-a53.ipk
Configuring kmod-usb-serial.
Configuring kmod-usb-serial-wwan.
Configuring kmod-usb-serial-option.
Check the serial ports
root@OpenWrt:~# ls /dev/ttyUSB*
Expected output:
/dev/ttyUSB0 /dev/ttyUSB1 /dev/ttyUSB2 /dev/ttyUSB3
You should see
/dev/ttyUSB0/1/2/3
Install the minicom serial tool
root@OpenWrt:~# opkg install minicom
Example installation output:
Installing minicom (2.9-r1) to root...
Downloading https://downloads.openwrt.org/releases/24.10.6/packages/aarch64_cortex-a53/packages/minicom_2.9-r1_aarch64_cortex-a53.ipk
Installing terminfo (6.4-r2) to root...
Downloading https://downloads.openwrt.org/releases/24.10.6/packages/aarch64_cortex-a53/base/terminfo_6.4-r2_aarch64_cortex-a53.ipk
Installing libncurses6 (6.4-r2) to root...
Downloading https://downloads.openwrt.org/releases/24.10.6/packages/aarch64_cortex-a53/base/libncurses6_6.4-r2_aarch64_cortex-a53.ipk
Configuring terminfo.
Configuring libncurses6.
Configuring minicom.
Install the ECM mode driver
root@OpenWrt:~# opkg install kmod-usb-net-cdc-ether
Example installation output:
Installing kmod-usb-net-cdc-ether (6.6.127-r1) to root...
Downloading https://downloads.openwrt.org/releases/24.10.6/targets/mediatek/filogic/kmods/6.6.127-1-43cbcde0affaaf16309bb4ab09799e9a/kmod-usb-net-cdc-ether_6.6.127-r1_aarch64_cortex-a53.ipk
Installing kmod-mii (6.6.127-r1) to root...
Downloading https://downloads.openwrt.org/releases/24.10.6/targets/mediatek/filogic/kmods/6.6.127-1-43cbcde0affaaf16309bb4ab09799e9a/kmod-mii_6.6.127-r1_aarch64_cortex-a53.ipk
Installing kmod-usb-net (6.6.127-r1) to root...
Downloading https://downloads.openwrt.org/releases/24.10.6/targets/mediatek/filogic/kmods/6.6.127-1-43cbcde0affaaf16309bb4ab09799e9a/kmod-usb-net_6.6.127-r1_aarch64_cortex-a53.ipk
Configuring kmod-mii.
Configuring kmod-usb-net.
Configuring kmod-usb-net-cdc-ether.
Configuring the RM520N-GL Operating Mode
Start minicom
root@OpenWrt:~# minicom -D /dev/ttyUSB2
Send an AT command; a reply of OK means success
Welcome to minicom 2.9

OPTIONS:
Port /dev/ttyUSB2, 07:42:02

Press CTRL-A Z for help on special keys

AT
OK
Check the current operating mode
AT+QCFG="usbnet"
Expected output:
+QCFG: "usbnet",1
Switch to ECM mode and reboot to apply
AT+QCFG="usbnet",1
OK

# Reboot to apply
AT+CFUN=1,1
Exit the minicom terminal:
Press Ctrl + A, then X, and select Leave Minicom? → Yes
Appendix
OpenWRT: Configuring Internet Access from the Command Line
Check whether the RM520N-GL network adapter is detected (usually usb0)
root@OpenWrt:~# ip addr
Example output:
5: usb0: <BROADCAST,MULTICAST,UP,LOWER_UP> mtu 1500 qdisc fq_codel state UNKNOWN qlen 1000
    link/ether 8e:1e:43:55:46:bc brd ff:ff:ff:ff:ff:ff
    inet 192.168.225.138/22 brd 192.168.227.255 scope global usb0
       valid_lft forever preferred_lft forever
    inet6 240e:47e:648:49ac:8c1e:43ff:fe55:46bc/64 scope global noprefixroute
       valid_lft forever preferred_lft forever
    inet6 fe80::8c1e:43ff:fe55:46bc/64 scope link
       valid_lft forever preferred_lft forever
Set the WAN and WAN6 interface devices to usb0
uci set network.wan.device='usb0'
uci set network.wan6.device='usb0'

uci commit
service network restart
OpenWRT: Configuring Internet Access in the Web UI
In the web interface:
- Click Interfaces → wan → edit → select
usb0for Device → Save → Save & Apply - For IPv6: click Interfaces → wan6 → edit → select
usb0for Device → Save → Save & Apply
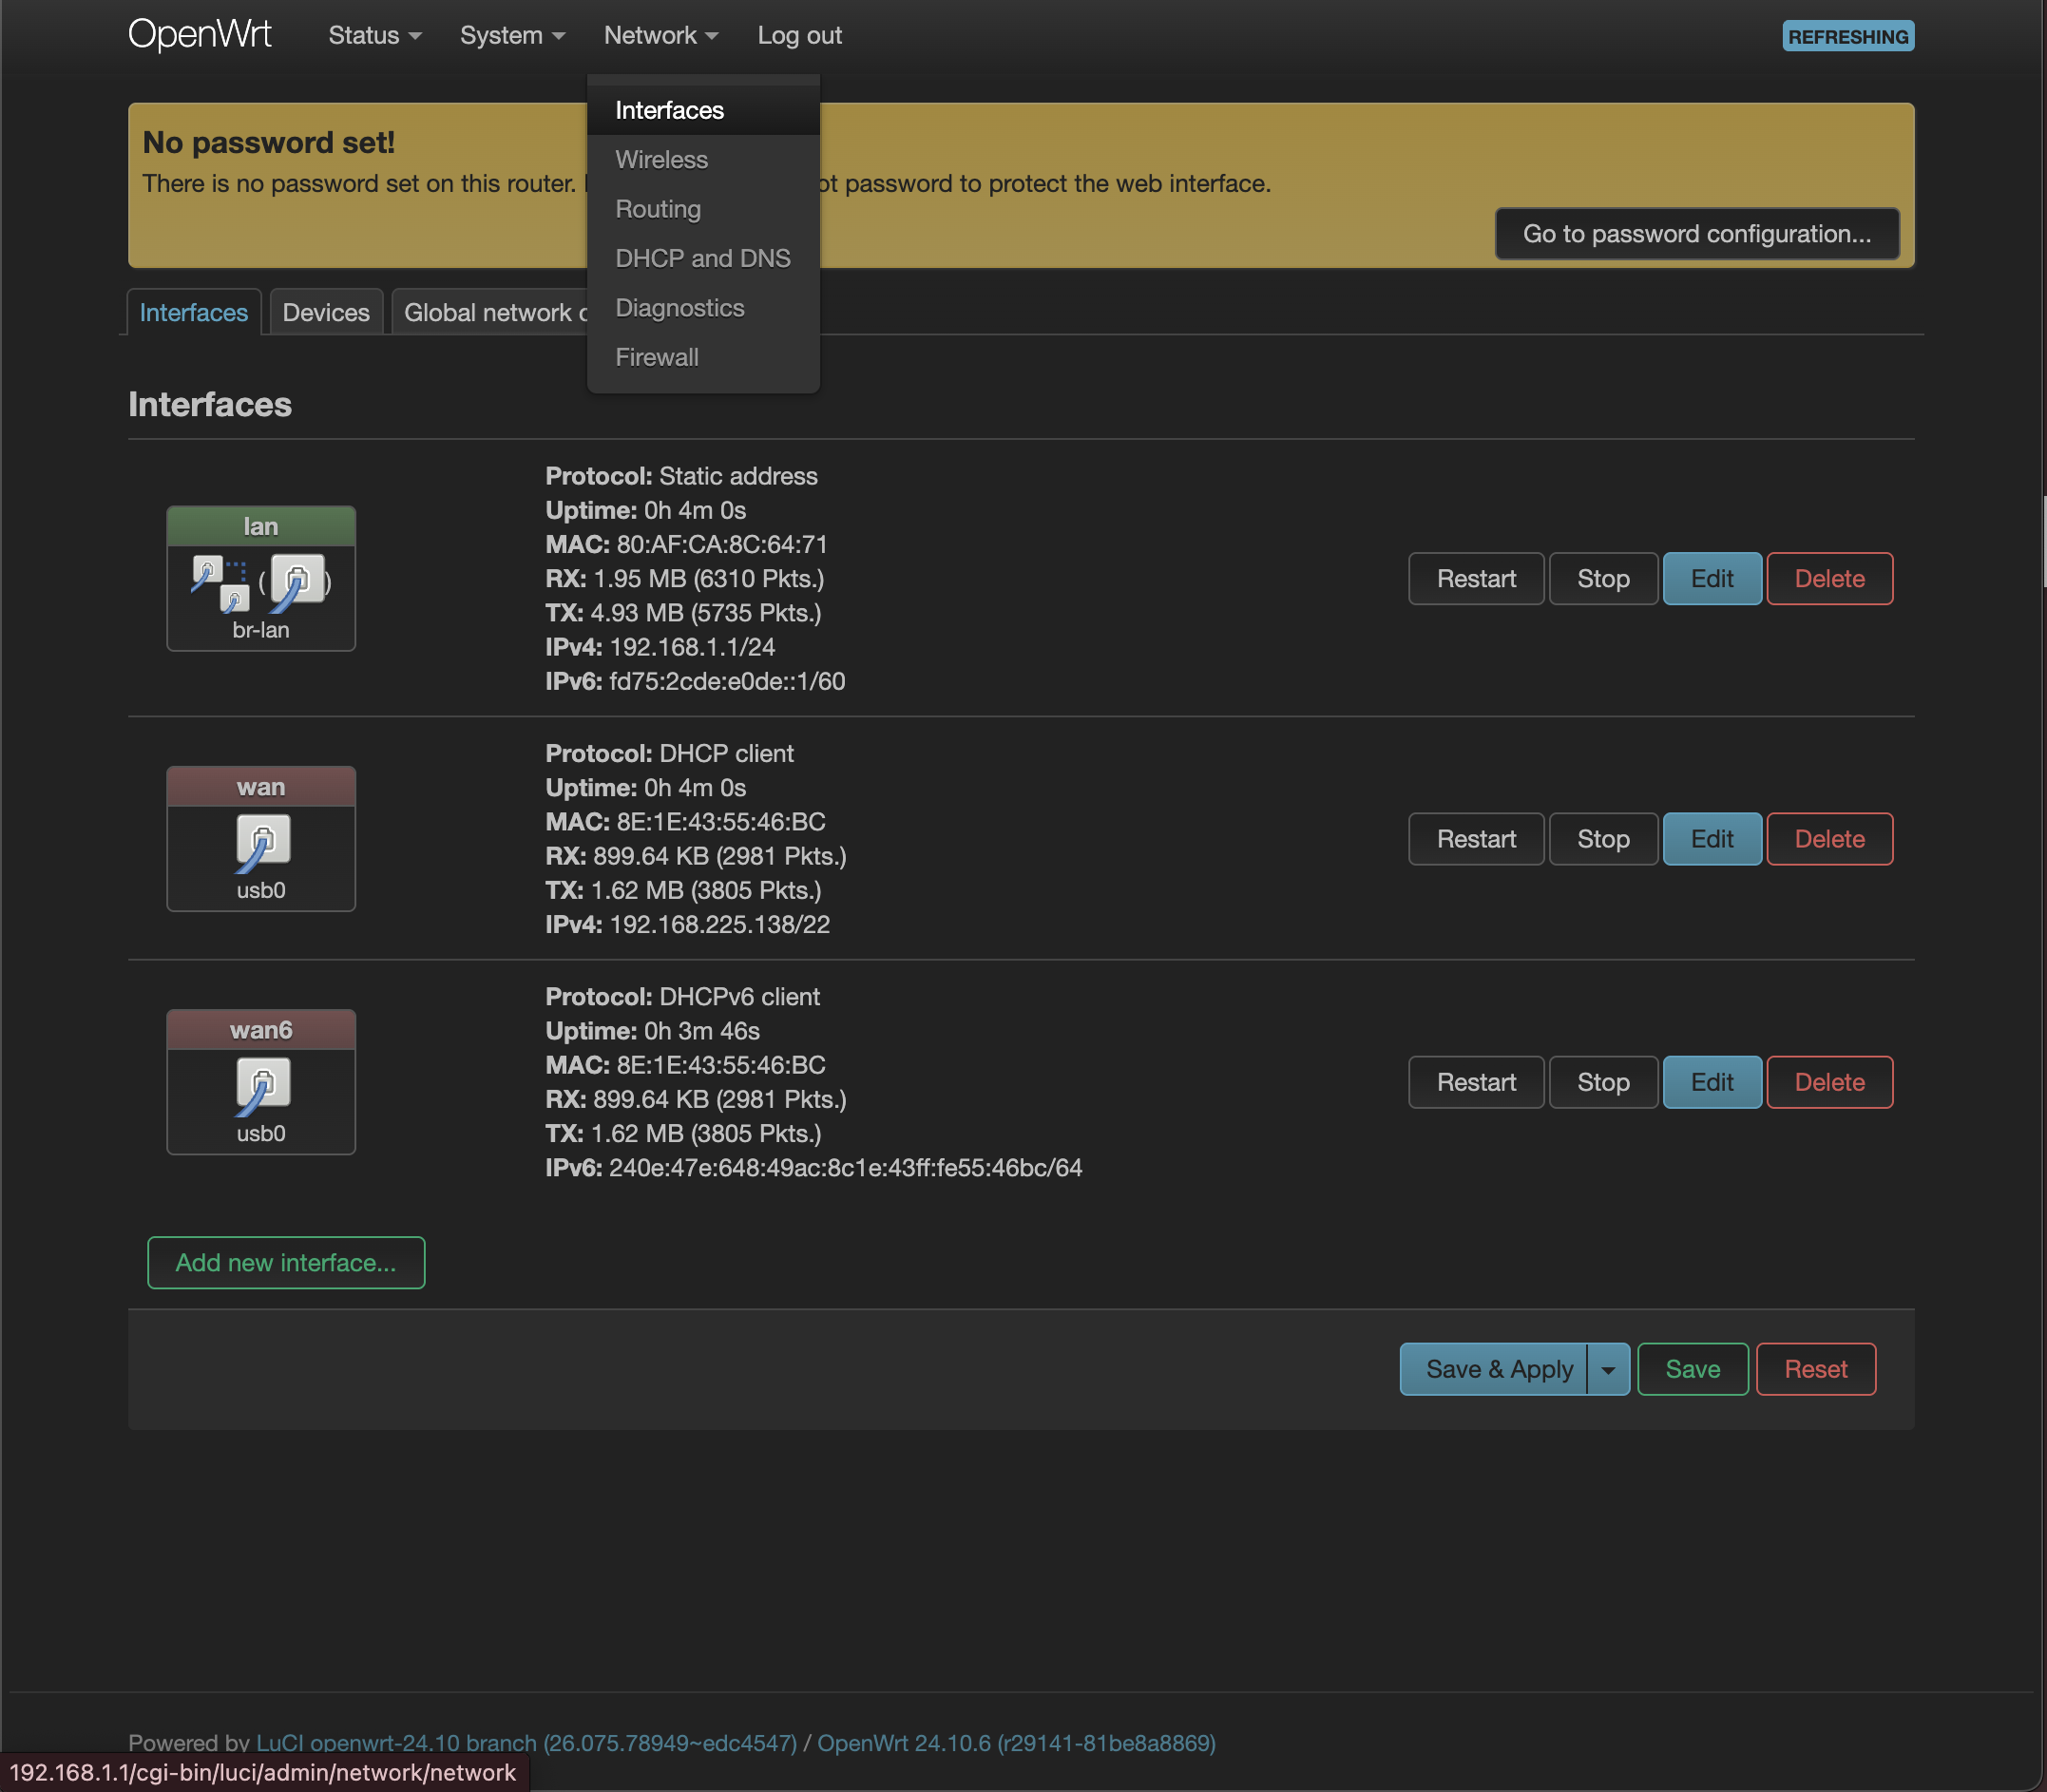
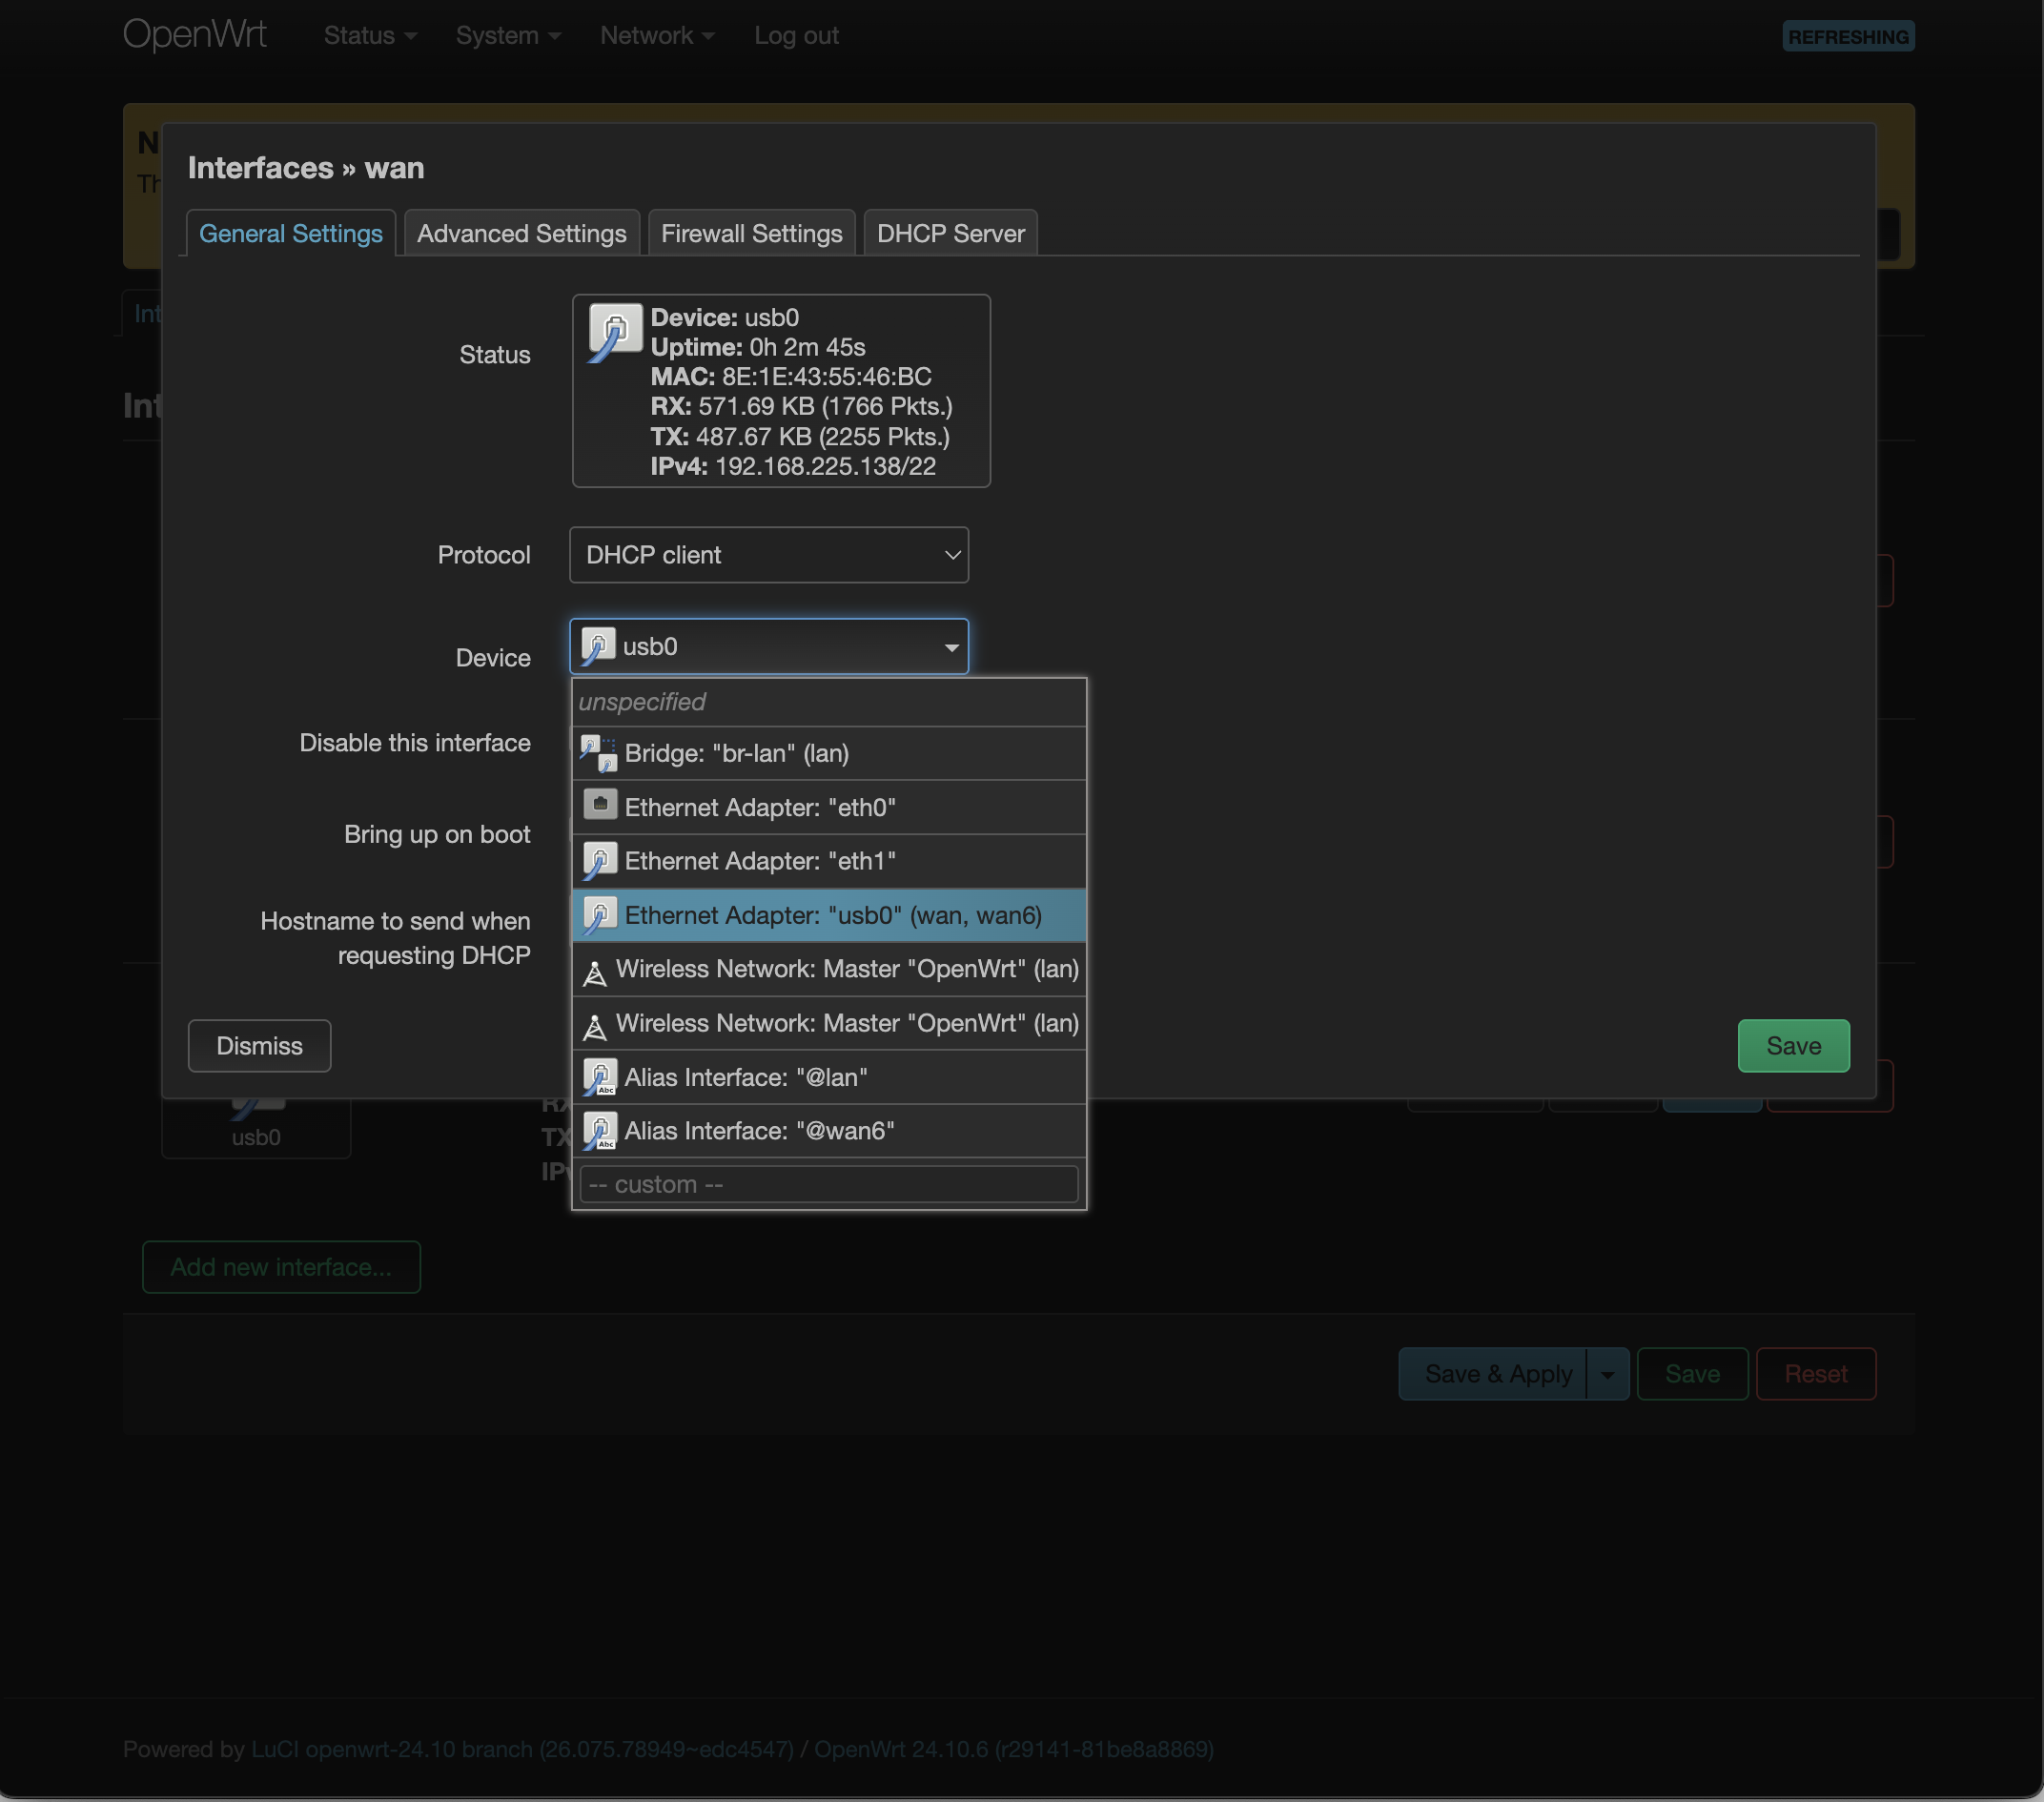
Once the configuration above is complete, you can disconnect the WAN port and use the Dongle for Internet access.
OpenWRT: Wi-Fi Configuration
Note: the official firmware has no Wi-Fi password by default, and the SSID is
OpenWrt.
# OpenWrt disables wireless by default; remove the disabled flag
uci del wireless.radio0.disabled
uci del wireless.radio1.disabled
uci set wireless.radio0.channel='auto'   # Automatic channel
uci set wireless.radio1.channel='auto'

# Enable the default Wi-Fi
uci del wireless.default_radio0.disabled
uci del wireless.default_radio1.disabled
uci commit
wifi reload
OpenWRT: Wi-Fi Password Configuration
Custom Wi-Fi settings:
- 2.4 GHz SSID:
ORBI60_2g - 5 GHz SSID:
ORBI60 - Password for both:
fanconn123 - Available encryption methods:
sae,psk2,sae-mixed,psk-mixed(psk2is used in the example)
# Remove the disabled flag
uci del wireless.radio0.disabled
uci del wireless.radio1.disabled
uci set wireless.radio0.channel='auto'
uci set wireless.radio1.channel='auto'

# Delete the default Wi-Fi configuration named OpenWrt
uci del wireless.default_radio0
uci del wireless.default_radio1

# 2.4 GHz AP
uci set wireless.wifinet0=wifi-iface
uci set wireless.wifinet0.device='radio0'
uci set wireless.wifinet0.network='lan'
uci set wireless.wifinet0.mode='ap'
uci set wireless.wifinet0.ssid='ORBI60_2g'
uci set wireless.wifinet0.encryption='psk2'
uci set wireless.wifinet0.key='fanconn123'

# 5 GHz AP
uci set wireless.wifinet1=wifi-iface
uci set wireless.wifinet1.device='radio1'
uci set wireless.wifinet1.network='lan'
uci set wireless.wifinet1.mode='ap'
uci set wireless.wifinet1.ssid='ORBI60'
uci set wireless.wifinet1.encryption='psk2'
uci set wireless.wifinet1.ocv='0'
uci set wireless.wifinet1.key='fanconn123'

uci commit
wifi reload
Once all the configuration above is complete, the router accesses the Internet through the GT500 Dongle and Wi-Fi can be used as needed.