Quick Installation

DC688 Wiring Method
The DC688 and DC686 share the same PCB, so you can directly refer to the following wiring:
The images on this page are actual photos of the DC688. The DC688 and DC686 share the
Quick Installation
Main Unit Quick Installation
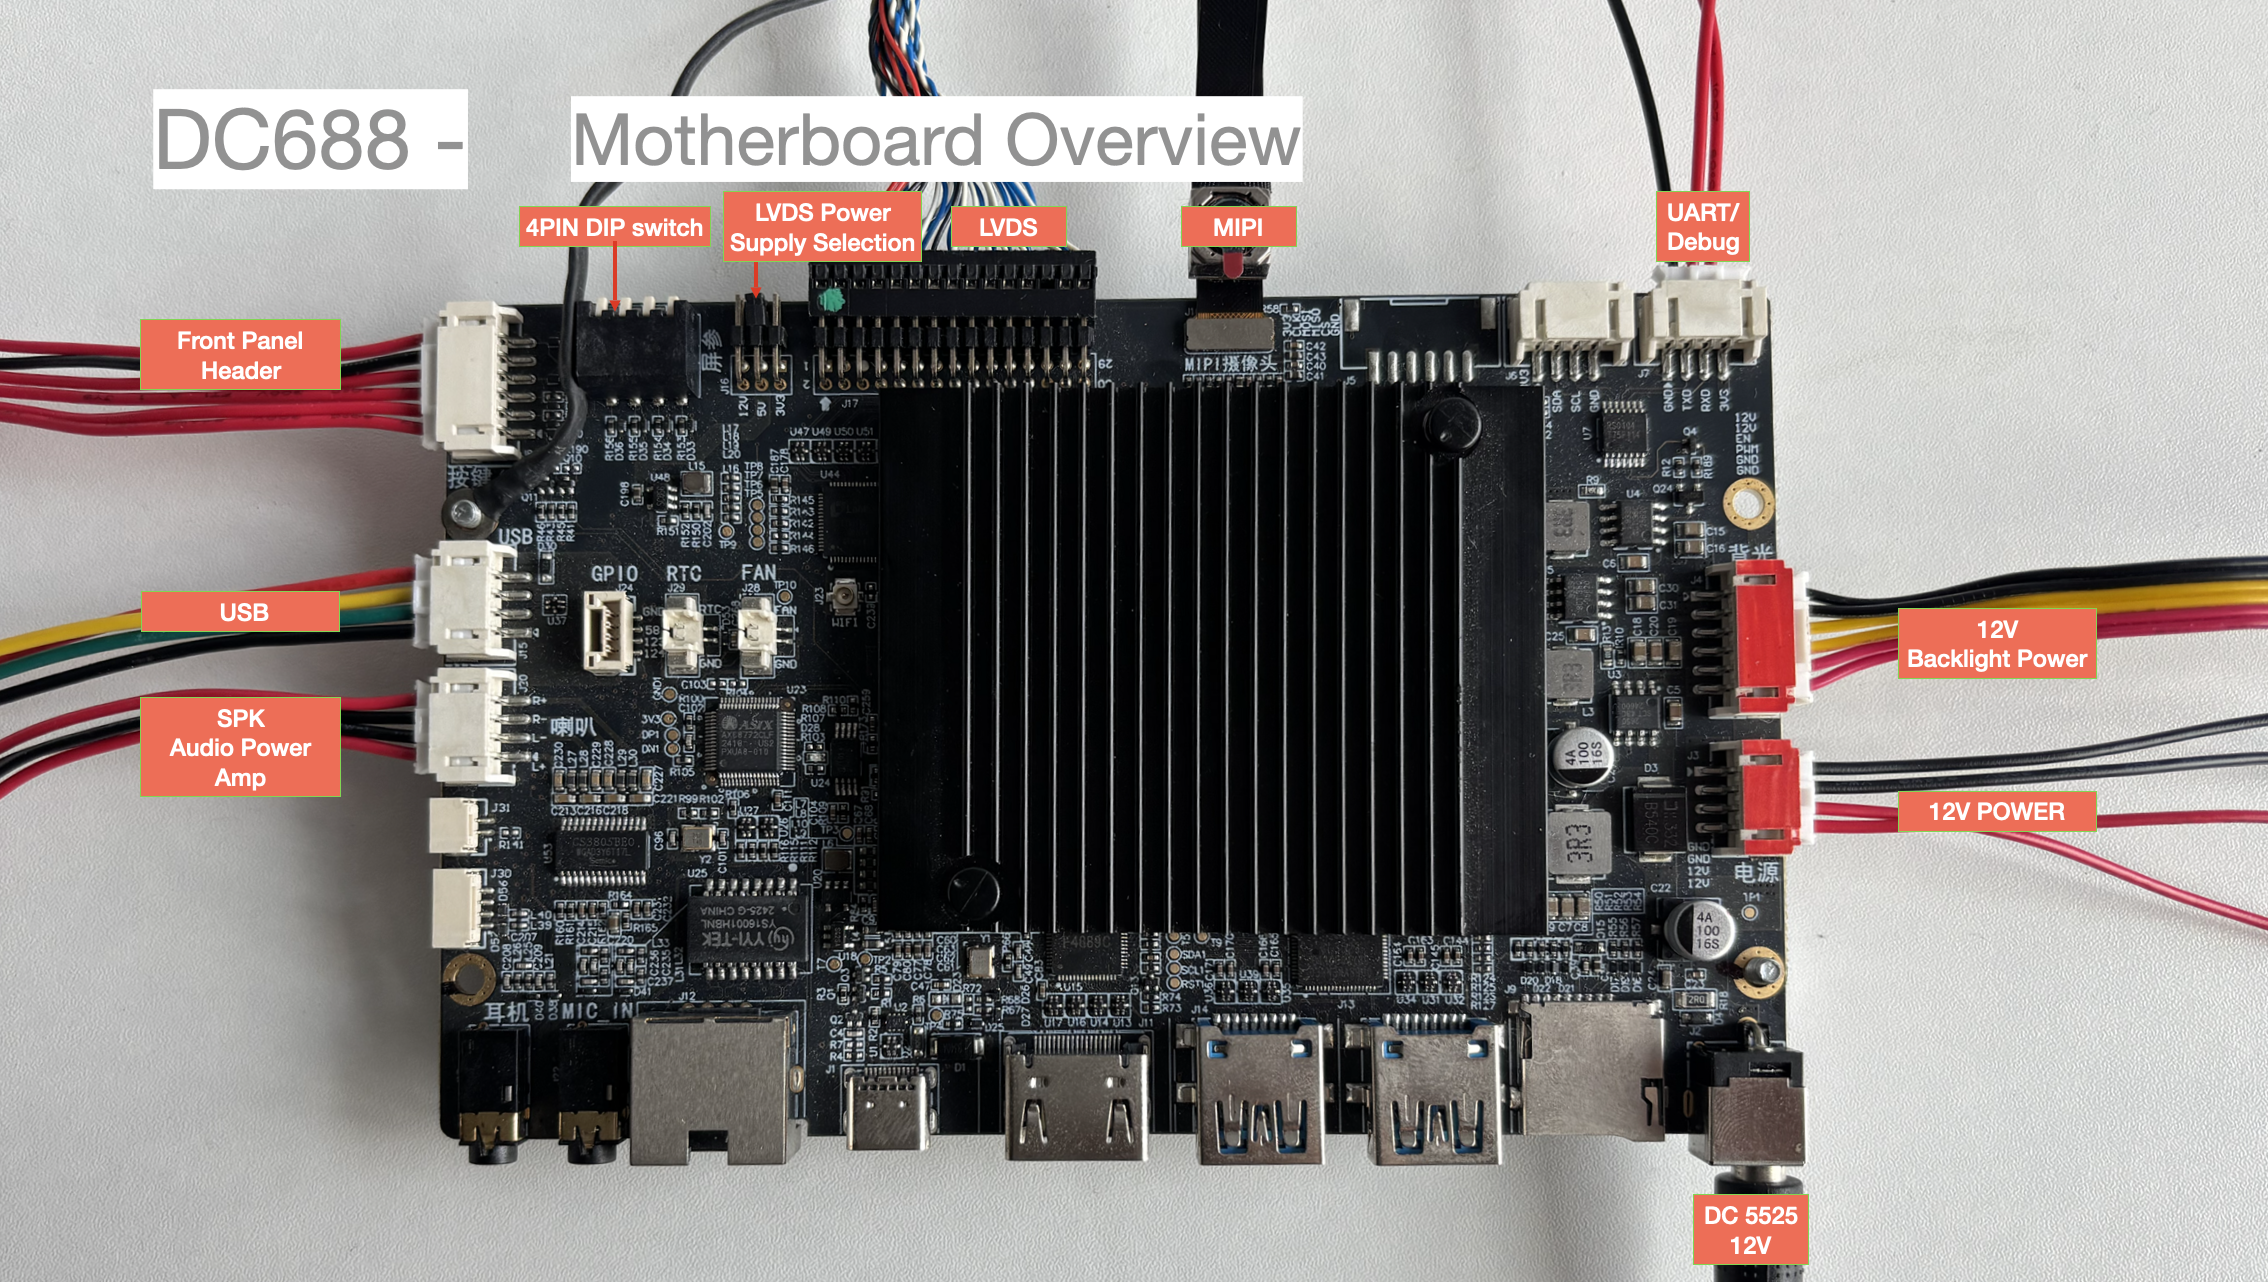
J2/J3 Power
-
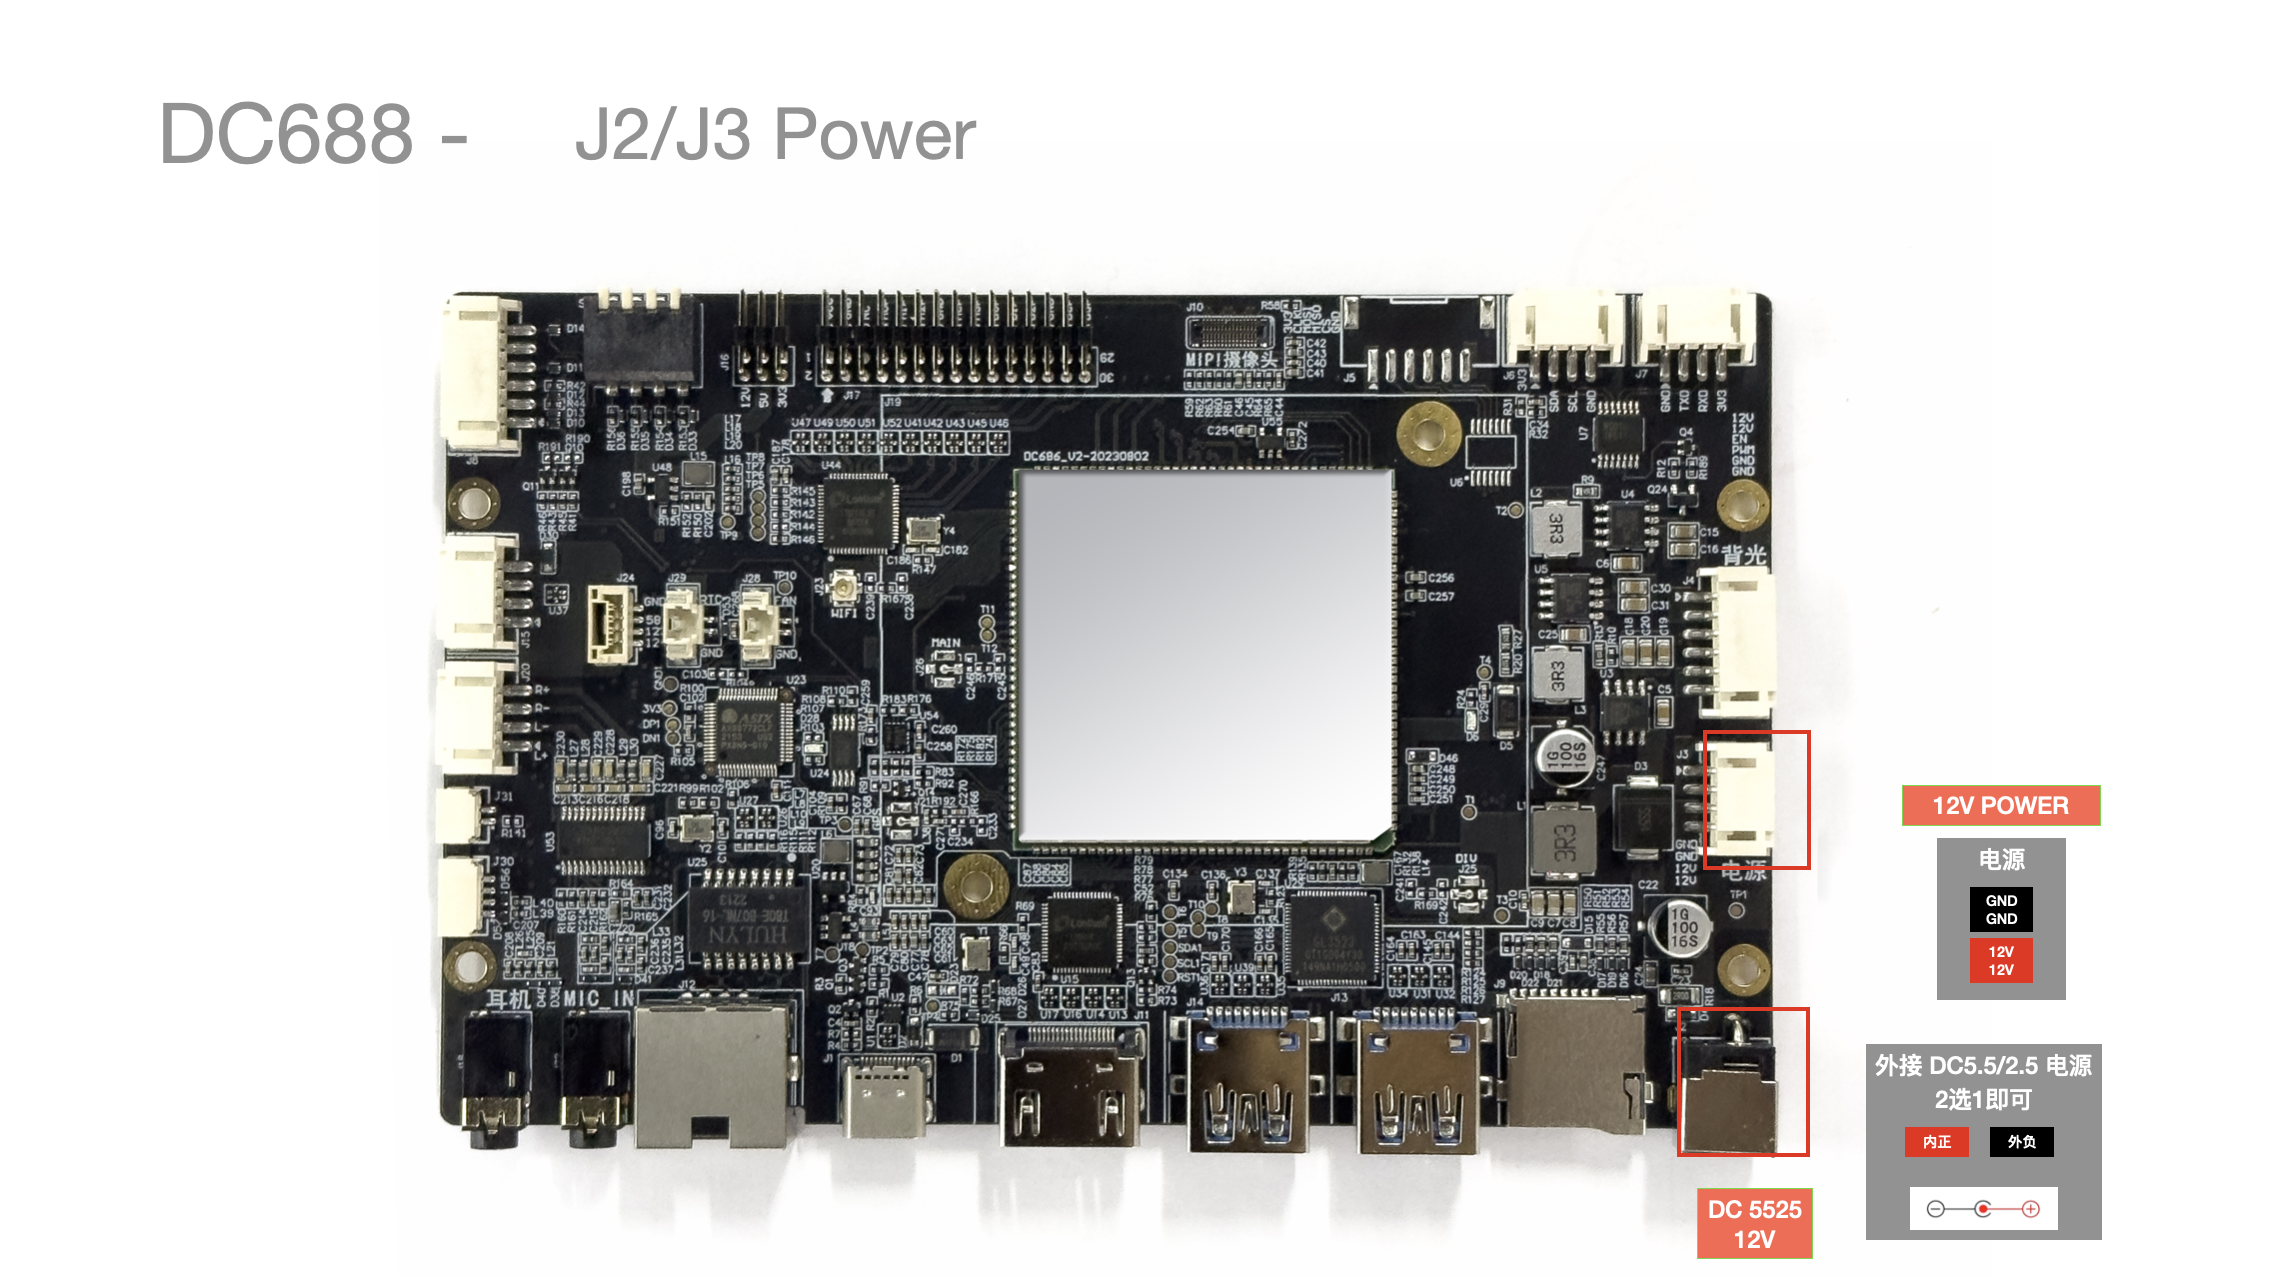
Choose either power option according to the actual situation:
-
Power jack: outer 55, inner 25, 12V
-
PH socket: PH2.0 4PIN
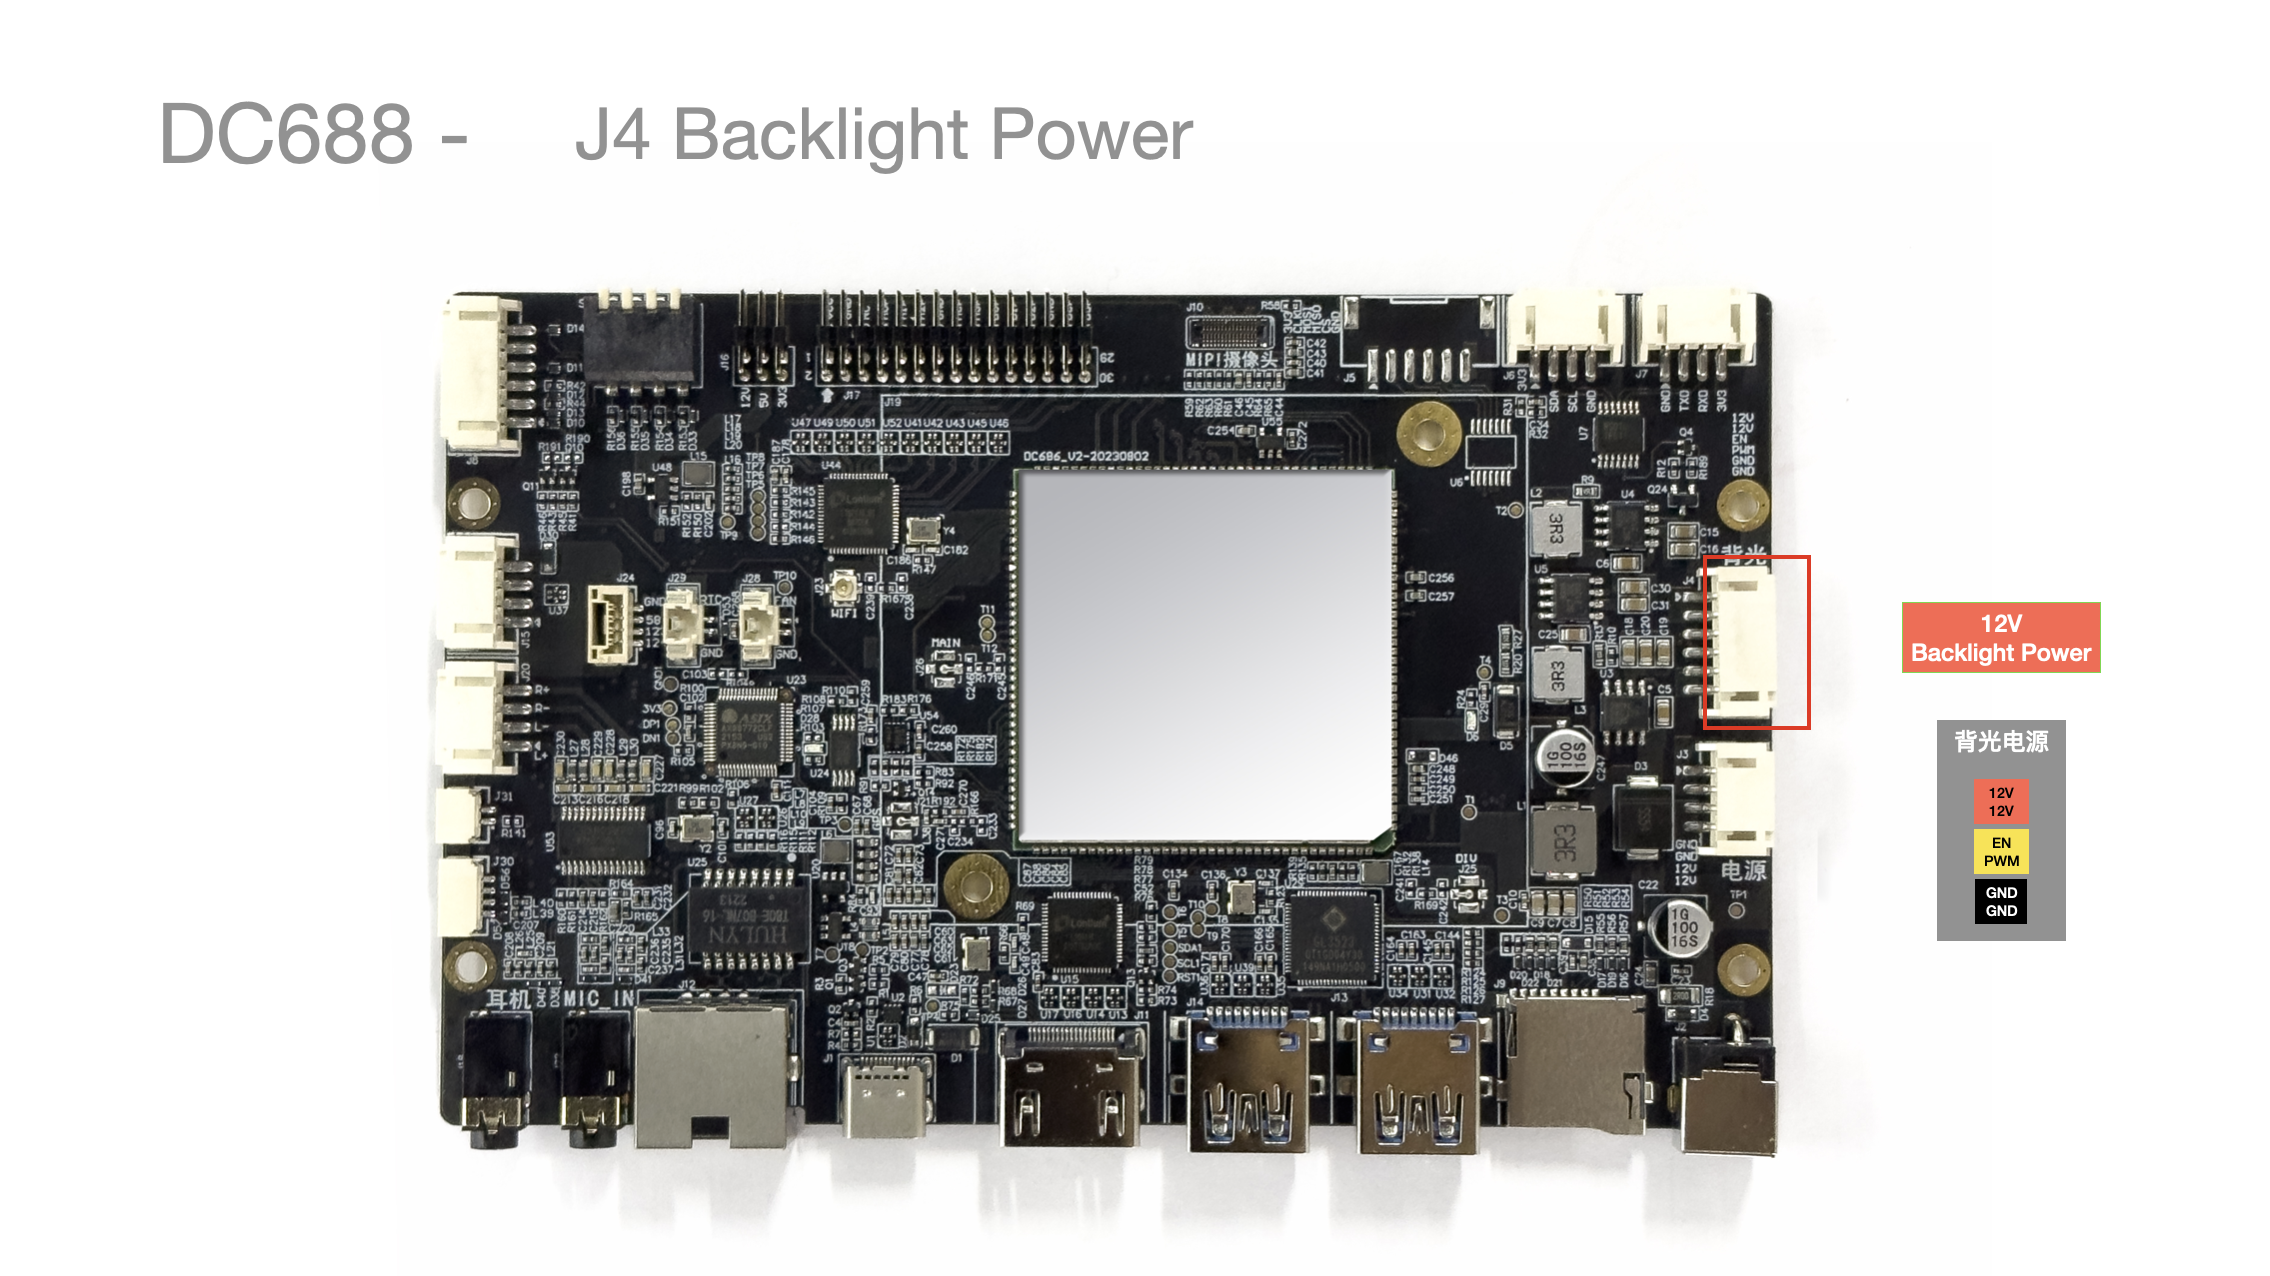
J4 Backlight Power
-
Maximum
3A Max -
PH socket: PH2.0 6PIN
| Pin No. | Pin Description | Wire Color (Reference) | Remarks |
|---|---|---|---|
| 1 | 12V | Red | Operating voltage 12V |
| 2 | 12V | Red | Operating voltage 12V |
| 3 | BL EN | Yellow | Backlight control |
| 4 | BL PWM | Yellow | Backlight control |
| 5 | GND | Black | Ground |
| 6 | GND | Black | Ground |
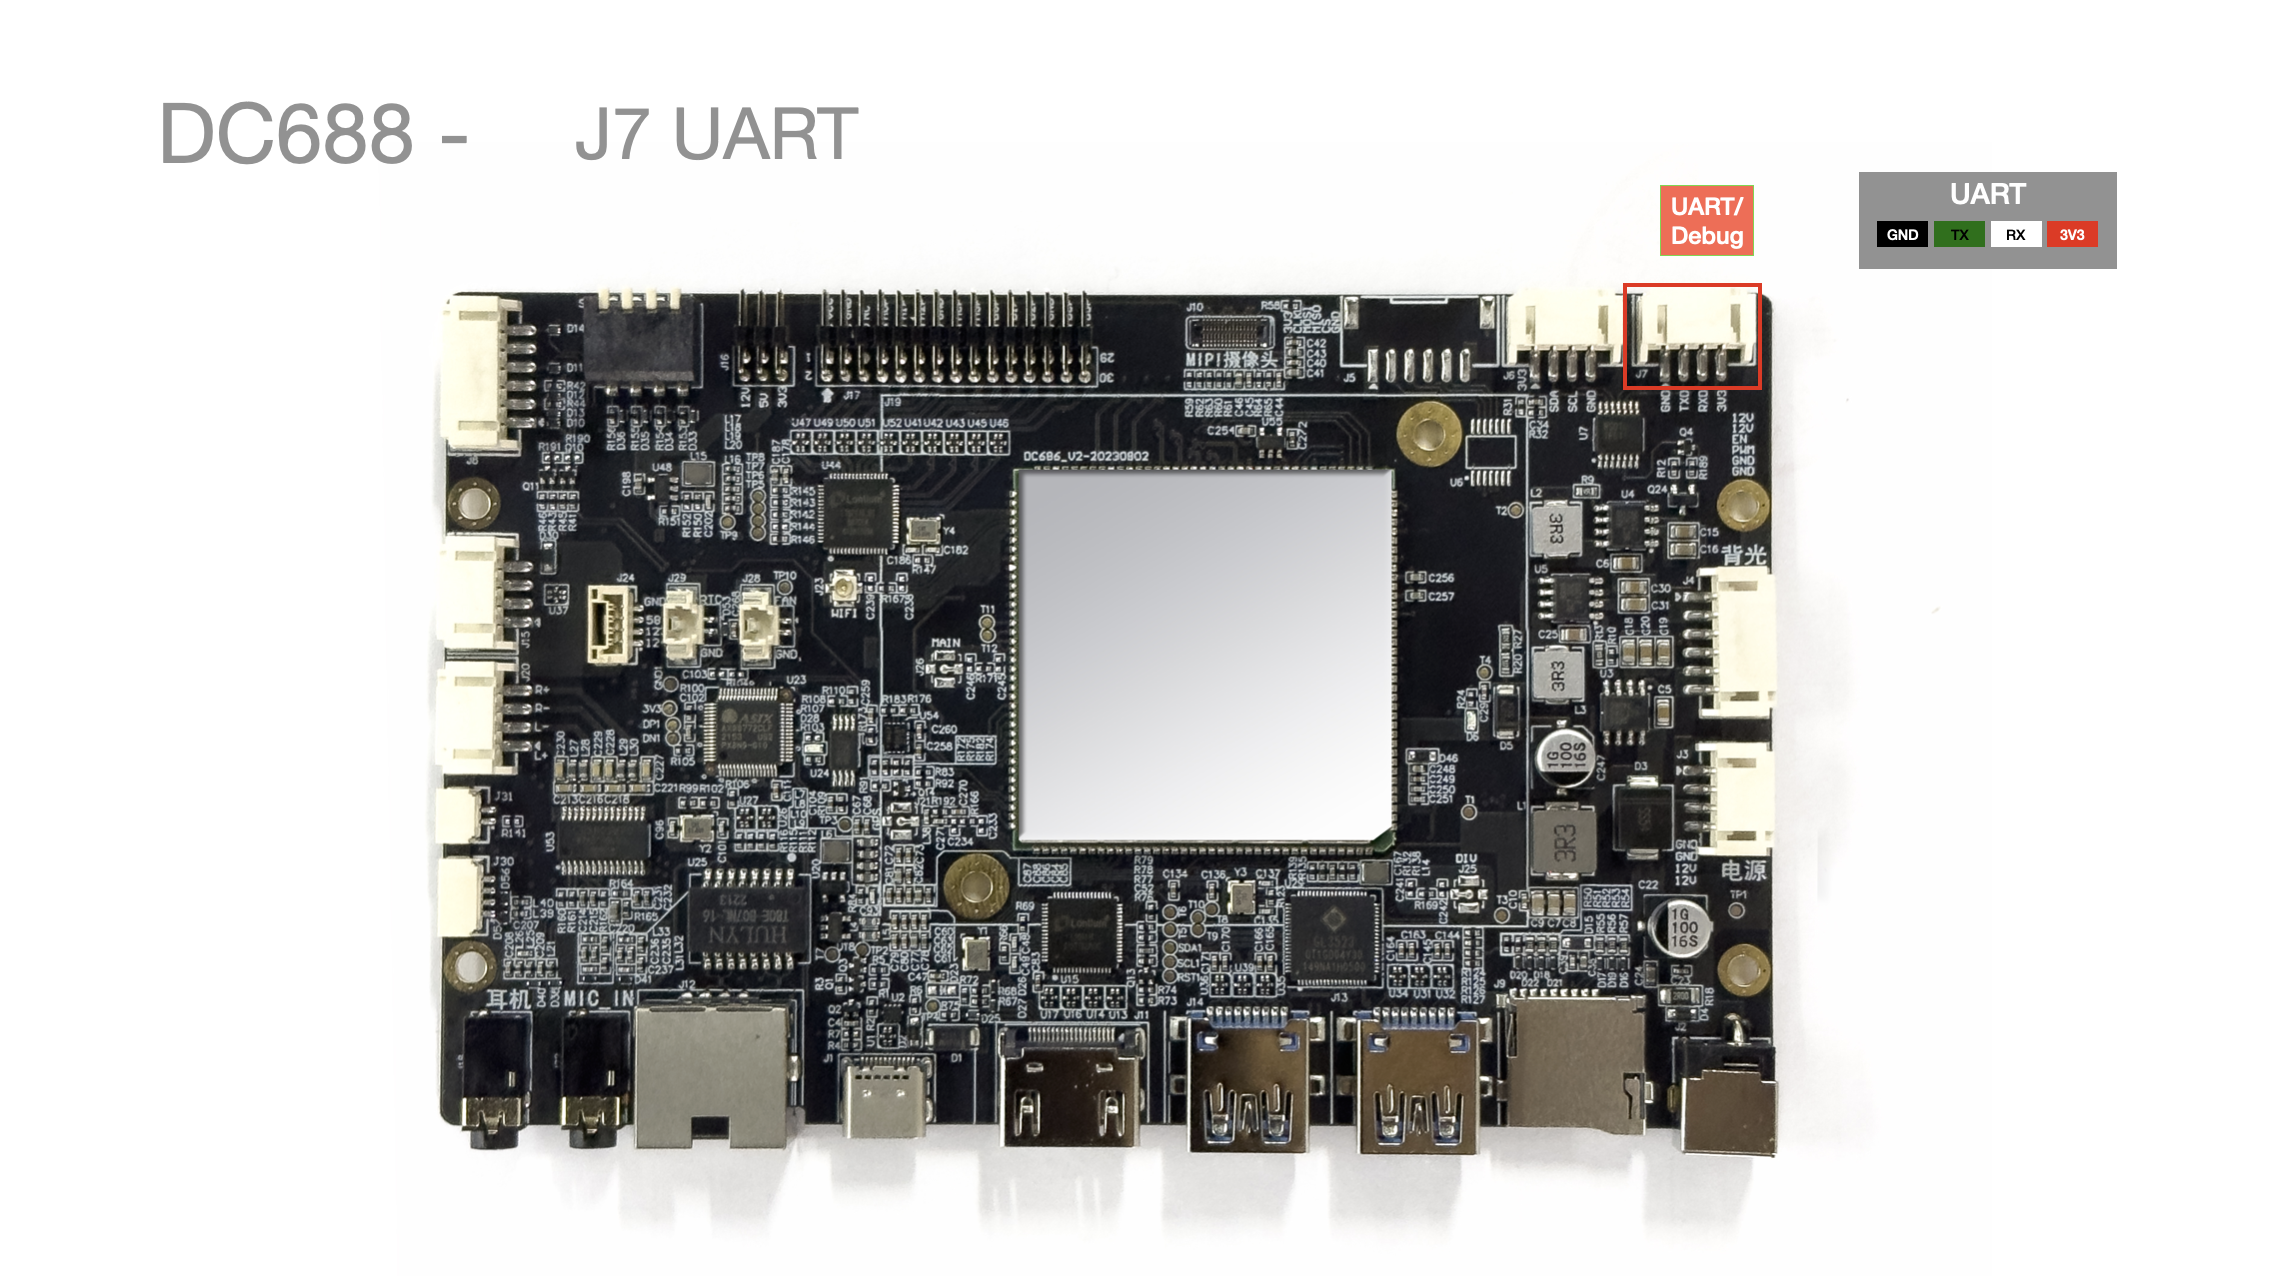
J7 Battery Signal (Optional)
-
Select the battery level signal according to your needs
-
PH socket: PH 2.0 4PIN (GND is shared, so only RX and TX need to be connected)
For supported battery types and protocol configuration, see the next page: USB Drive Production
| Pin No. | Pin Description | Wire Color (Reference) |
|---|---|---|
| 1 | GND | Black |
| 2 | TX | Green |
| 3 | RX | White |
| 4 | 3V3 | Red |
J8 Panel Button Interface
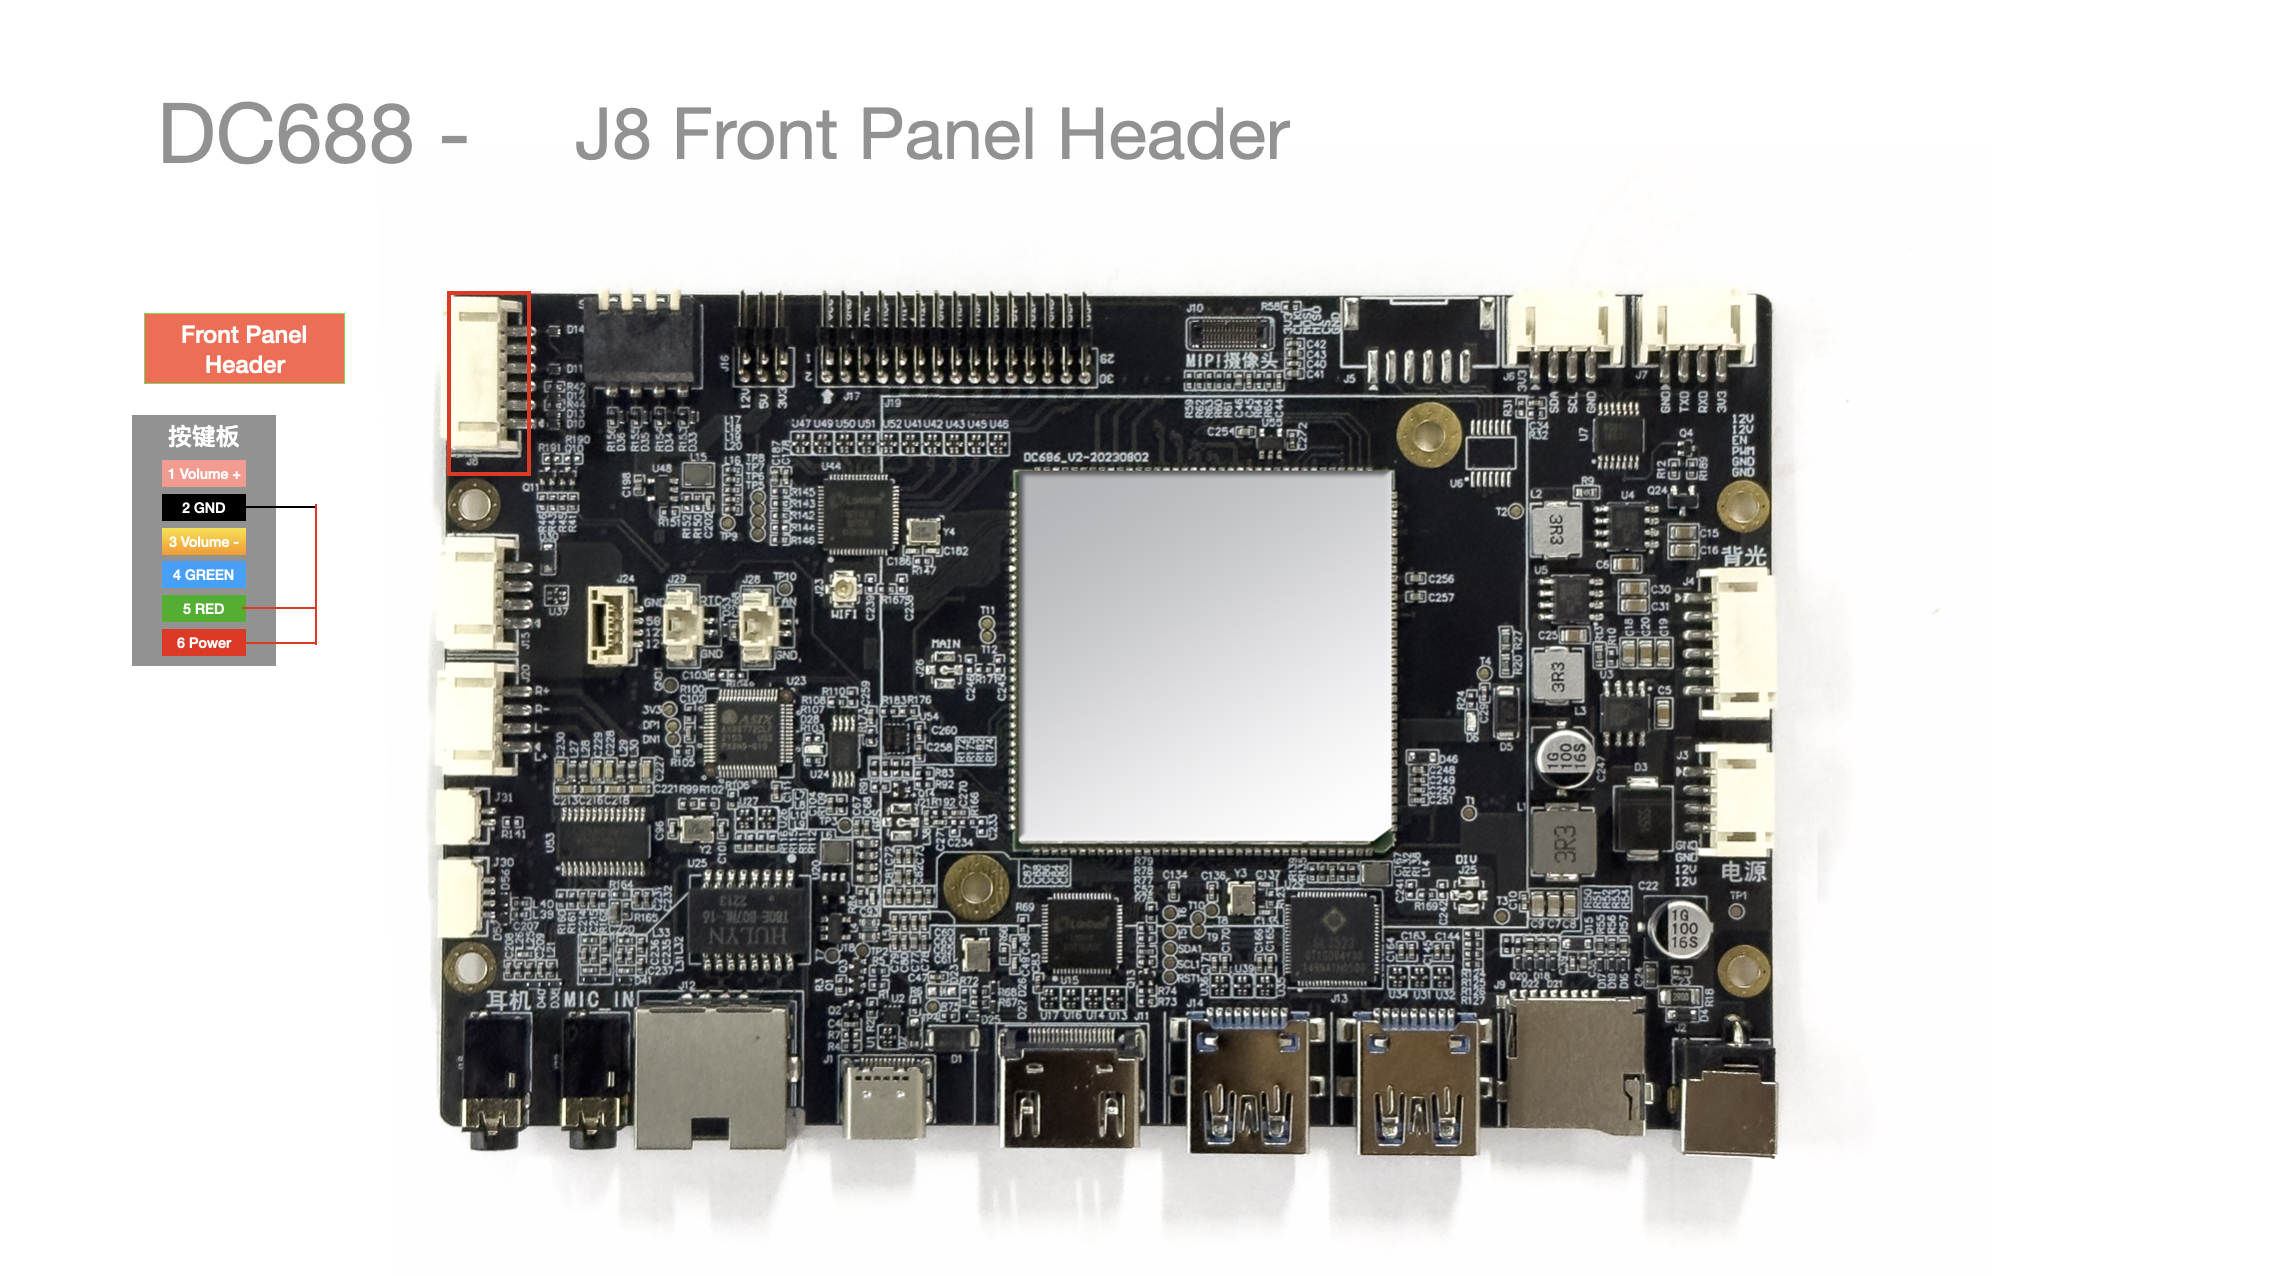
-
For the non-auto power-on version, you need to manually power on by connecting GND + pin 5 of POWER + pin 1 (counting from bottom to top)
-
PH socket: PH2.0 6PIN
| Pin No. | Pin Description | Wire Color (Reference) | Remarks |
|---|---|---|---|
| 1 | Power | None | Short with 5 GND for the power button |
| 2 | GPIO57_3v3 | None | |
| 3 | GPIO44_3V3 | None | |
| 4 | Volume + | None | Short with 5 GND for volume - |
| 5 | GND | Black | Ground |
| 6 | Volume + | None | Short with 5 GND for volume + |
J10 MIPI Camera
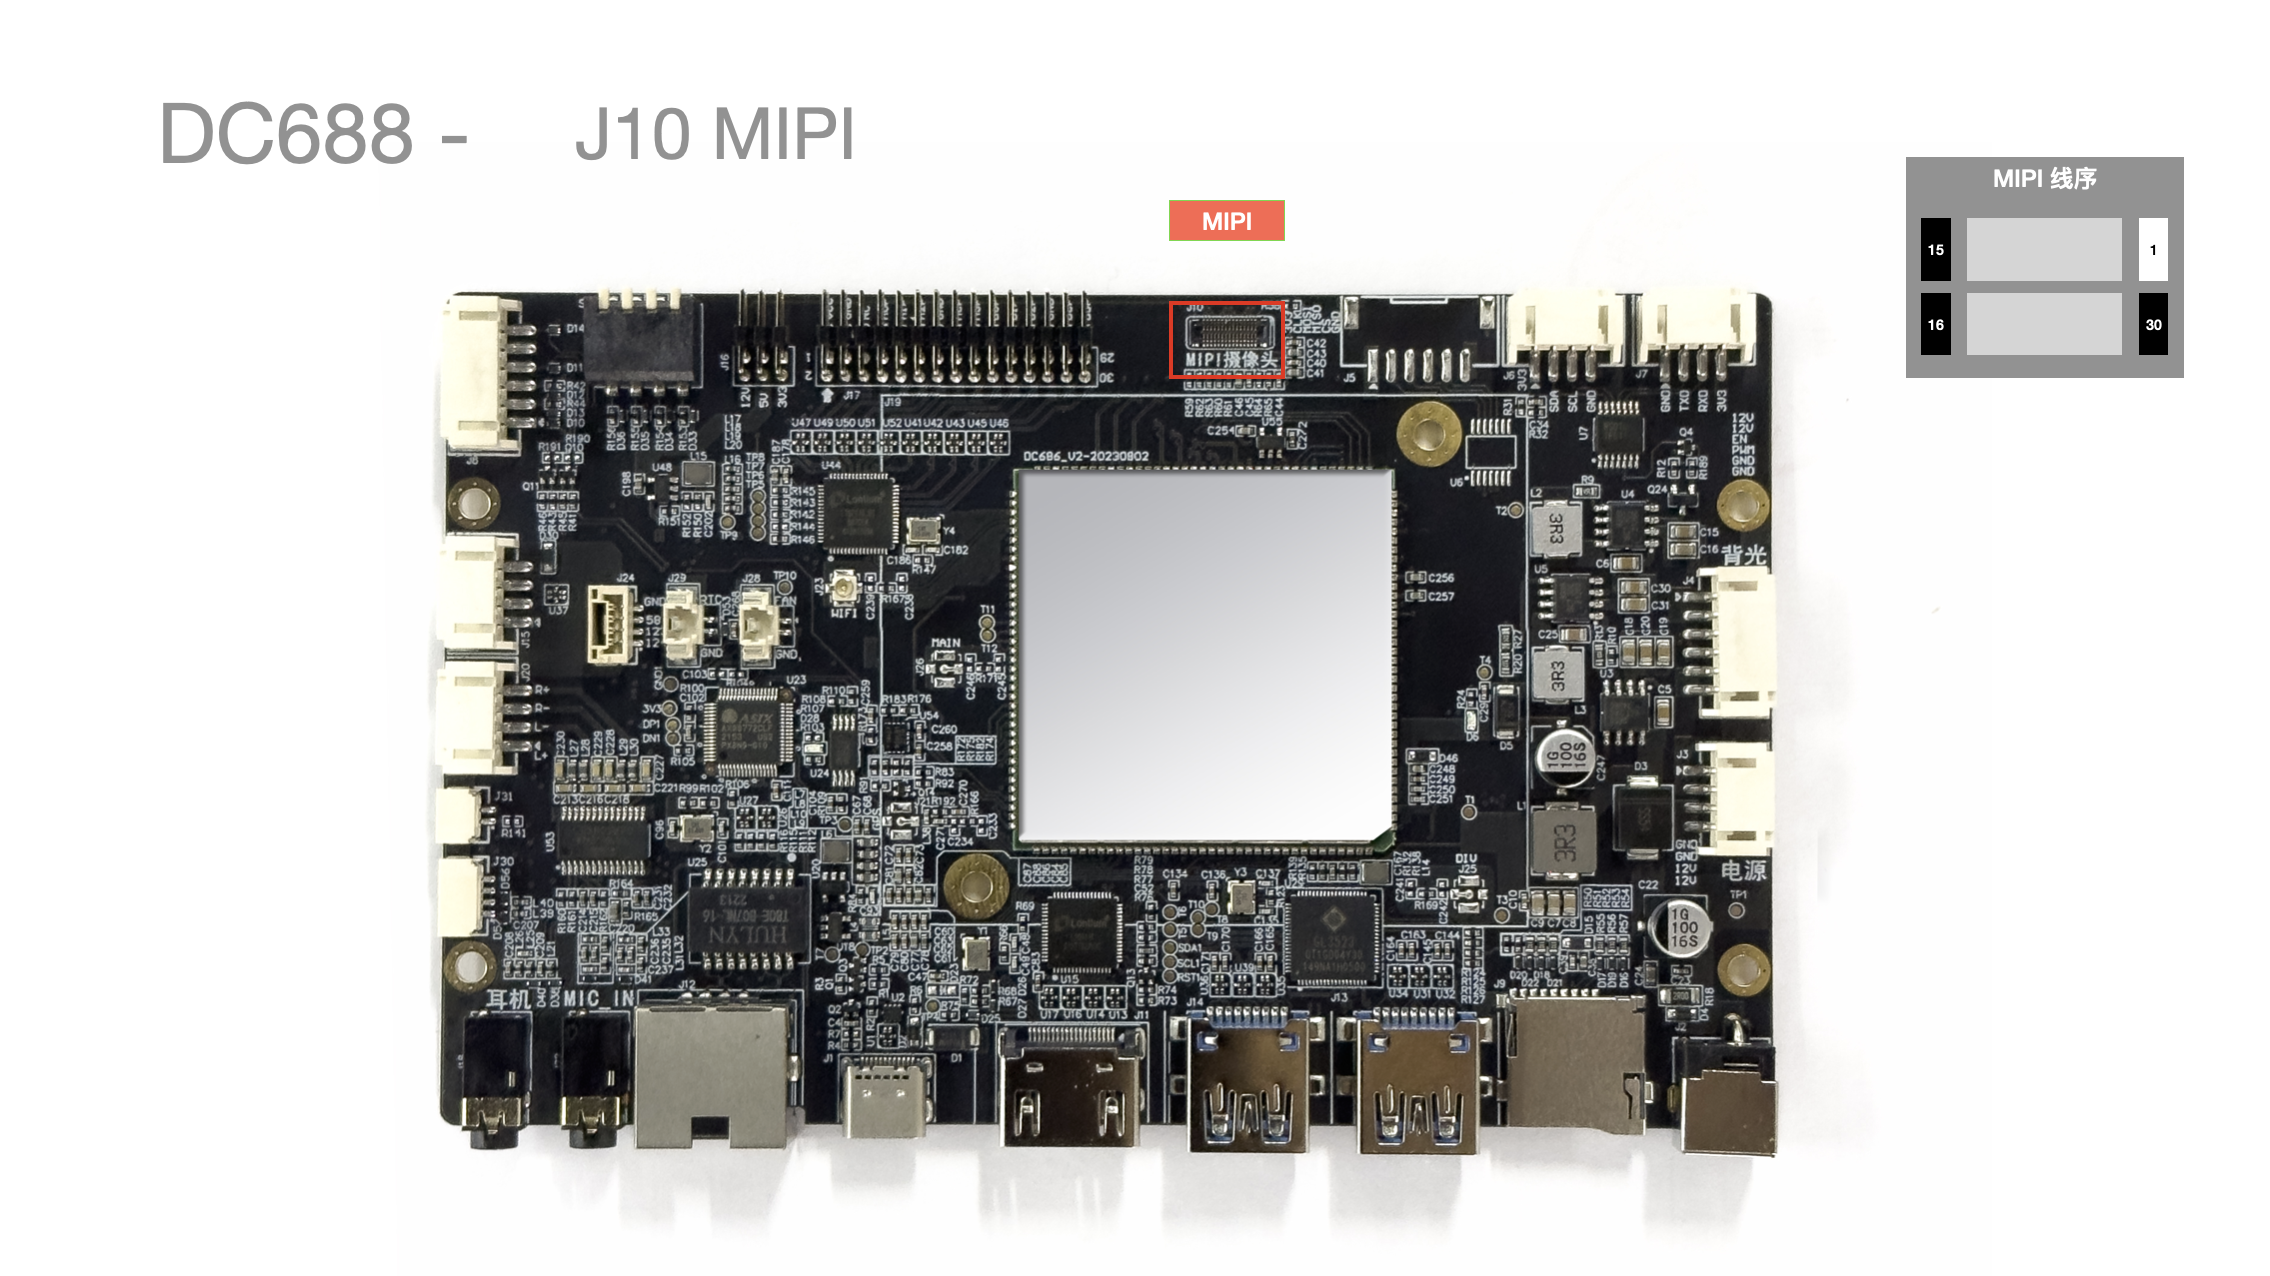
-
Refer to the connection method of the customized lens in the figure
-
Connector model: YXT-BB10-30S-02
J15 USB Interface
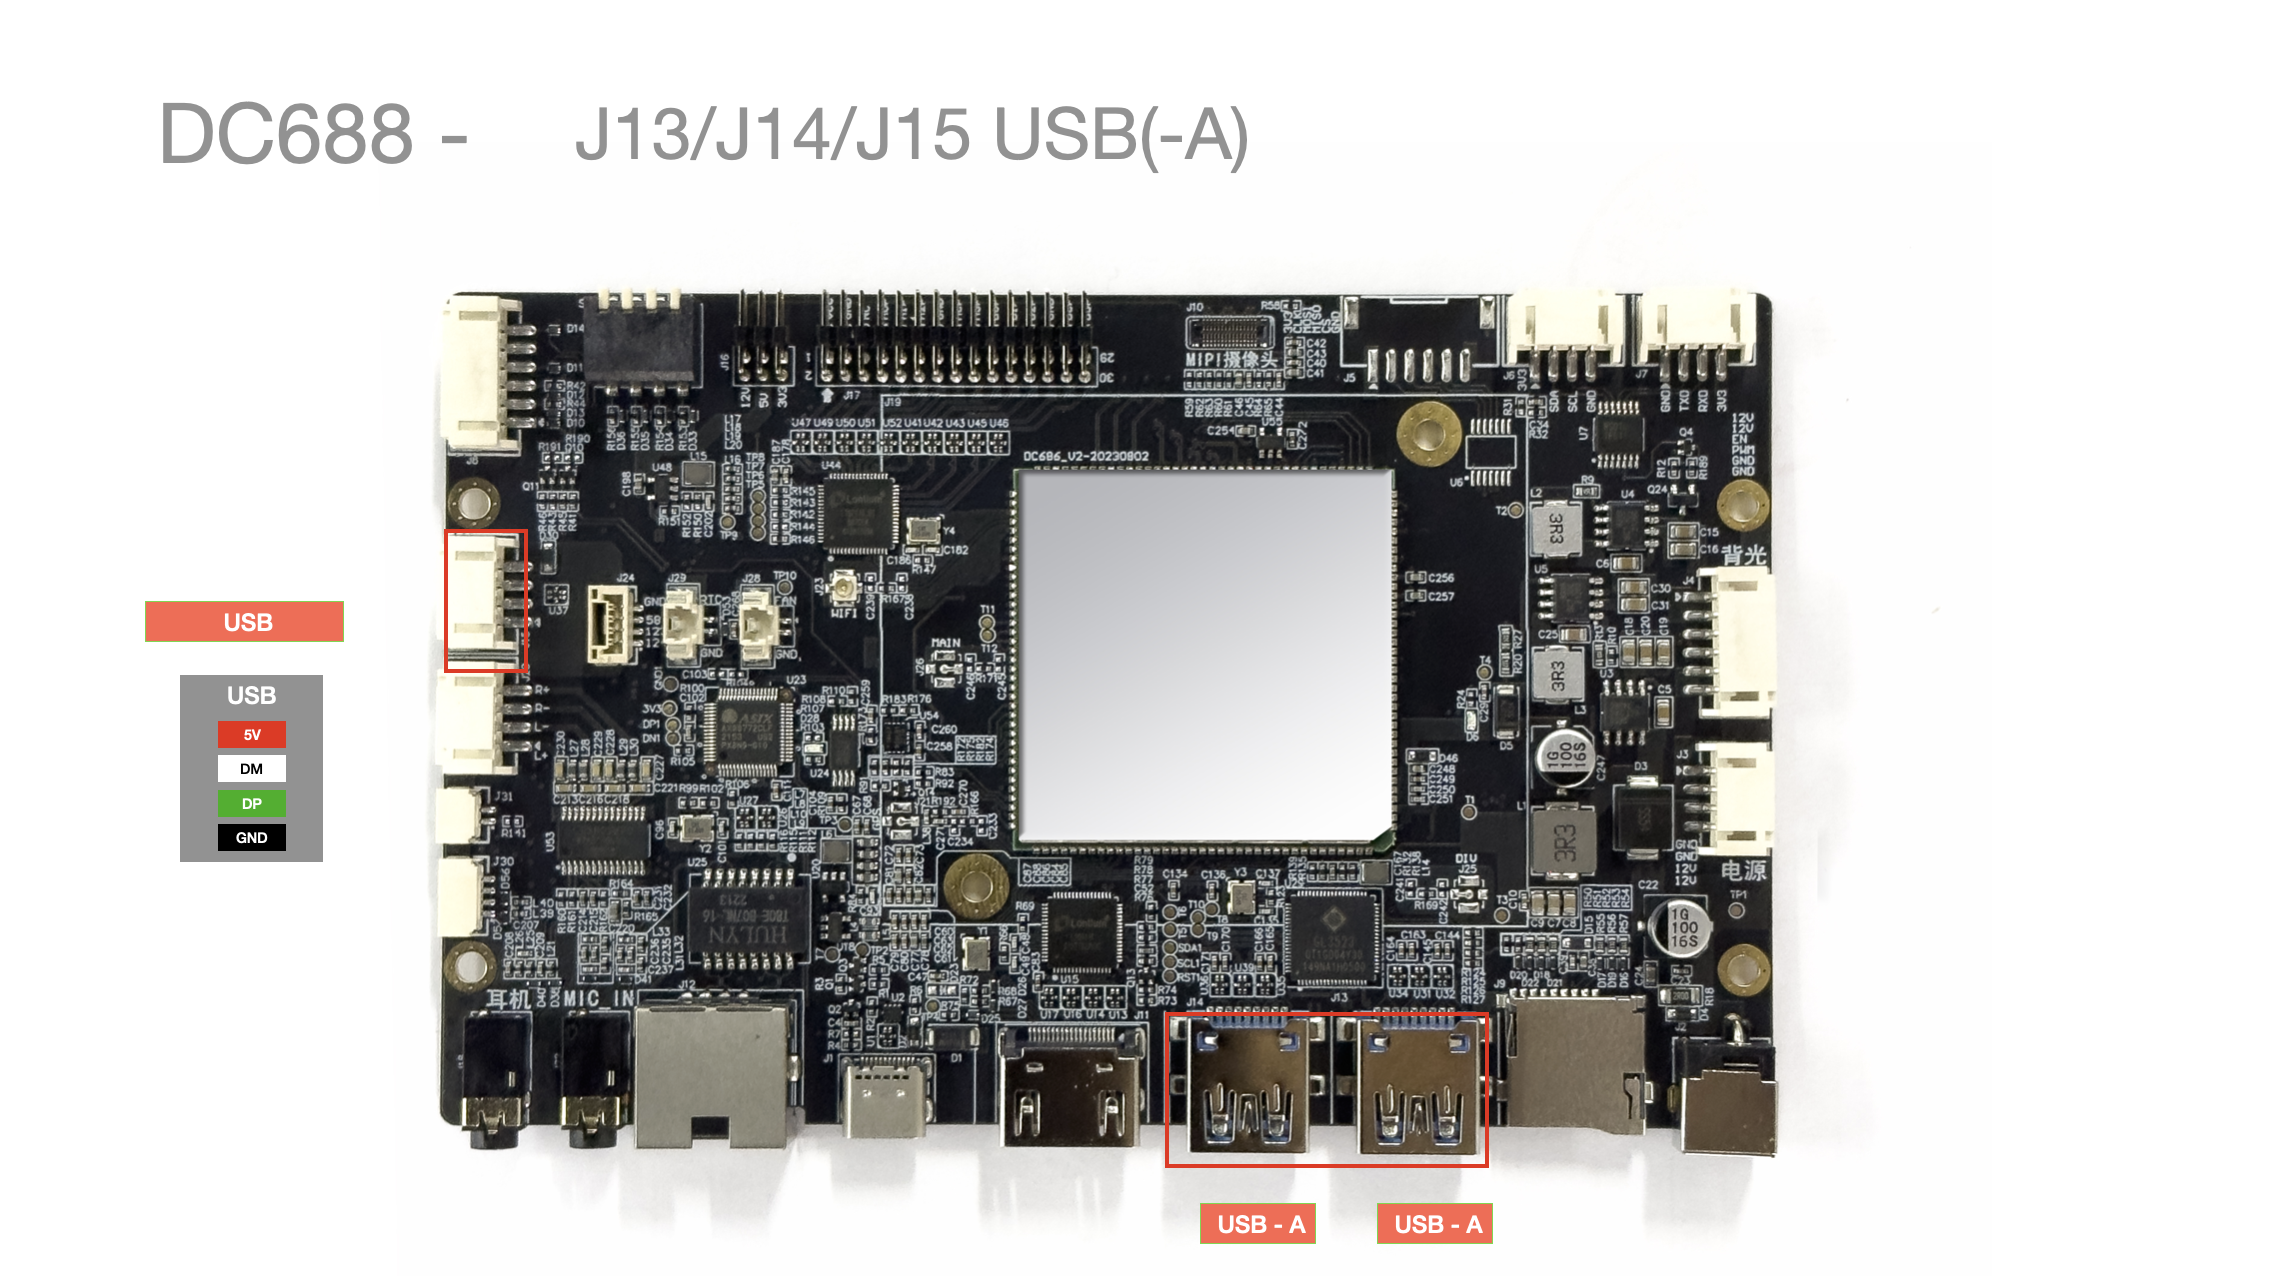
- Supports 1 USB PH2.0 4PIN channel (left side)
| Pin No. | Pin Description | Wire Color (Reference) | Remarks |
|---|---|---|---|
| 1 | GND | Black | Ground |
| 2 | DP | Green | |
| 3 | DM | White | |
| 4 | 5V | Red | 5V |
J16 LVDS Power Selection
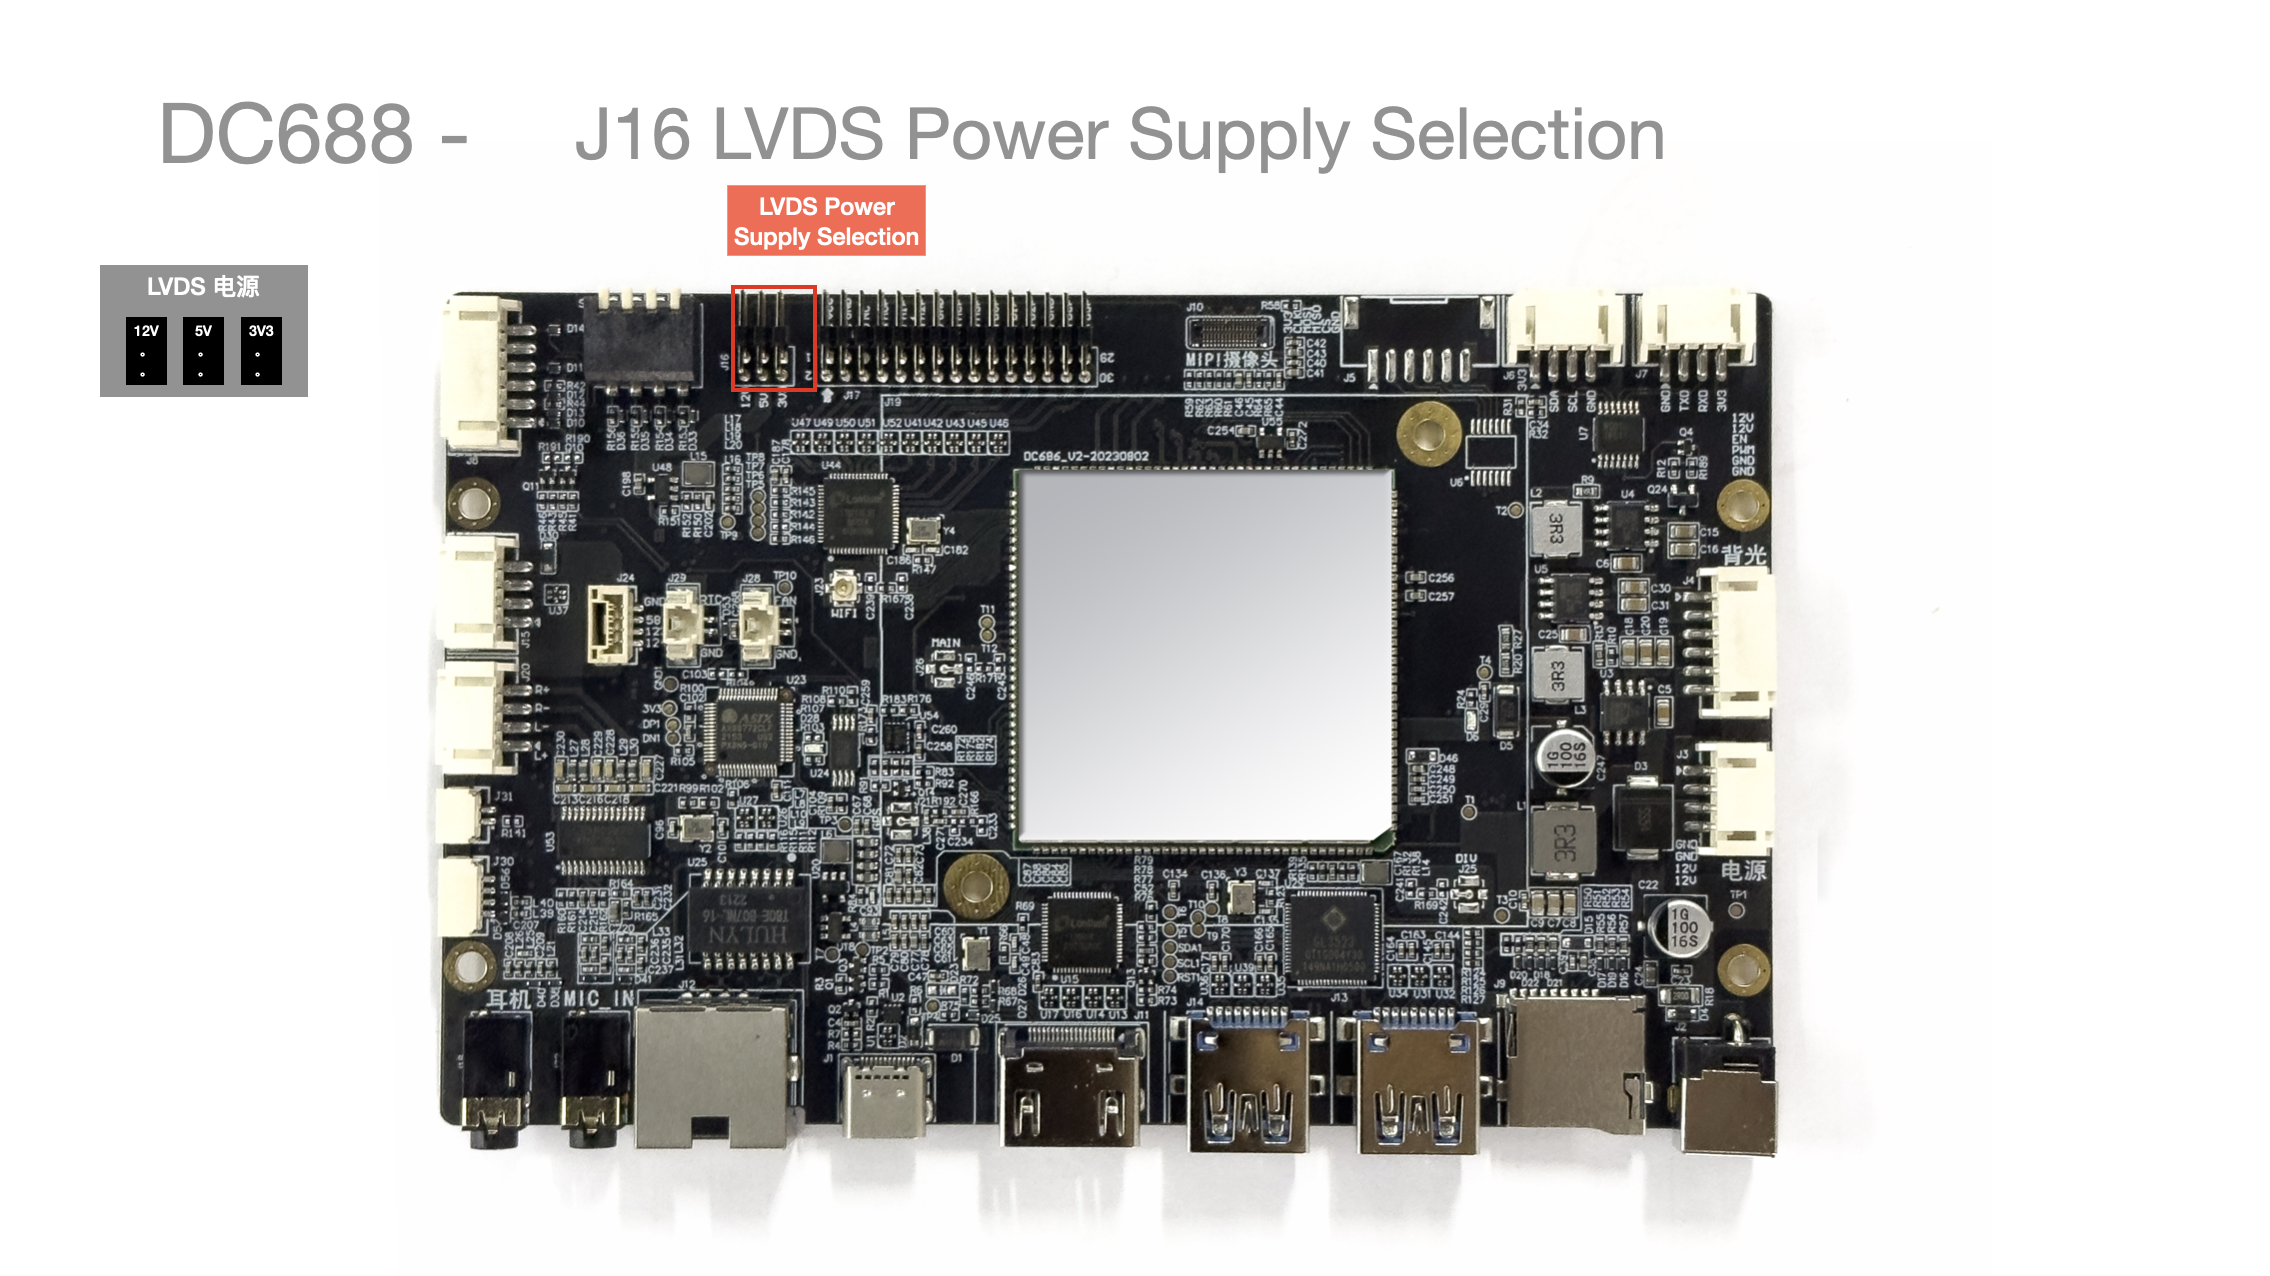
-
Note that you need to select the jumper position manually; the factory default is generally 5V
-
Please refer to the screen requirements and select the appropriate
output voltage to avoiddamaging the screen
| Jumper Pin | Silkscreen | Position | |
|---|---|---|
| 1 | 12V | Left |
| 2 | 5V | Middle |
| 3 | 3.3V | Right |
J17 LVDS Interface
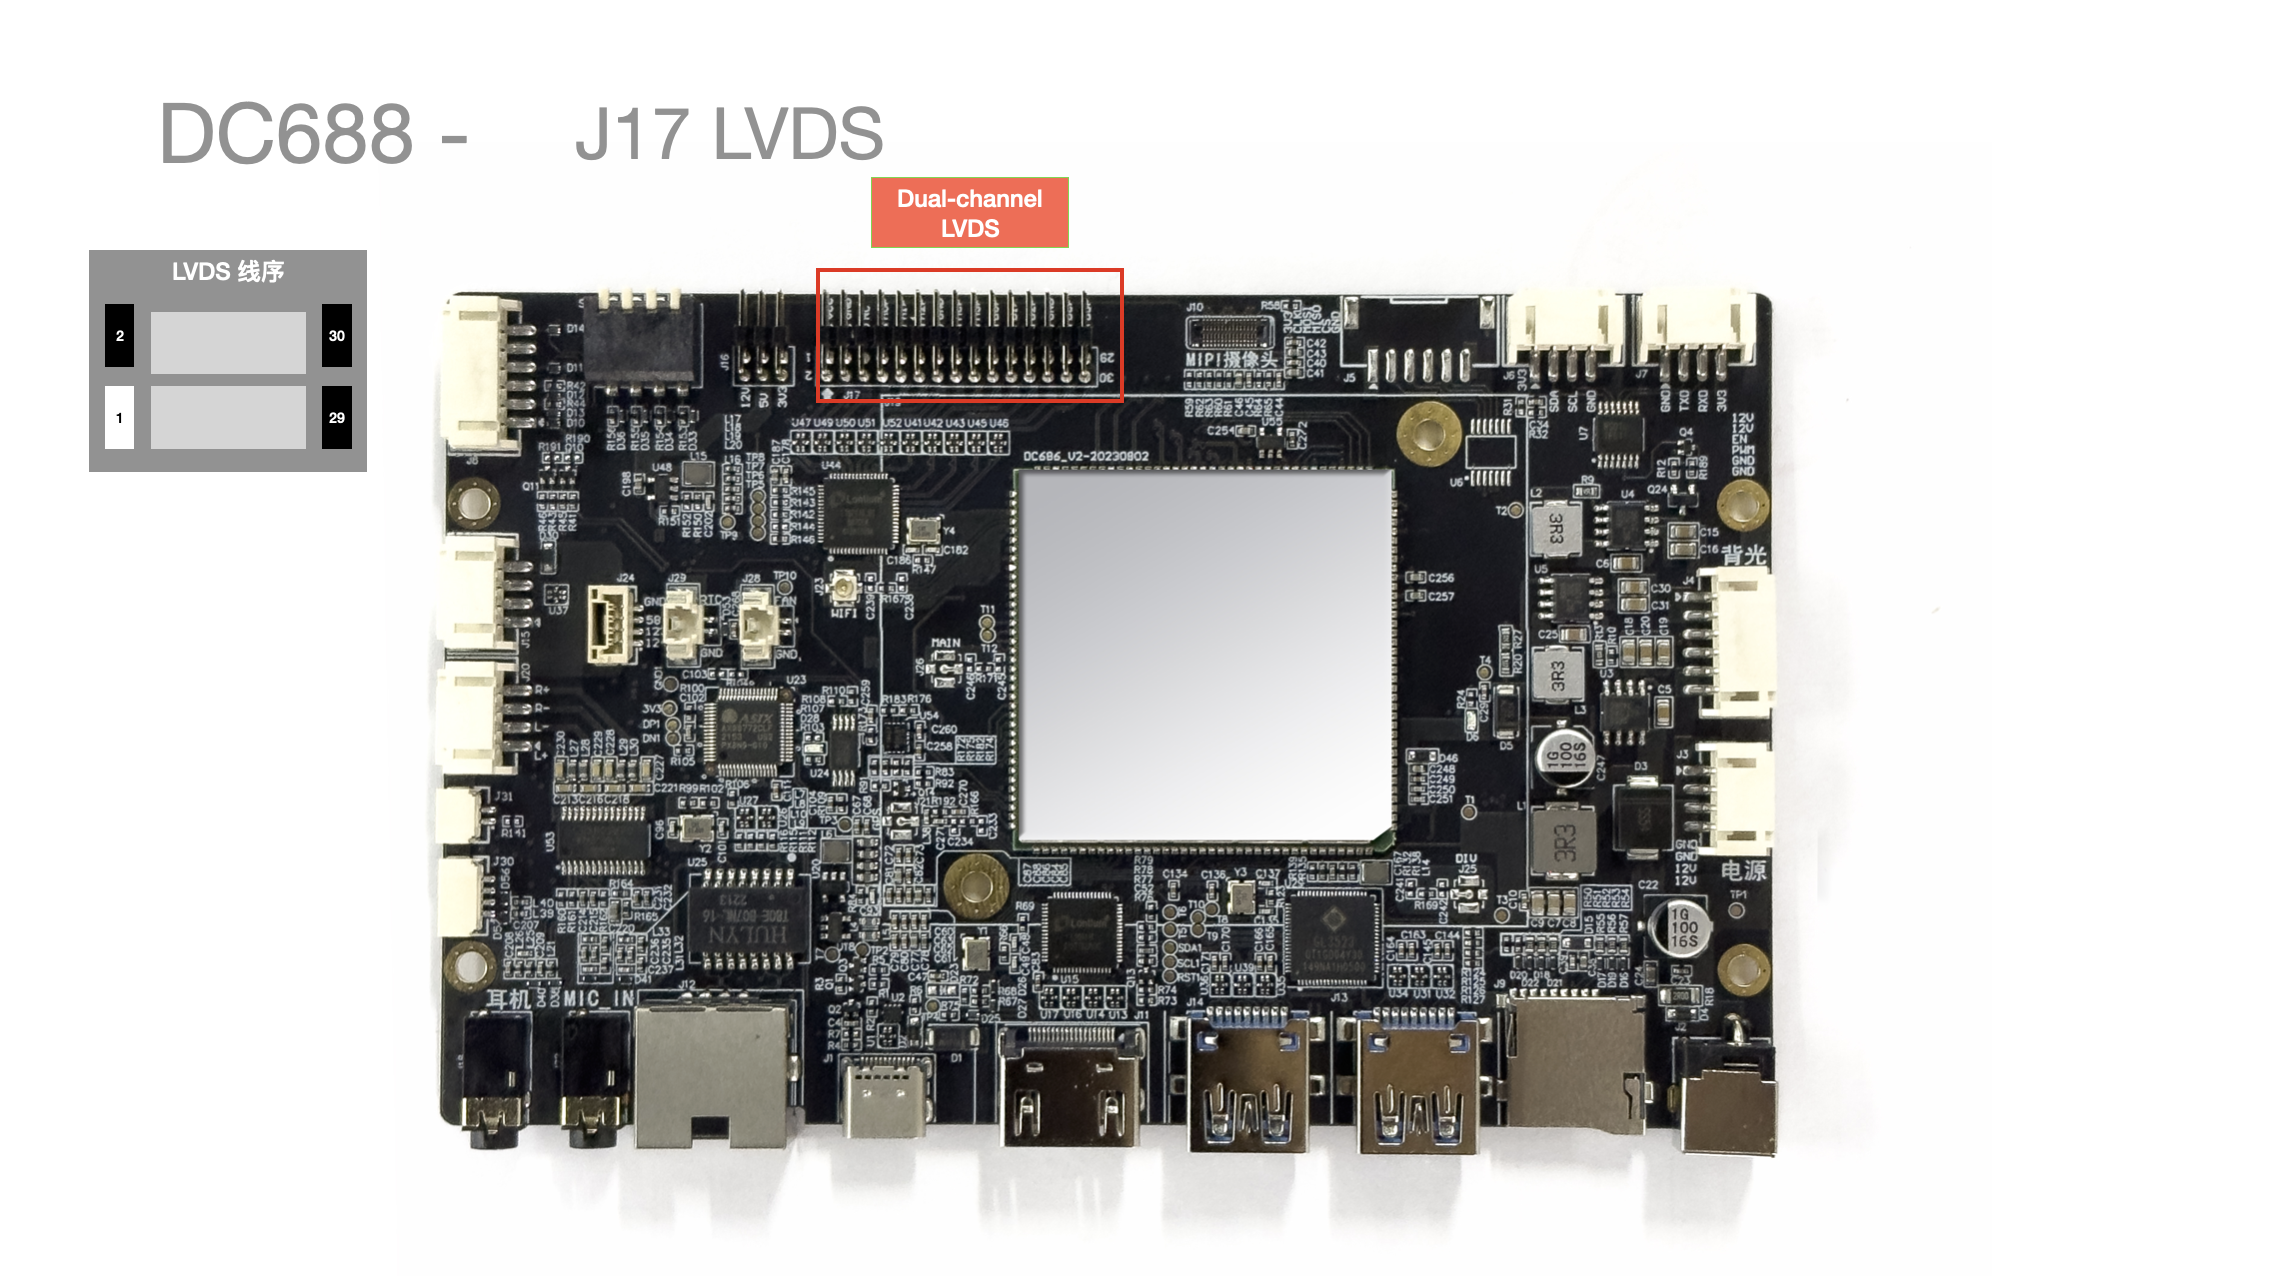
- Standard LVDS interface 30PIN
| Pin No. | Pin Description |
|---|---|
| 1 | LVDS1_VCC |
| 2 | LVDS1_VCC |
| 3 | GND |
| 4 | LVDS1_VCC |
| 5 | NC |
| 6 | GND |
| 7 | LVDS1A_Y0P |
| 8 | LVDS1A_Y0N |
| 9 | LVDS1A_Y1P |
| 10 | LVDS1A_Y1N |
| 11 | LVDS1A_Y2P |
| 12 | LVDS1A_Y2N |
| 13 | GND |
| 14 | GND |
| 15 | LVDS1A_CLK_P |
| 16 | LVDS1A_CLK_N |
| 17 | LVDS1A_Y3P |
| 18 | LVDS1A_Y3N |
| 19 | LVDS1B_Y0P |
| 20 | LVDS1B_Y0N |
| 21 | LVDS1B_Y1P |
| 22 | LVDS1B_Y1N |
| 23 | LVDS1B_Y2P |
| 24 | LVDS1B_Y2N |
| 25 | GND |
| 26 | GND |
| 27 | LVDS1B_CLK_P |
| 28 | LVDS1B_CLK_N |
| 29 | LVDS1B_Y3P |
| 30 | LVDS1B_Y3N |
J23 WI-FI / BT Antenna(s)
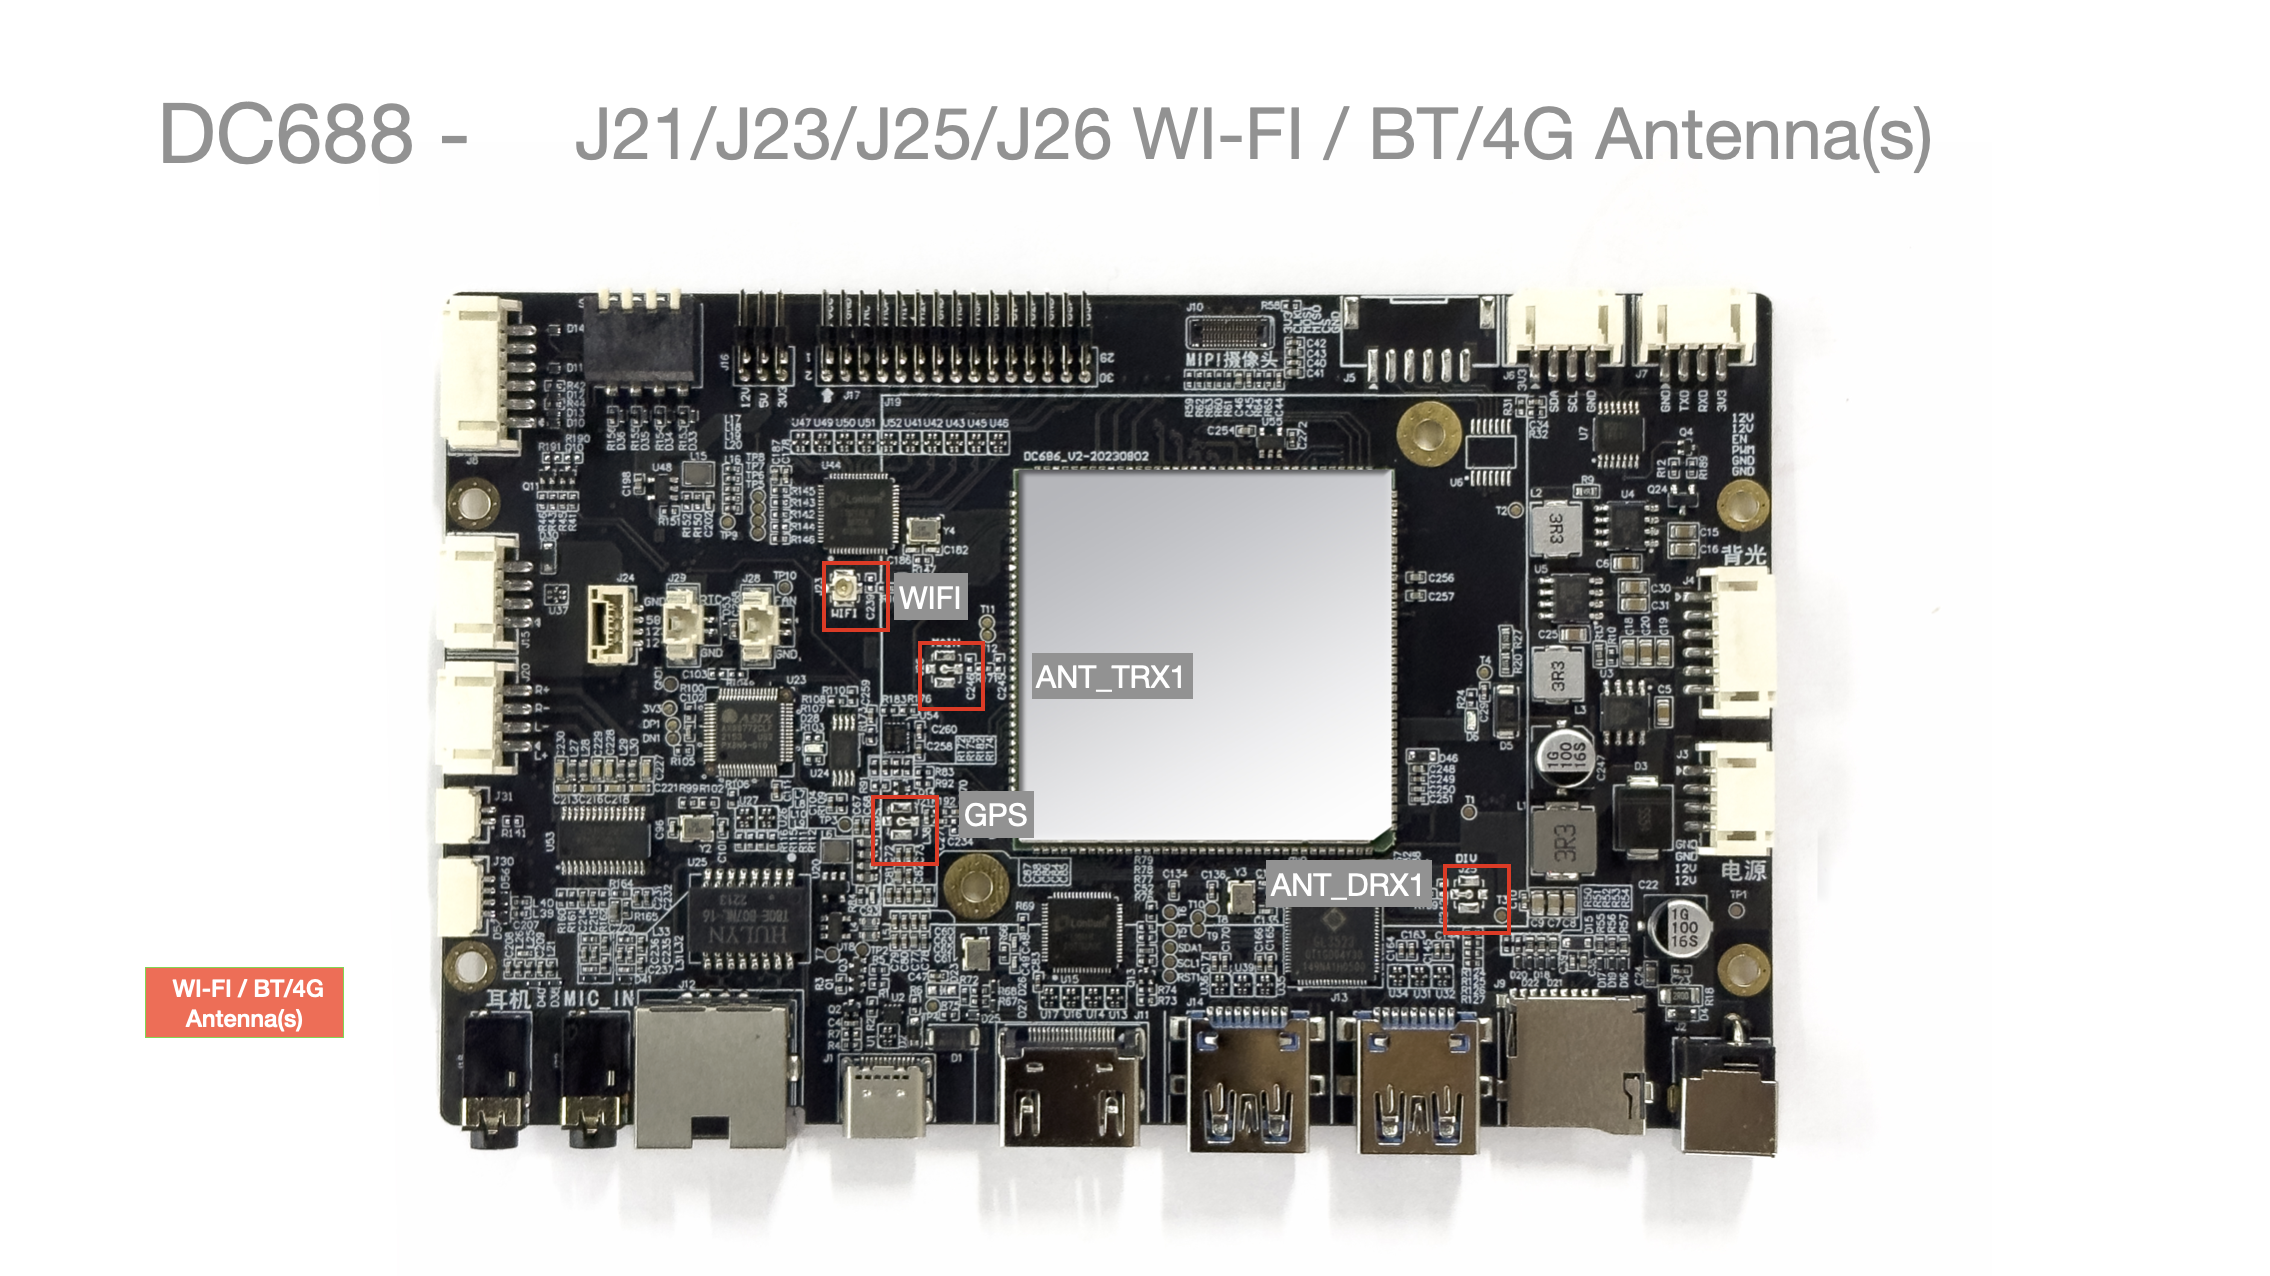
-
For the standard version, only the J23 WI-FI antenna (topmost) needs to be connected
-
Note that there are currently no J21/J25/J26 4G/GPS versions, so the corresponding antennas do not need to be installed
S1 DIP Switch
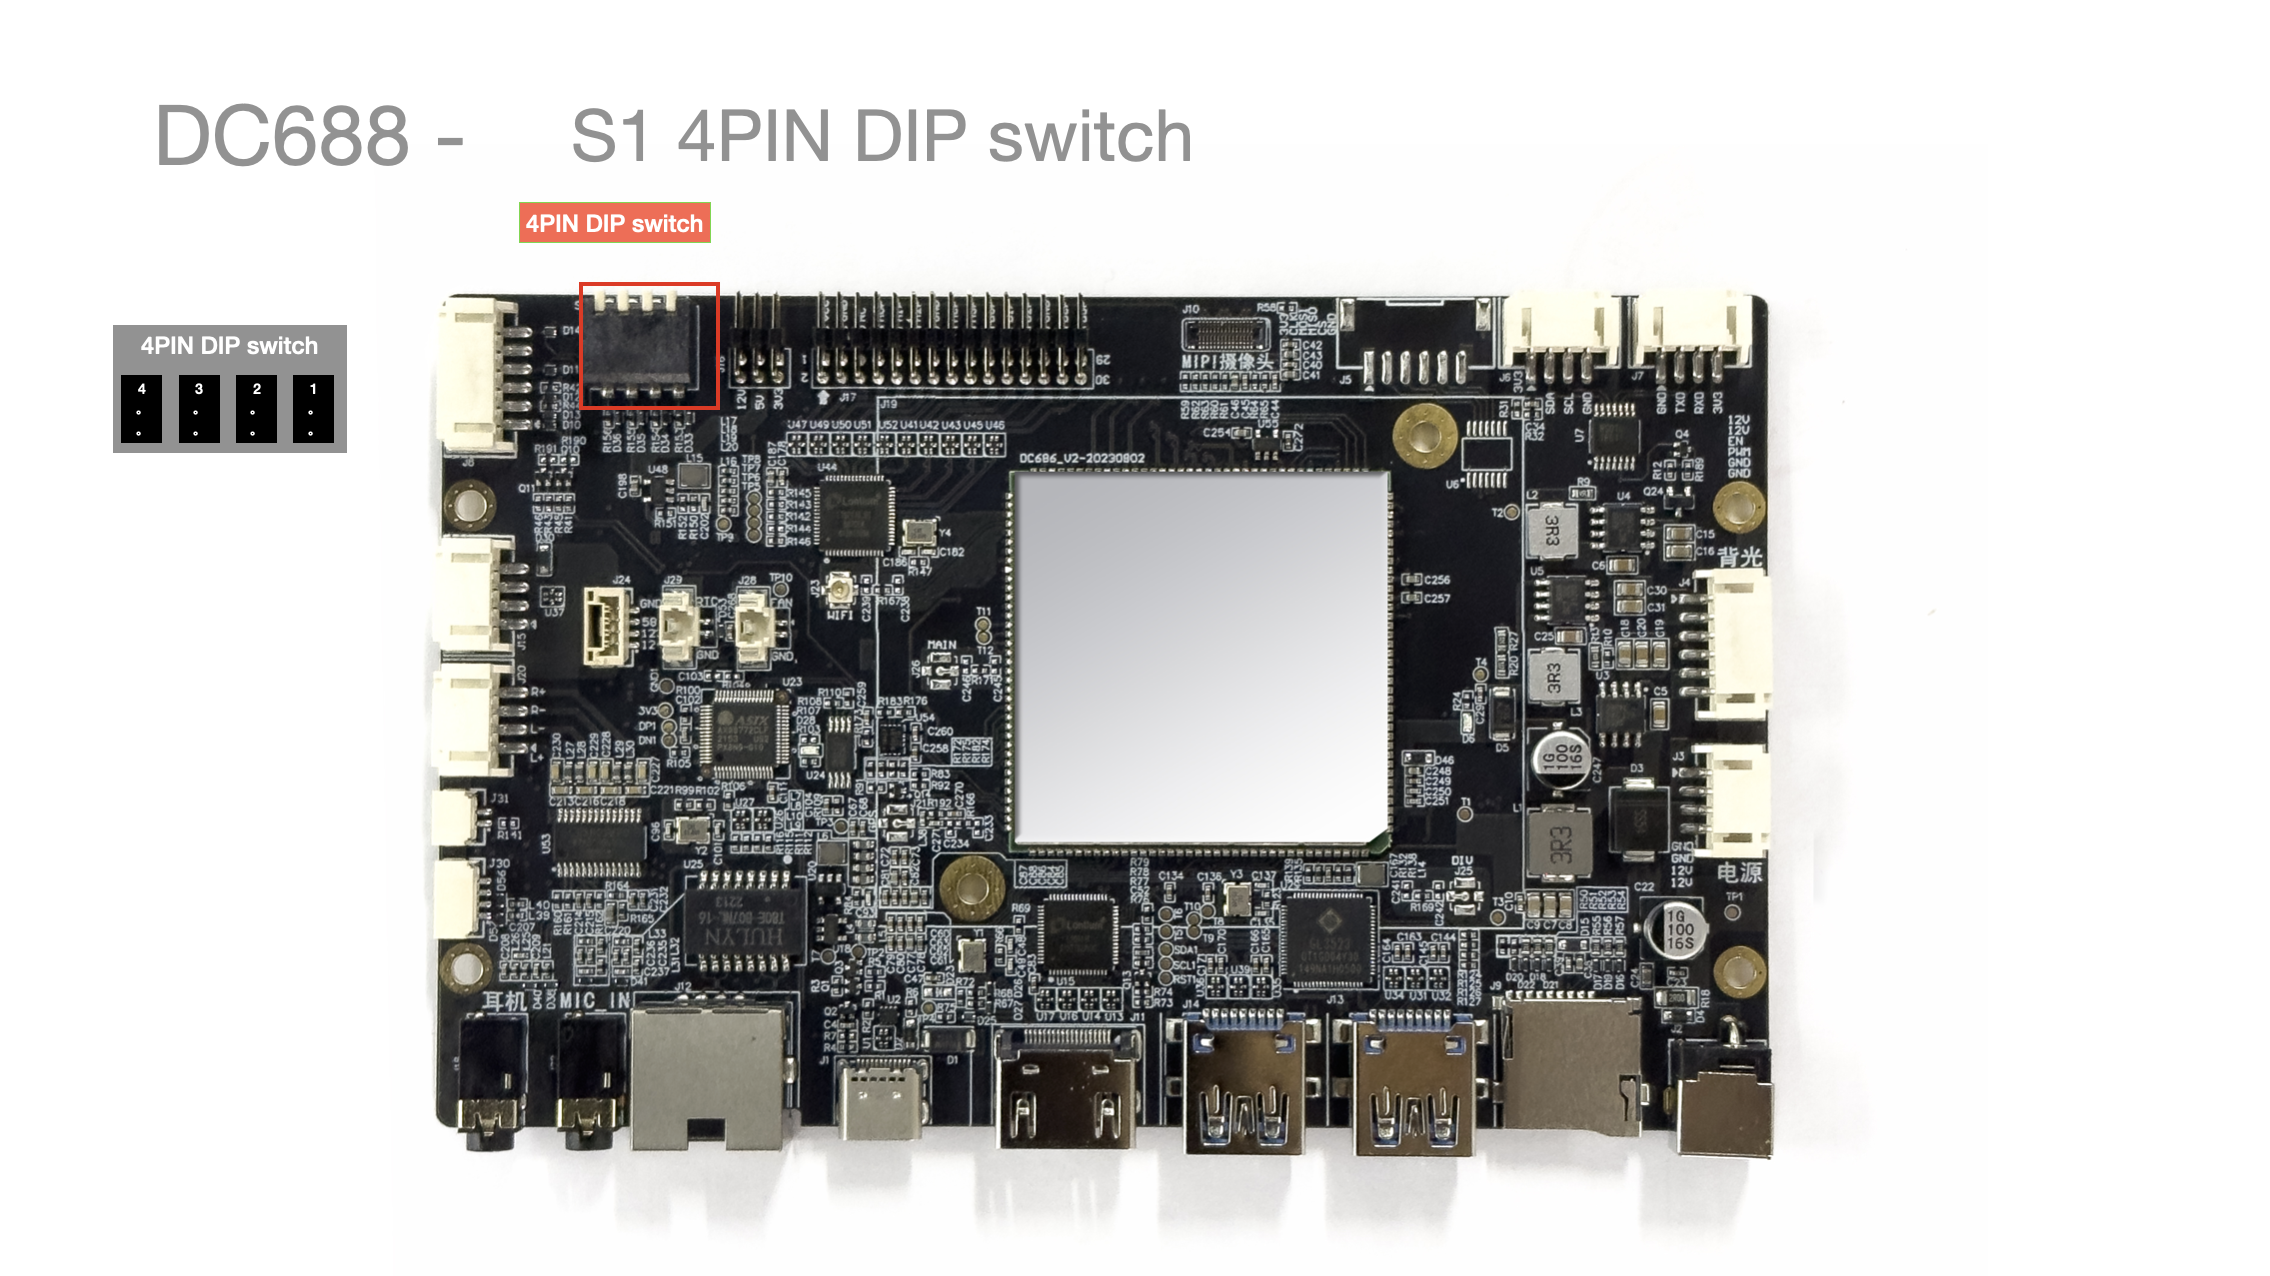
- Part model:
DSPV04LSGET, DIP Switch-Side Piano Key-SMD-2.54mm-4 Position-DSPV04LSGET
DIP No. Name State (Up/Down) Corresponding Function Remarks 1 TAG_DATA_FORMAT Up/Pressed JEIDA Abnormal screen colors (the 1st from the right in the figure) 2 TAG_PORT_WASP Up/Pressed 1 Stripes on the screen (the 2nd from the right in the figure) 3 TAG_COLOR_DEPTH Up/Pressed DEPTH_6BIT Color cast on the screen (the 3rd from the right in the figure) 4 Backlight polarity adjustment Up/Pressed Polarity reversed Brightness decreases when increased (the 4th from the right in the figure)
Pressing toward the PCB means