快速安装 - Linux
GX500 安装
Linux 平台快速使用 GX500 5G Dongle
需要准备
- 一台 Linux 设备(OpenWRT,此处用 CUDY TR30000 演示,提前刷好官方固件)
- Dongle GX500 及 Type-C 数据线
- 可上网的 Nano-SIM 卡
- 一根可外网的网线,一根内网网线
安装 Nano-SIM 卡
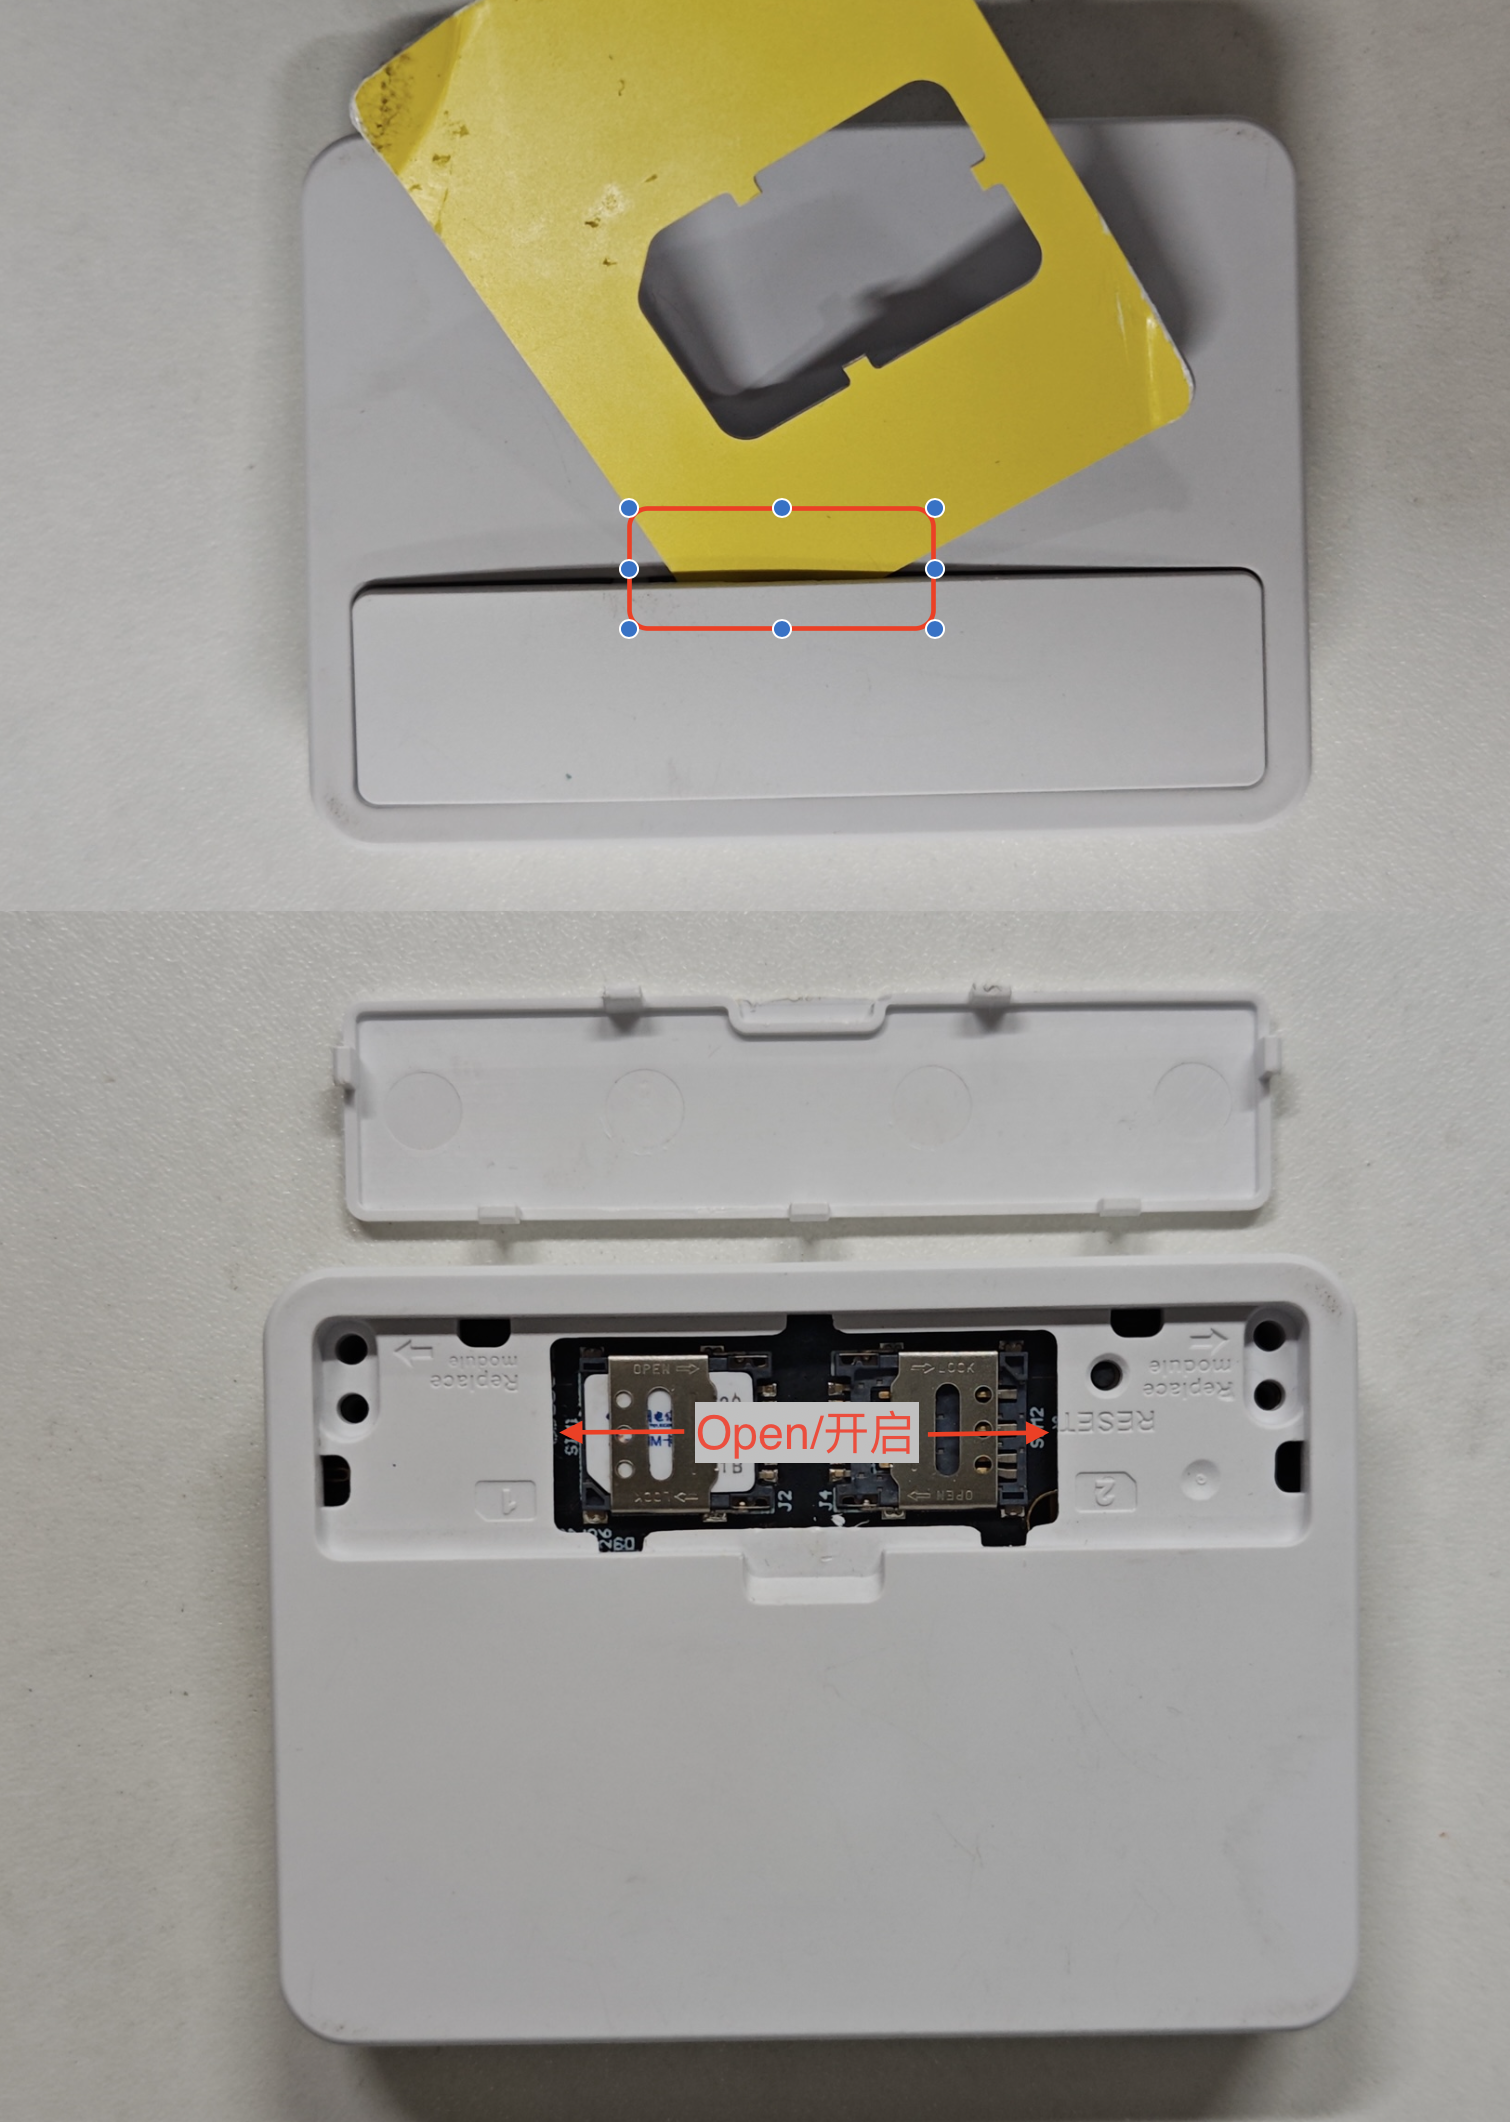
- 找个塑料卡片撬开盖子
- SIM1 卡座轻轻的往外推,放入 Nano-SIM 卡并推回固定
接入路由器 USB 接口
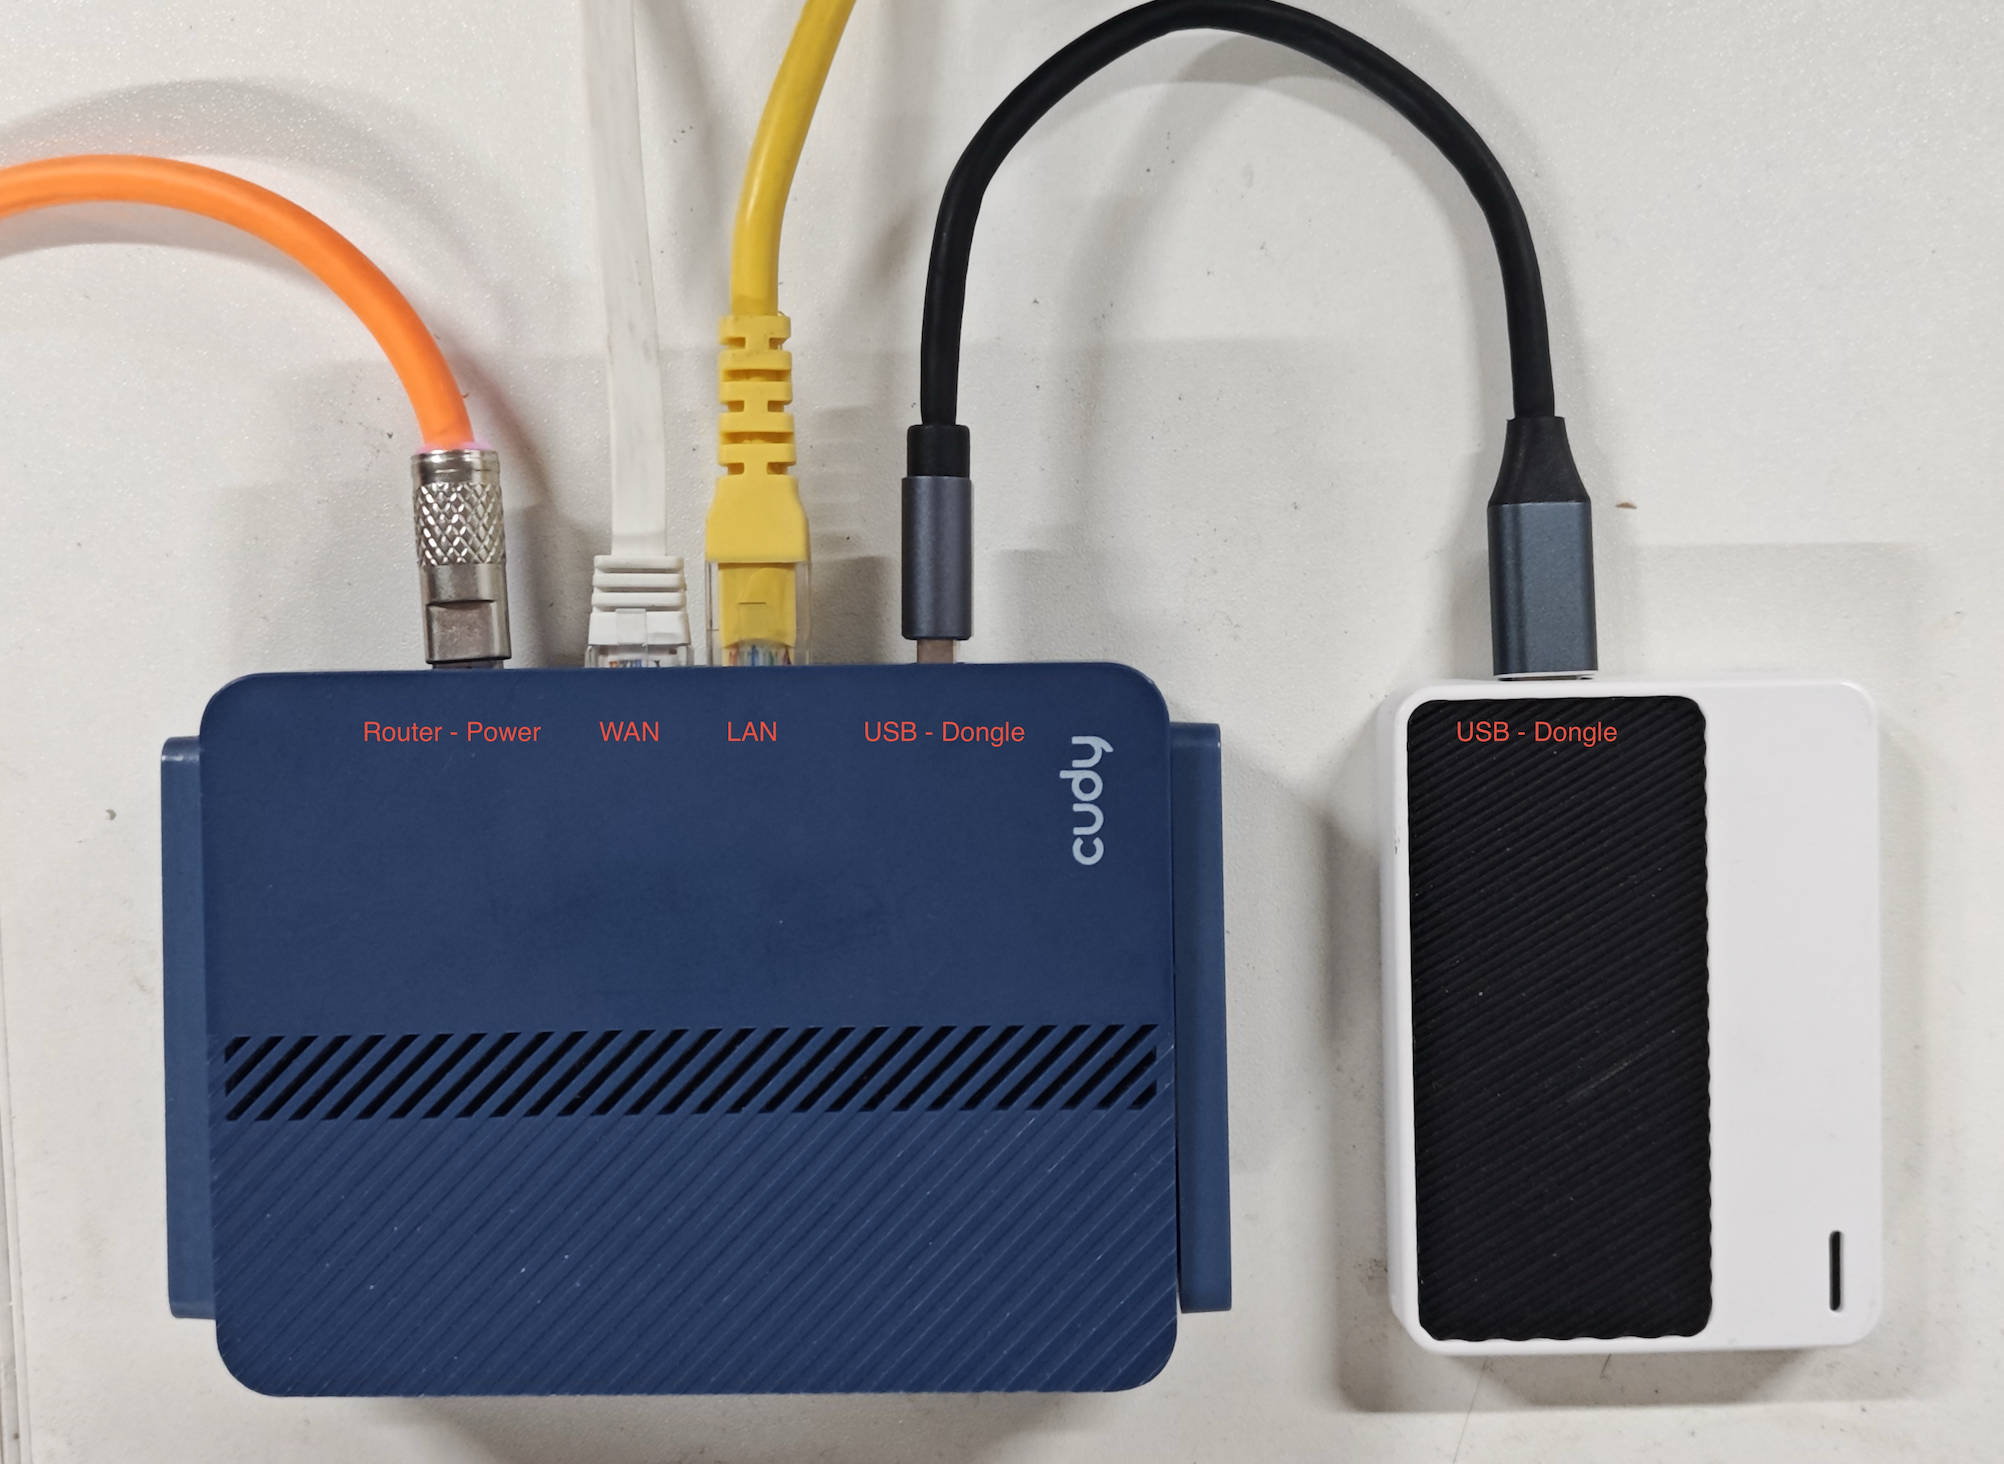
蓝色指示灯表示网络注册成功
接线说明:
- Router-Power:路由器供电
- USB-Dongle:接通 Dongle
- WAN:用于给路由器上网下载驱动软件
- LAN:OpenWRT 官方固件默认没有开启 Wi-Fi,需要用电脑接入 LAN 才可以管理(可以手动开启 Wi-Fi 后就不需要接 LAN 了)
配置 Dongle - 路由器部分
安装配置 Dongle 上网
连接到 Linux 路由器
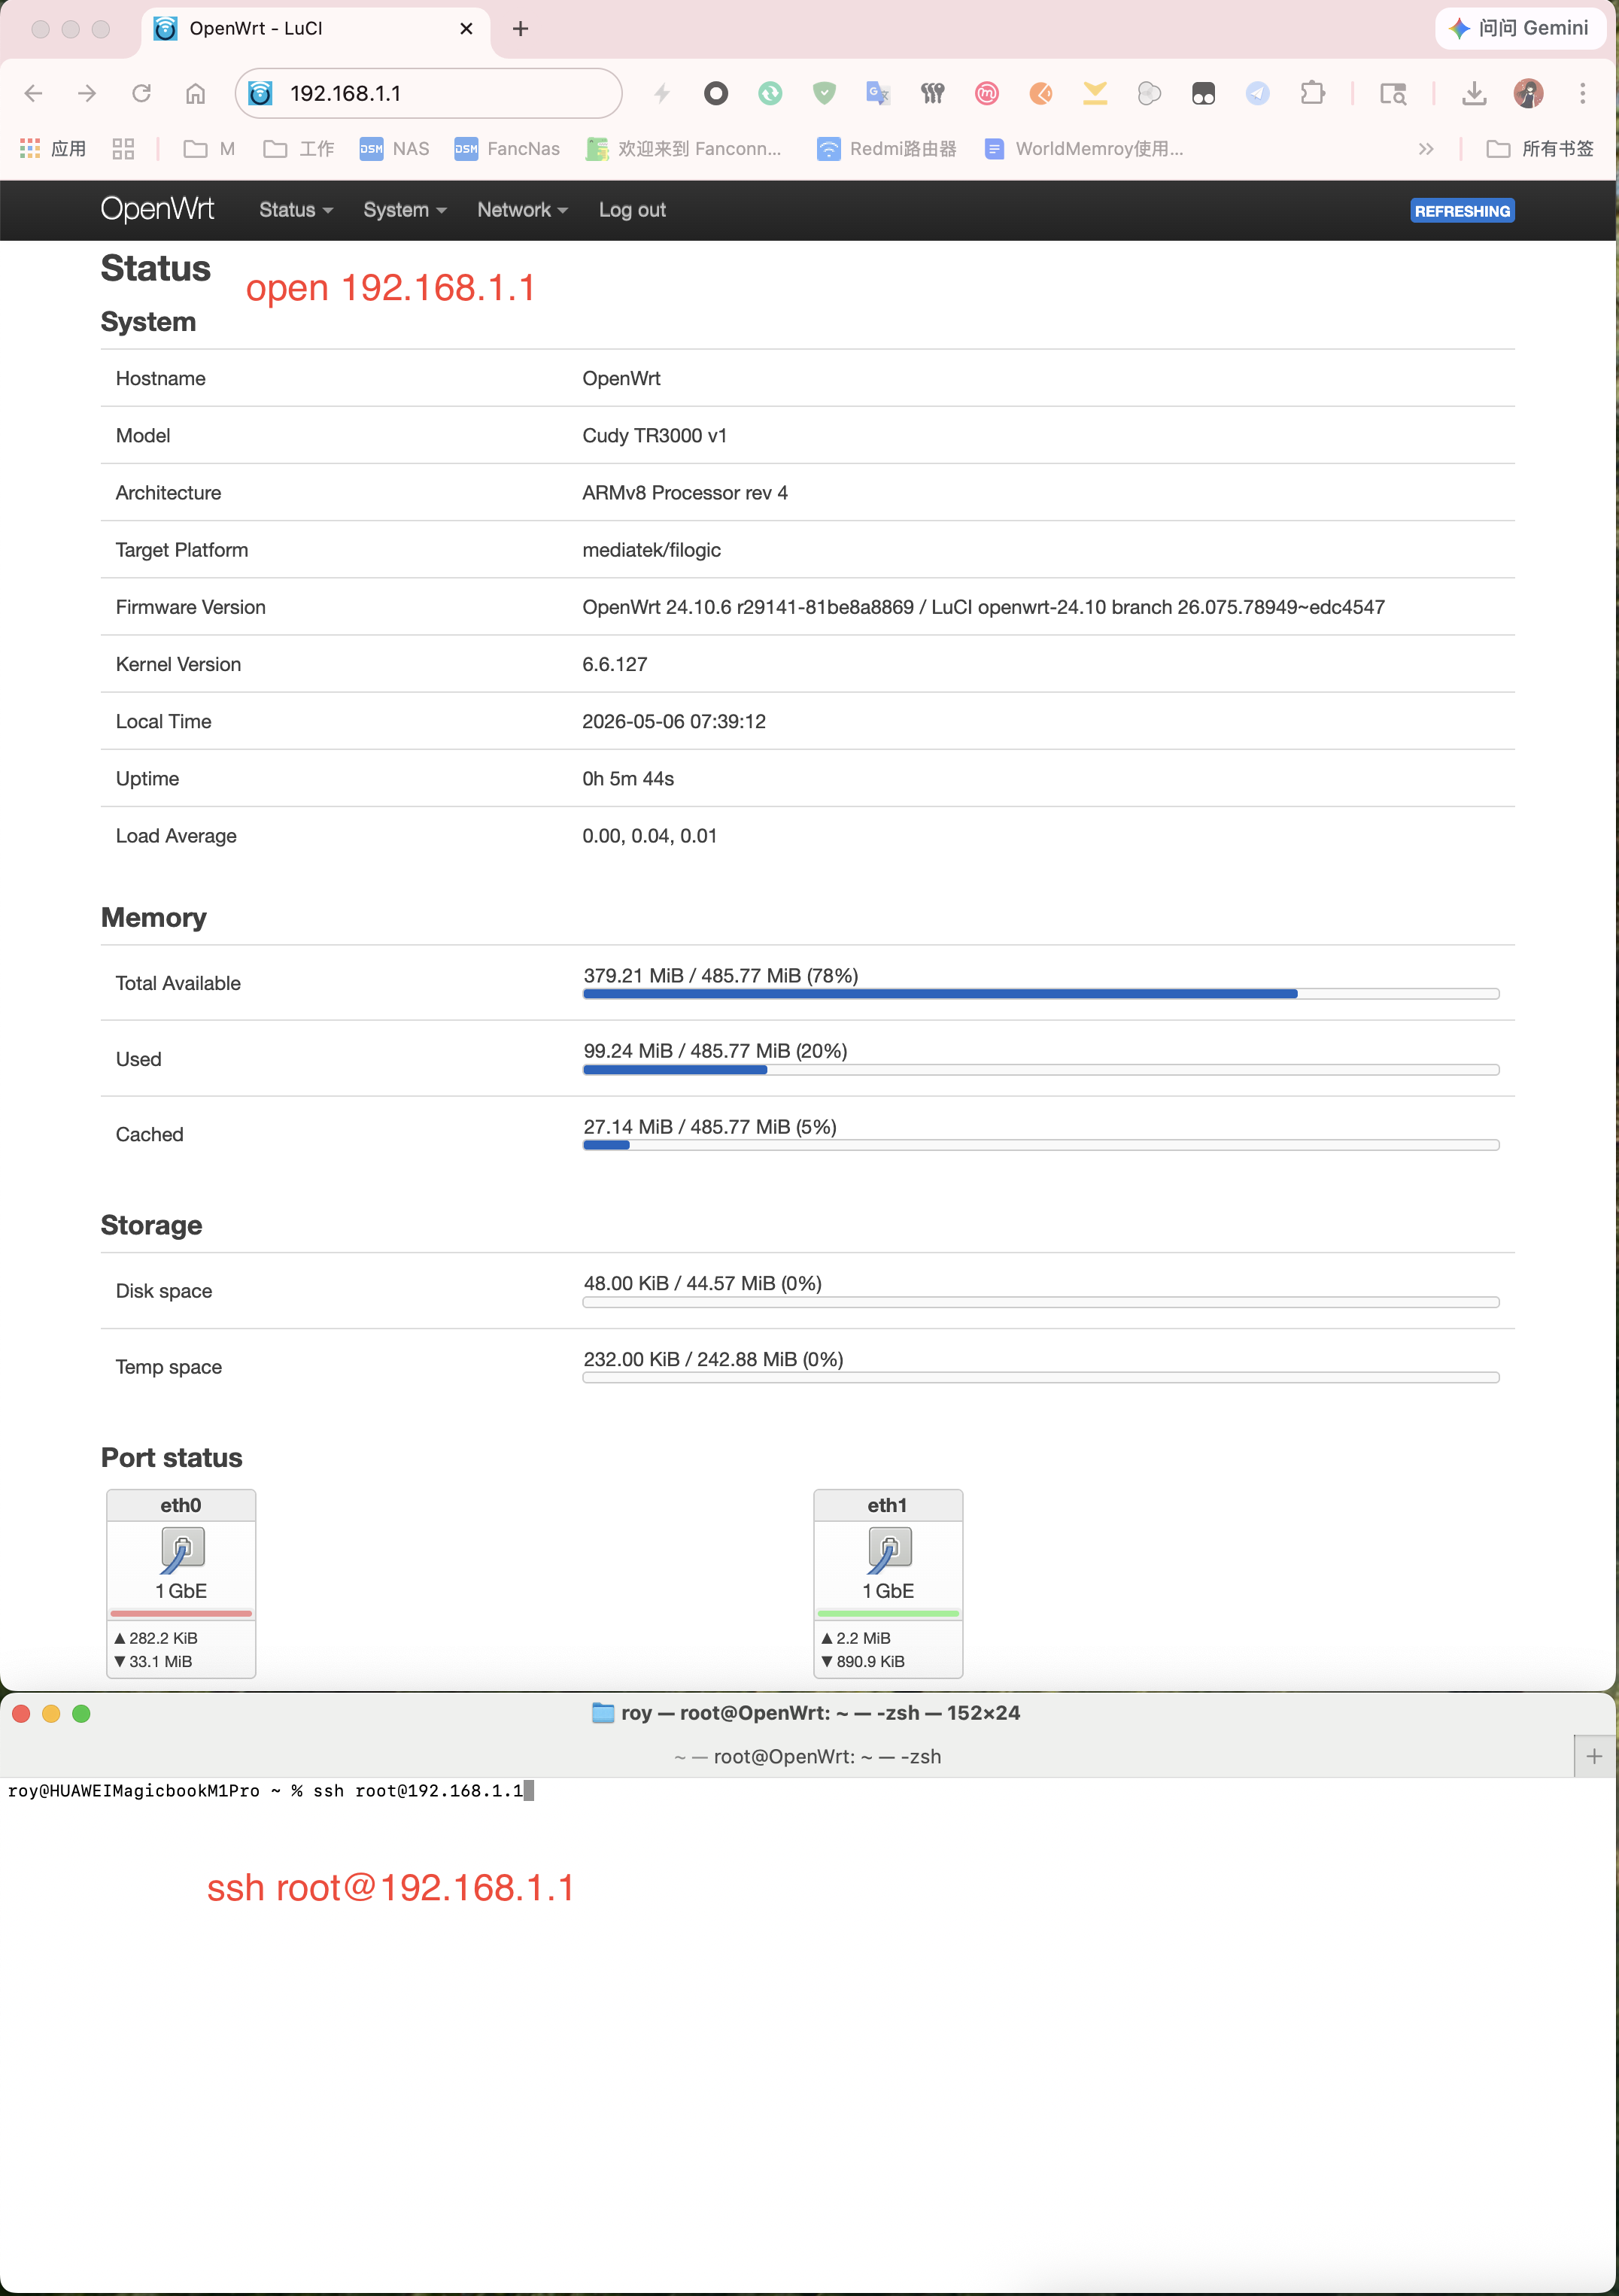
- 浏览器打开路由器管理地址
192.168.1.1,可查看路由器基本信息 - 使用 SSH 连接到路由器:
ssh root@192.168.1.1
roy@HUAWEIMagicbookM1Pro ~ % ssh root@192.168.1.1
The authenticity of host '192.168.1.1 (192.168.1.1)' can't be established.
ED25519 key fingerprint is: SHA256:W+oPSxJkukBdzWxgtKRutIGYc5KGRfUrzS7aV9RZOek
This key is not known by any other names.
Are you sure you want to continue connecting (yes/no/[fingerprint])? yes
Warning: Permanently added '192.168.1.1' (ED25519) to the list of known hosts.
*WARNING: connection is not using a post-quantum key exchange algorithm.
*This session may be vulnerable to "store now, decrypt later" attacks.
*The server may need to be upgraded. See https://openssh.com/pq.html

BusyBox v1.36.1 (2026-03-17 00:58:59 UTC) built-in shell (ash)

  _______                     ________        __
 |       |.-----.-----.-----.|  |  |  |.----.|  |_
 |   -   ||  _  |  -__|     ||  |  |  ||   _||   _|
 |_______||   __|_____|__|__||________||__|  |____|
          |__| W I R E L E S S   F R E E D O M
 -----------------------------------------------------
 OpenWrt 24.10.6, r29141-81be8a8869
 -----------------------------------------------------
=== WARNING! =====================================
There is no root password defined on this device!
Use the "passwd" command to set up a new password
in order to prevent unauthorized SSH logins.
--------------------------------------------------
root@OpenWrt:~#
路由器安装驱动和工具
注意 :WAN 口必须可以上网,才能下载驱动。
注意 :如果没有网络,可以下载对应的 IPK 包使用U盘安装。IPK 在对应的安装日志里有Downloading ...,不同版本的路由器不同架构请自行寻找对应驱动软件 https://downloads.openwrt.org/releases/24.10.6
OPKG 更新软件源
root@OpenWrt:~# opkg update
安装串口驱动
root@OpenWrt:~# opkg install kmod-usb-serial-option
安装过程输出示例:
Installing kmod-usb-serial-option (6.6.127-r1) to root...
Downloading https://downloads.openwrt.org/releases/24.10.6/targets/mediatek/filogic/kmods/6.6.127-1-43cbcde0affaaf16309bb4ab09799e9a/kmod-usb-serial-option_6.6.127-r1_aarch64_cortex-a53.ipk
Installing kmod-usb-serial (6.6.127-r1) to root...
Downloading https://downloads.openwrt.org/releases/24.10.6/targets/mediatek/filogic/kmods/6.6.127-1-43cbcde0affaaf16309bb4ab09799e9a/kmod-usb-serial_6.6.127-r1_aarch64_cortex-a53.ipk
Installing kmod-usb-serial-wwan (6.6.127-r1) to root...
Downloading https://downloads.openwrt.org/releases/24.10.6/targets/mediatek/filogic/kmods/6.6.127-1-43cbcde0affaaf16309bb4ab09799e9a/kmod-usb-serial-wwan_6.6.127-r1_aarch64_cortex-a53.ipk
Configuring kmod-usb-serial.
Configuring kmod-usb-serial-wwan.
Configuring kmod-usb-serial-option.
查看串口信息
root@OpenWrt:~# ls /dev/ttyUSB*
预期输出:
/dev/ttyUSB0 /dev/ttyUSB1 /dev/ttyUSB2 /dev/ttyUSB3
可以看到
/dev/ttyUSB0/1/2/3
安装串口工具 minicom
root@OpenWrt:~# opkg install minicom
安装过程输出示例:
Installing minicom (2.9-r1) to root...
Downloading https://downloads.openwrt.org/releases/24.10.6/packages/aarch64_cortex-a53/packages/minicom_2.9-r1_aarch64_cortex-a53.ipk
Installing terminfo (6.4-r2) to root...
Downloading https://downloads.openwrt.org/releases/24.10.6/packages/aarch64_cortex-a53/base/terminfo_6.4-r2_aarch64_cortex-a53.ipk
Installing libncurses6 (6.4-r2) to root...
Downloading https://downloads.openwrt.org/releases/24.10.6/packages/aarch64_cortex-a53/base/libncurses6_6.4-r2_aarch64_cortex-a53.ipk
Configuring terminfo.
Configuring libncurses6.
Configuring minicom.
安装 ECM 模式驱动
root@OpenWrt:~# opkg install kmod-usb-net-cdc-ether
安装过程输出示例:
Installing kmod-usb-net-cdc-ether (6.6.127-r1) to root...
Downloading https://downloads.openwrt.org/releases/24.10.6/targets/mediatek/filogic/kmods/6.6.127-1-43cbcde0affaaf16309bb4ab09799e9a/kmod-usb-net-cdc-ether_6.6.127-r1_aarch64_cortex-a53.ipk
Installing kmod-mii (6.6.127-r1) to root...
Downloading https://downloads.openwrt.org/releases/24.10.6/targets/mediatek/filogic/kmods/6.6.127-1-43cbcde0affaaf16309bb4ab09799e9a/kmod-mii_6.6.127-r1_aarch64_cortex-a53.ipk
Installing kmod-usb-net (6.6.127-r1) to root...
Downloading https://downloads.openwrt.org/releases/24.10.6/targets/mediatek/filogic/kmods/6.6.127-1-43cbcde0affaaf16309bb4ab09799e9a/kmod-usb-net_6.6.127-r1_aarch64_cortex-a53.ipk
Configuring kmod-mii.
Configuring kmod-usb-net.
Configuring kmod-usb-net-cdc-ether.
配置 RM520N-GL 工作模式
开启 minicom 管理
root@OpenWrt:~# minicom -D /dev/ttyUSB2
发送 AT 指令,回复 OK 即为成功
Welcome to minicom 2.9

OPTIONS:
Port /dev/ttyUSB2, 07:42:02

Press CTRL-A Z for help on special keys

AT
OK
查看当前工作模式
AT+QCFG="usbnet"
预期输出:
+QCFG: "usbnet",1
切换为 ECM 模式并重启生效
AT+QCFG="usbnet",1
OK

# 重启生效
AT+CFUN=1,1
退出 minicom 终端:按 Ctrl + A,再按 X,选择 Leave Minicom? → Yes
常用模式参考:
AT+QCFG="usbnet",0:NDIS/QMI 模式(Windows 系统推荐)AT+QCFG="usbnet",1:ECM 模式(Linux 系统较推荐)AT+QCFG="usbnet",2:MBIM 模式(常用于 OpenWrt,支持较好)
常用重启方式(也可以拔掉 Dongle 重启):
AT+CFUN=1,1(软件复位)AT+QPOWD=1(优雅关机)AT+QRST=1(硬重置)
命令配置上网
查看是否识别到 RM520N-GL 网卡(一般为 usb0)
root@OpenWrt:~# ip addr
输出示例:
5: usb0: <BROADCAST,MULTICAST,UP,LOWER_UP> mtu 1500 qdisc fq_codel state UNKNOWN qlen 1000
    link/ether 8e:1e:43:55:46:bc brd ff:ff:ff:ff:ff:ff
    inet 192.168.225.138/22 brd 192.168.227.255 scope global usb0
       valid_lft forever preferred_lft forever
    inet6 240e:47e:648:49ac:8c1e:43ff:fe55:46bc/64 scope global noprefixroute
       valid_lft forever preferred_lft forever
    inet6 fe80::8c1e:43ff:fe55:46bc/64 scope link
       valid_lft forever preferred_lft forever
配置 WAN 和 WAN6 接口设备为 usb0
uci set network.wan.device='usb0'
uci set network.wan6.device='usb0'

uci commit
service network restart
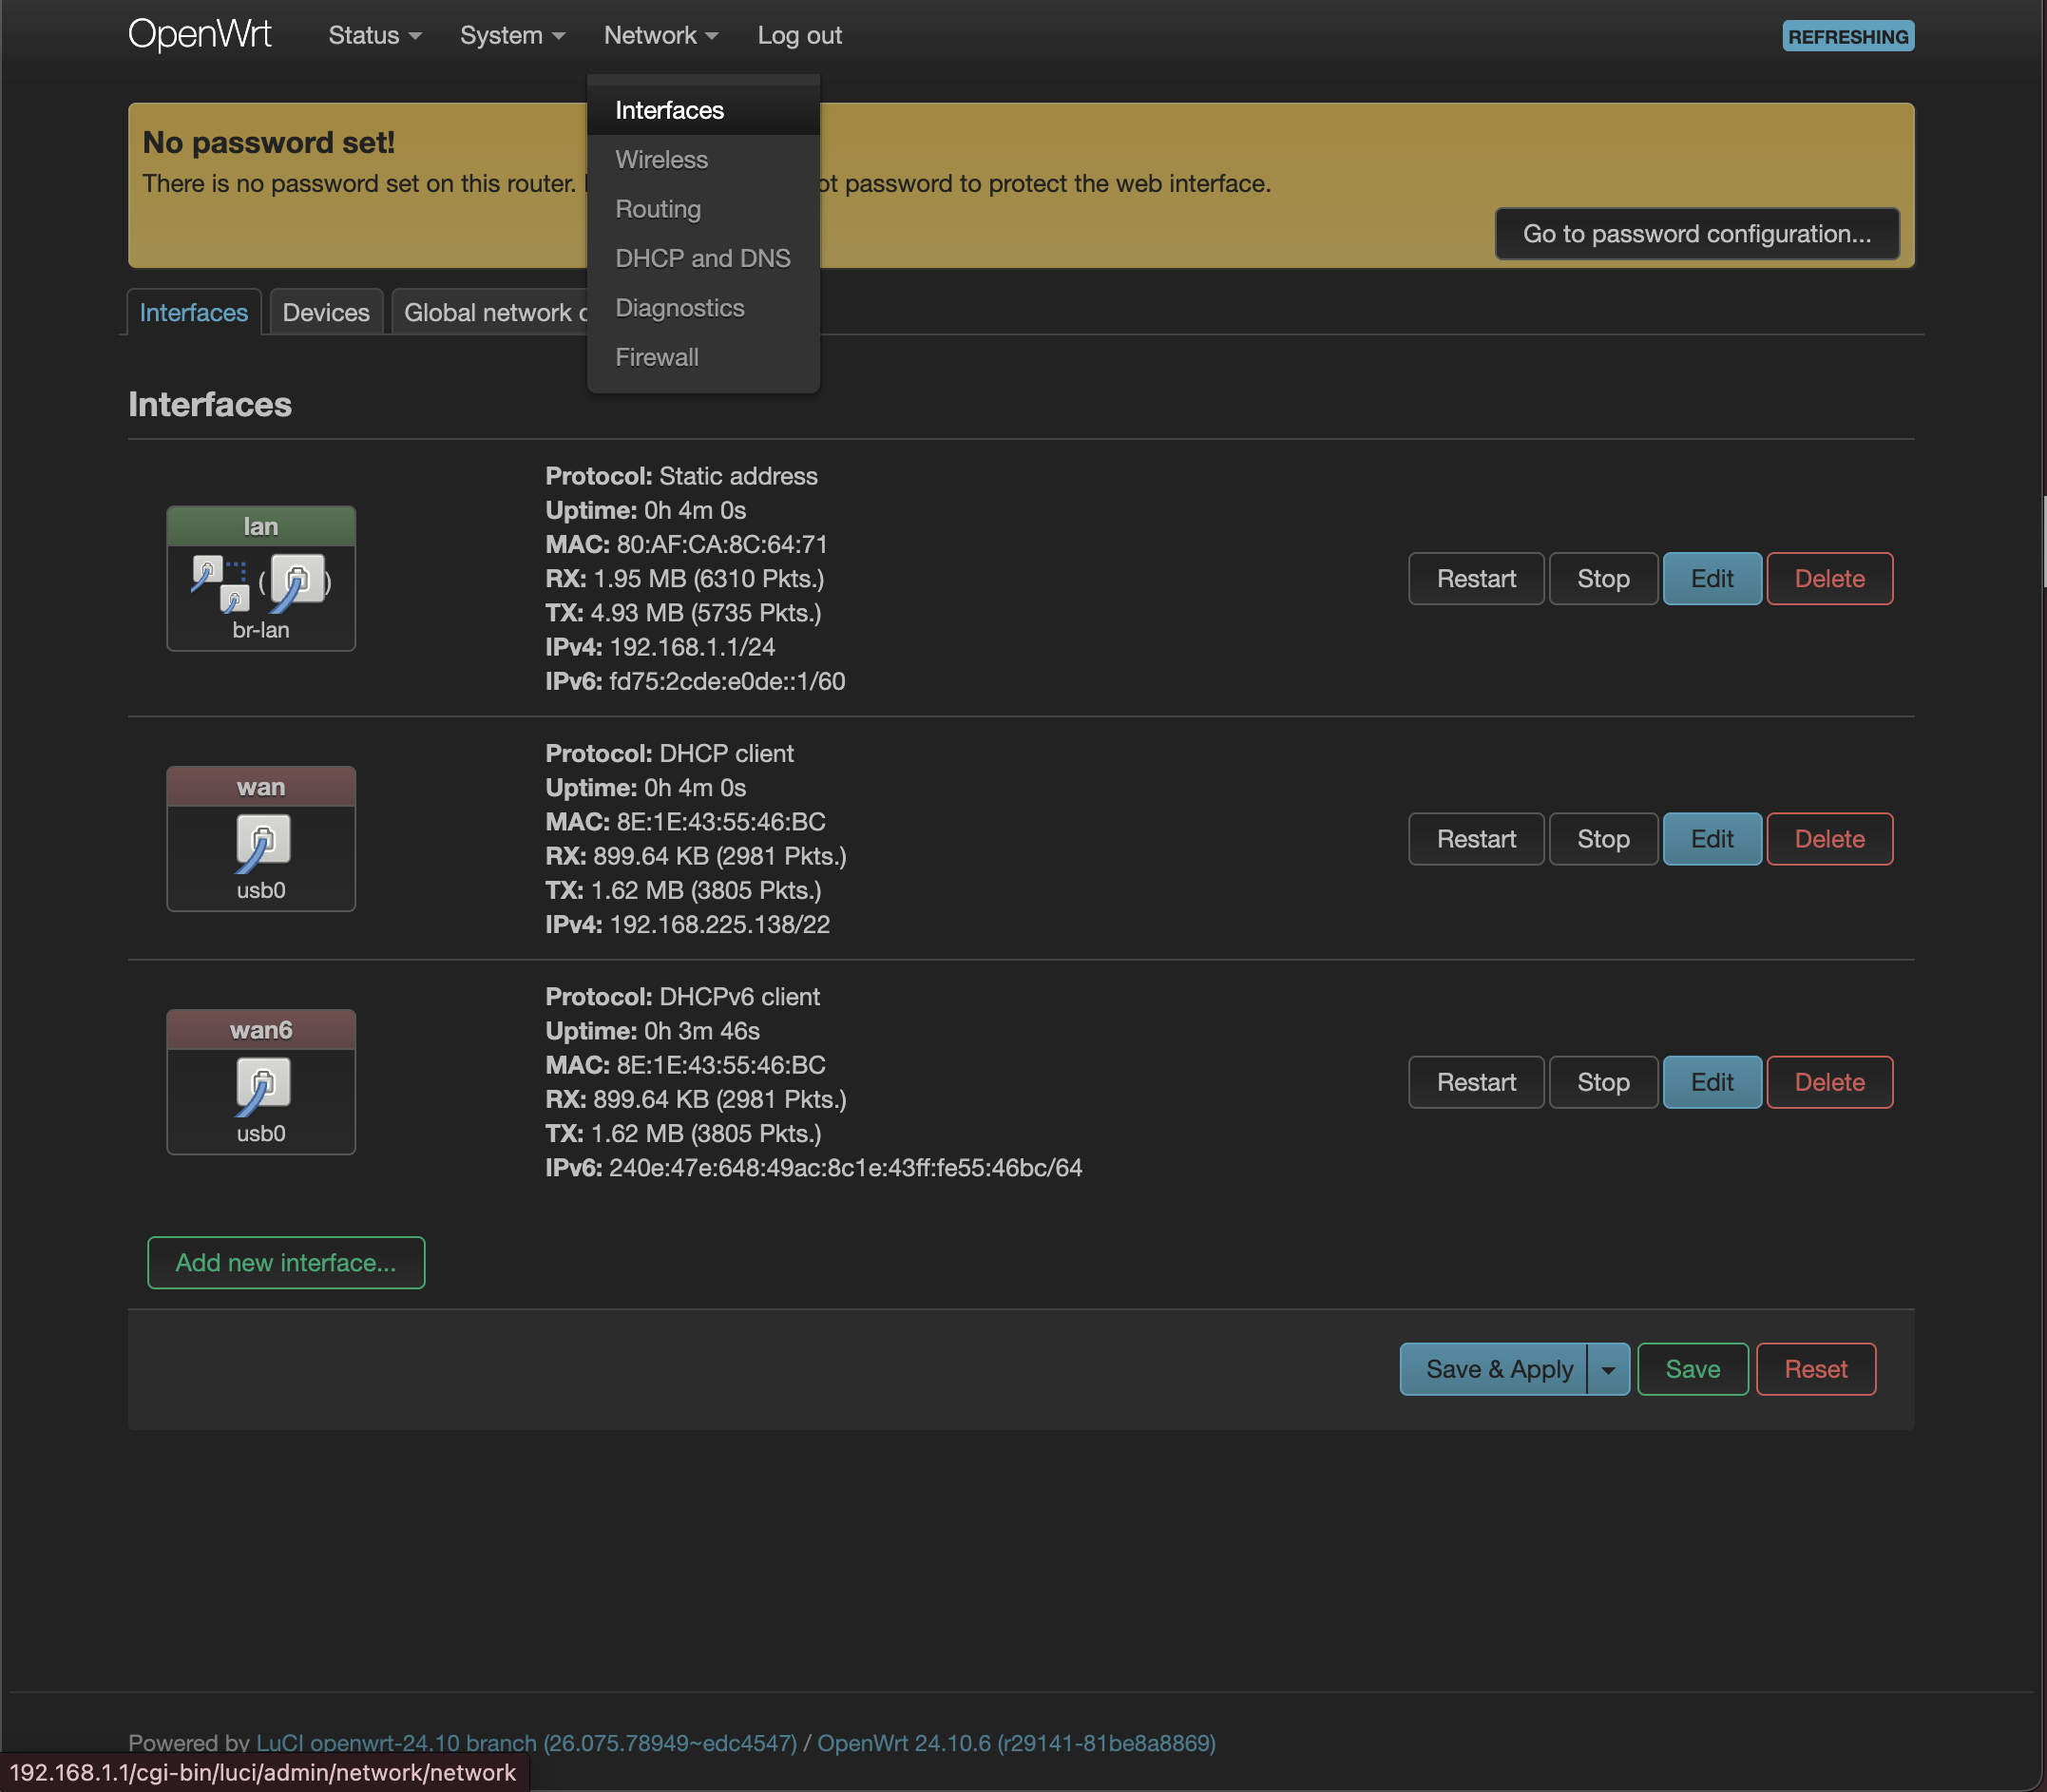
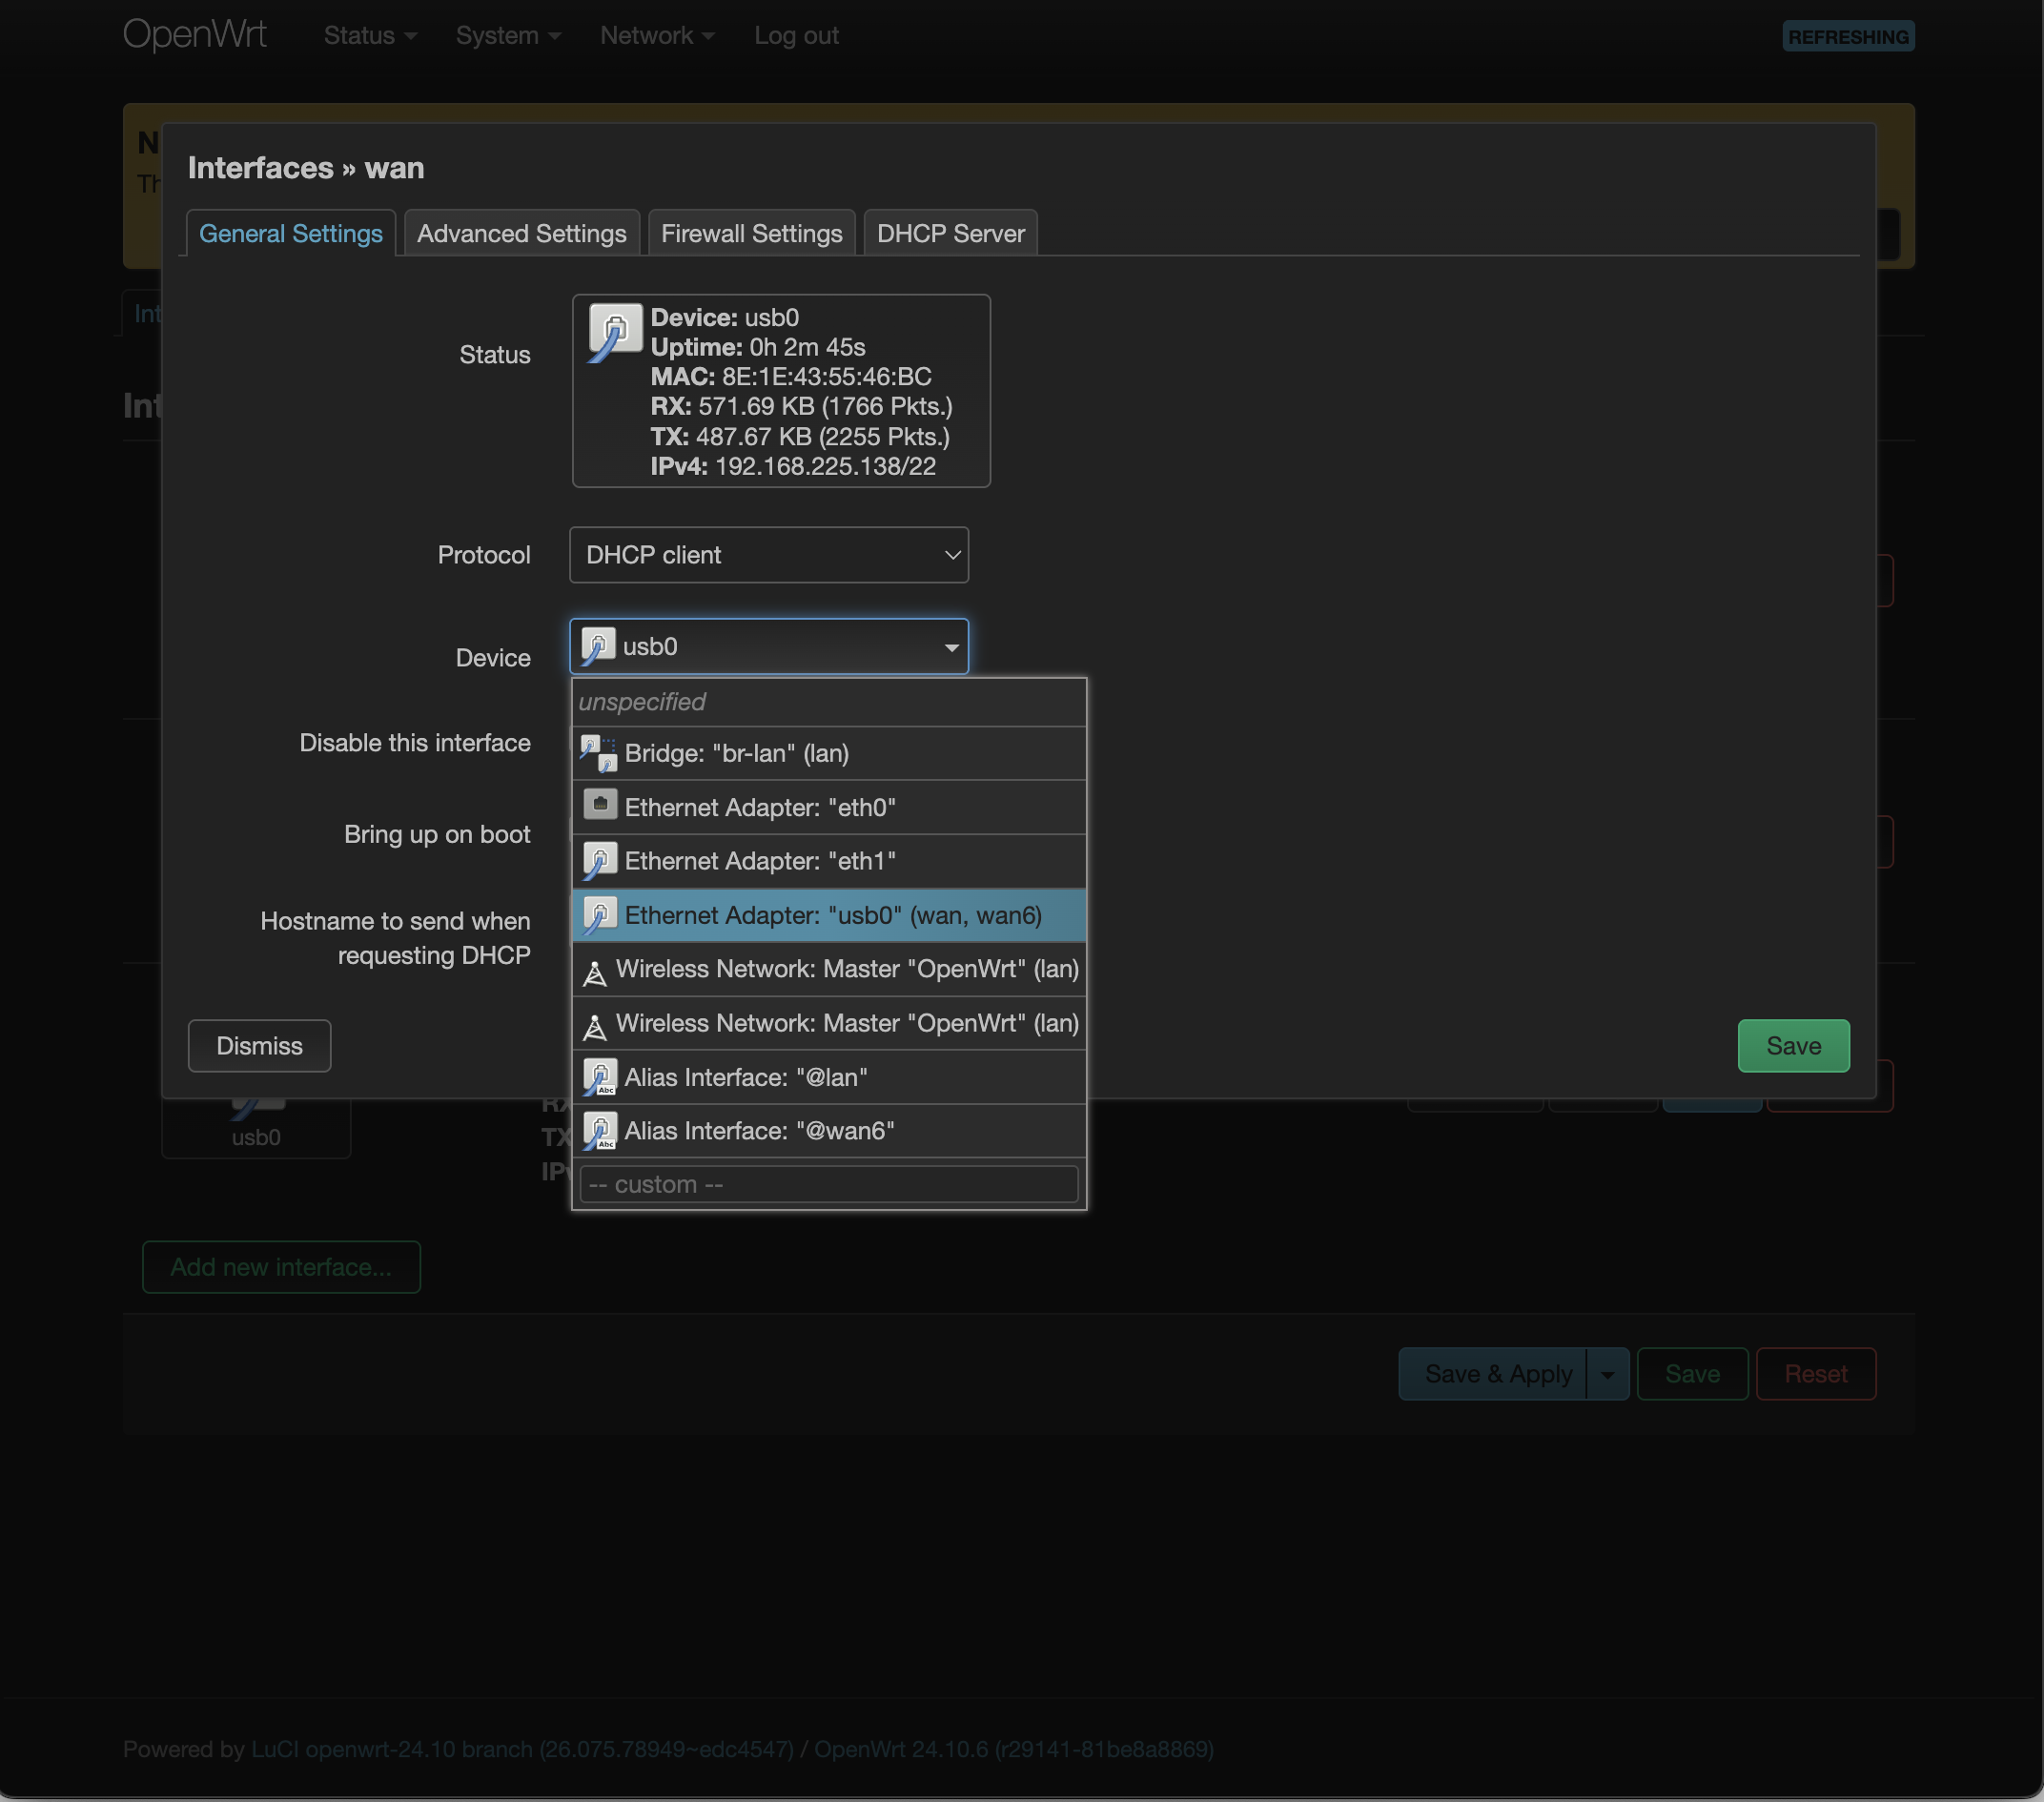
图形化配置上网
在 Web 界面中:
- 点击 Interfaces → wan → edit → Device 选择
usb0→ Save → Save & Apply - 如果需要 IPv6:点击 Interfaces → wan6 → edit → Device 选择
usb0→ Save → Save & Apply
以上配置完成后,即可断开 WAN 口,使用 Dongle 上网。
附加
开启路由器 Wi-Fi 功能及配置
注意:官方固件默认 Wi-Fi 无密码,SSID 为
OpenWrt。
# OpenWrt 默认禁止无线功能,删除禁止标志
uci del wireless.radio0.disabled
uci del wireless.radio1.disabled
uci set wireless.radio0.channel='auto'   # 频道自动
uci set wireless.radio1.channel='auto'

# 开启默认的 Wi-Fi
uci del wireless.default_radio0.disabled
uci del wireless.default_radio1.disabled
uci commit
wifi reload
自定义 Wi-Fi 密码
自定义 Wi-Fi 信息:
- 2.4 GHz SSID:
ORBI60_2g - 5 GHz SSID:
ORBI60 - 密码均为:
fanconn123 - 加密方式可选:
sae、psk2、sae-mixed、psk-mixed(示例中使用psk2)
# 删除禁止标志
uci del wireless.radio0.disabled
uci del wireless.radio1.disabled
uci set wireless.radio0.channel='auto'
uci set wireless.radio1.channel='auto'

# 删除默认名为 OpenWrt 的 Wi-Fi 配置
uci del wireless.default_radio0
uci del wireless.default_radio1

# 2.4 GHz AP
uci set wireless.wifinet0=wifi-iface
uci set wireless.wifinet0.device='radio0'
uci set wireless.wifinet0.network='lan'
uci set wireless.wifinet0.mode='ap'
uci set wireless.wifinet0.ssid='ORBI60_2g'
uci set wireless.wifinet0.encryption='psk2'
uci set wireless.wifinet0.key='fanconn123'

# 5 GHz AP
uci set wireless.wifinet1=wifi-iface
uci set wireless.wifinet1.device='radio1'
uci set wireless.wifinet1.network='lan'
uci set wireless.wifinet1.mode='ap'
uci set wireless.wifinet1.ssid='ORBI60'
uci set wireless.wifinet1.encryption='psk2'
uci set wireless.wifinet1.ocv='0'
uci set wireless.wifinet1.key='fanconn123'

uci commit
wifi reload
以上所有配置完成后,路由器将通过 GX500 Dongle 上网,并可按需使用 Wi-Fi。